

Integrasi pengiriman di India: unggahan CSV vs API kurir
Integrasi pengiriman di India: putuskan apa yang diotomasi dan apa yang tetap manual dengan membandingkan unggahan CSV dan API kurir, plus checklist praktis event pelacakan.
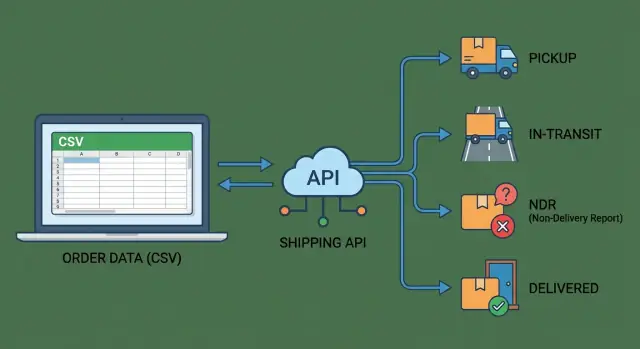
What this is really about: fewer shipping follow-ups
When order volume is small, shipping updates can be handled with quick checks, a spreadsheet, and a couple of messages to the courier. As orders grow, small gaps add up: labels get created late, pickups get missed, and tracking stays stale.
The pattern is familiar: customers ask, “Where is my order?” Support asks ops. Ops checks a portal. Someone manually updates a status that should have updated on its own.
An integration simply means your system can send shipping data out (address, weight, COD, invoice value) and pull shipping data back in (AWB number, pickup confirmation, tracking scans, delivery results) in a reliable way. “Reliable” matters because it should work every day, not only when someone remembers to upload a file.
That’s why this comparison matters:
- A CSV upload workflow is the baseline. It’s easy to start, but depends on people repeating the same steps on time.
- A full courier API integration is the always-on version. It can create shipments, fetch tracking scans, and react to exceptions without waiting for manual work.
Most teams don’t want “more tech.” They want fewer delays, fewer manual edits, and tracking everyone can trust. Reduce follow-ups (from customers and internal teams), and you usually reduce refunds, reattempt costs, and support tickets too.
Where shipping work goes wrong in real operations
Most teams begin with a simple routine: book pickups, print labels, paste tracking IDs into a sheet, and reply when customers ask for updates. It works at low volume, but the cracks show quickly in India, especially when you juggle multiple couriers, COD, and inconsistent address quality.
The manual steps don’t look big on their own. Someone chooses a courier, creates the shipment, downloads labels, and makes sure the right package gets the right airway bill (AWB). Then someone else updates order status, shares tracking, and checks delivery proofs for COD.
The most common failure points look like:
- The wrong AWB gets stuck on the wrong parcel, leading to a lost package or a return.
- Duplicate shipments get created after a reattempt or a spreadsheet copy mistake.
- Tracking isn’t updated on time, so support has no clear answer and customers lose trust.
- Pickup isn’t confirmed, so orders sit “ready to ship” while the courier thinks nothing is scheduled.
- COD amounts or fees don’t match, creating reconciliation problems later.
NDR means Non-Delivery Report. It’s what happens when delivery fails (wrong address, customer unavailable, refusal, payment issue). NDR creates extra work because it forces decisions: call the customer, update the address, approve a reattempt, or mark it for return.
Ops feels the pressure first. Support gets the angry messages. Finance gets stuck on COD reconciliation. Customers feel the silence when statuses don’t change.
Option A: the CSV upload baseline (what you get and what you don’t)
CSV upload is the default starting point for many shipping setups in India. You export a batch of paid orders from your store or ERP, format them into a courier or aggregator template, then upload the file in a dashboard to generate AWBs and labels.
What you get is simplicity. There’s usually no engineering work, and you can be live in a day. For low volume or predictable shipping (same pickup address, a small set of SKUs, few exceptions), a daily CSV can be “good enough” and easy to train.
Where it breaks down is everything after the upload. Most teams end up doing the same cleanup every day: fixing failed rows because a pin code or phone format doesn’t match the template, re-uploading corrected files, checking for accidental duplicates, and copy-pasting tracking numbers back into the storefront.
Then comes the messy part: chasing exceptions (address issues, payment problems, RTO risk) across emails, calls, and courier portals, and updating status in multiple places because the courier dashboard isn’t your system of record.
The hidden cost is time and inconsistency. Different couriers expect different columns and rules, so “one CSV” turns into multiple versions plus spreadsheet workarounds. And because updates aren’t real-time, support often learns about delays only when a customer complains.
Option B: full courier API integration (what it unlocks and what it costs)
A full courier API setup means your system and the courier’s systems talk directly. Instead of uploading files, you send order and address details automatically, receive a label, and keep pulling tracking updates without anyone checking multiple portals. This is usually the point where shipping stops being a daily ops chore and starts behaving like dependable infrastructure.
What it unlocks
Most teams start a courier API integration for three core actions: booking, labels, and tracking. Typical capabilities include creating a shipment and getting an AWB instantly, generating the shipping label and invoice data, requesting a pickup (where supported), and pulling tracking scans in near real time.
Once you have those basics, you can also handle exceptions more cleanly, like address issues and NDR status updates.
The payoff is straightforward: faster dispatch, fewer copy-paste mistakes, and clearer customer updates. If an order is paid at 2 pm, your system can auto-book the shipment, print the label, and send the tracking number within minutes, without waiting for a CSV export and re-upload.
What it costs
API integrations aren’t “set and forget.” Plan time for setup, testing, and ongoing maintenance.
The usual sources of effort:
- Courier-specific rules (pincode serviceability, weight slabs, COD limits)
- Status code mismatches (one courier’s “RTO initiated” is another’s “return in transit”)
- Webhook reliability and retry logic for missed events
- Label formats and document requirements changing over time
- Sandboxes that don’t fully match production
If you plan for these quirks early, the setup scales cleanly. If you don’t, you can end up with shipments booked but not picked up, or customers seeing confusing statuses because tracking events weren’t mapped correctly.
What to automate vs keep manual (a practical split)
A simple rule works well: automate the tasks that happen many times a day and create the most rework when someone makes a small mistake.
In India, that usually means booking, labels, and tracking updates. One typo or one missed scan can trigger a chain of follow-ups.
Manual steps still have a place. Keep something manual when volume is low, when exceptions are frequent, or when courier processes aren’t consistent enough to trust automation.
A practical split by workflow:
- Automate first: shipment booking from your order system, label generation and printing, tracking status pulls or webhooks, NDR alerts with an internal queue, and delivery confirmation messages for your support team.
- Keep manual (until you have volume): choosing a courier for edge cases, negotiating pickup changes on the phone, approving risky COD reattempts, and one-off address fixes that need judgment.
A quick decision table before you build anything:
| Factor | When manual is fine | When automation pays off |
|---|---|---|
| Daily order volume | Under ~20/day | 50+/day or frequent spikes |
| Number of couriers | 1 courier | 2+ couriers or frequent switching |
| SLA pressure | 3-5 day delivery is acceptable | Same/next-day promises, high penalties |
| Team size | Dedicated ops person | Shared ops/support roles |
A simple checkpoint: if your team touches the same data twice (copy-paste from order to courier portal, then back into a sheet), that step is a strong automation candidate.
Tracking events checklist: pickup, in-transit, NDR, delivered
If you want fewer “where is my order?” messages, treat tracking like a timeline of events, not a single status. This matters in India, where the same shipment can bounce between hubs, reattempts, and returns.
Capture these stages so your team and customers see the same story:
- Pickup: when pickup is scheduled, whether it was attempted, and the final outcome (picked up or failed). When it fails, store the courier’s failure reason so you can act without calling the rider.
- In-transit: the first scan (often the real start), major hub scans, exception or delay flags, and “out for delivery.” These are the points that trigger most support questions.
- NDR (Non-Delivery Report): when an NDR is raised, the reason code, whether the customer was contacted, and what happens next (reattempt planned or return started). The clock is usually ticking here.
- Delivered (or not): delivered time and proof of delivery details when available (name, signature, photo reference). Also separate “delivery failed” from “returned,” because customers hear those as very different outcomes.
For every event, store the same core fields: timestamp, location (city and hub if available), raw status text, normalized status, reason code, and the courier reference/AWB. Keeping both raw and normalized values makes audits and courier disputes easier.
Data you need before you integrate (so nothing breaks later)
Many shipping integrations fail for boring reasons: missing phone numbers, inconsistent weights, or no clear decision on which system “owns” the truth. Before you touch an API, lock down the minimum data you will always have for every order.
Start with a baseline that also works with CSV. If you can’t export these fields reliably, an API will only make errors happen faster:
- Order ID (unique and never reused)
- Full delivery address (name, pincode, city, state, landmark if you collect it)
- Phone number (validated format) and email (optional)
- Items and shipment info (SKU, quantity, dead weight, dimensions if you have them)
- Payment details (COD amount, prepaid flag)
Then define what you expect back from the courier, because these become your “handles” for everything else. At minimum, store shipment ID, AWB number, courier name or code, label reference, and pickup date or window.
One decision prevents weeks of confusion: pick your single source of truth for shipment status. If your team keeps checking the courier portal and overriding your system, customers will see one thing while support says another.
A simple mapping plan that keeps everyone aligned:
- Choose the internal statuses you will use (for example: Created, Picked Up, In Transit, Out for Delivery, Delivered, NDR).
- Map each courier status to one internal status (even if it feels less detailed).
- Save the raw courier status text separately for audits.
- Decide which events can change status automatically vs only by a human.
If you’re building this inside a tool like Koder.ai, treat these fields and mappings as first-class models early, so exports, tracking, and rollback don’t break when you add a second courier.
Step-by-step: move from CSV to API without chaos
The safest upgrade path is a series of small switches, not one big cutover. Ops should keep shipping while the integration gets tighter.
1) Lock the scope before you write code
Pick the couriers you’ll actually use, then confirm which actions you need now vs later: shipment booking, tracking, NDR handling, and returns (RTO). This matters because every courier names statuses differently and exposes different fields.
2) Integrate tracking first (read-only)
Before you automate booking or label creation, pull tracking events into your system and show them next to the order. This is low risk because it doesn’t change how parcels are created.
Make sure you can fetch events by AWB, and handle cases where the AWB is missing or wrong.
3) Map statuses, but store the raw truth
Create a small internal status model (pickup, in-transit, NDR, delivered), then map courier statuses into it. Also save every raw event payload exactly as received.
When a customer says “it shows delivered but I didn’t get it,” raw events help support answer quickly.
4) Add NDR automation carefully
Automate the easy parts first: detect NDR, assign it to a queue, notify the customer, and set timers for reattempt windows.
Keep a manual override for address changes and special cases.
5) Only then add booking, labels, and pickup scheduling
Once tracking is stable, add API booking, label generation, and pickup requests. Roll it out courier-by-courier, while keeping the CSV upload path as a fallback for a few weeks.
Test with real scenarios:
- Address change after NDR
- Reattempt requested but not done
- RTO triggered and then cancelled
- Partial delivery or split shipment
- Delivered scan without OTP or POD details
Common mistakes that cause delays and support tickets
Most shipping tickets aren’t just “where is my order?” They’re mismatched expectations: your system says one thing, the courier says another, and the customer sees a third.
A common trap is assuming status text is uniform. The same milestone can show up as different phrases across zones, service types, or hubs. If you map by exact text instead of normalizing into your own small set of states, your dashboard and customer messages drift.
Mistakes that create delays and extra follow-ups:
- Saving only the latest status: overwriting events loses the timeline that explains what happened. Keep the full history with timestamps and location.
- Treating NDR as one status: NDR is a process. You need the reason, the action taken, and the next attempt date.
- No handling for late or out-of-order events: couriers can send events in batches, or in a strange order. Without reconciliation and safe updates, your system can flip statuses back and forth.
- Missing retry logic and rate-limit behavior: API calls fail. If you don’t retry safely, you drop updates. If you retry too aggressively, you get rate-limited.
- No operational fallback plan: decide what happens when the API is down. Can you switch to CSV for a day, pause notifications, or flag orders for manual review?
A simple example: a customer calls saying the parcel was “returned.” Your system only shows “NDR.” If you stored the NDR reason and reattempt history, the agent could answer in one message instead of escalating to ops.
Quick checks before you call the integration “done”
Before you declare success, test the integration the way ops and support will use it on a busy day. A courier status update that arrives late, or arrives without the right details, creates the same problem as no update at all.
Run a “one shipment, end to end” drill on at least 10 real orders across pincodes and payment types (prepaid and COD). Pick one order and time how long it takes to answer:
- Where is it now?
- What happened before?
- What do we do next?
A quick checklist that catches most gaps:
- Pickup proof is visible quickly: you can see pickup confirmed within your expected window, and you can tell the difference between “label created” and “physically picked up.”
- NDR is actionable, not just a status: you store the NDR reason code plus the next step (reattempt, call, or RTO), and you can change that decision.
- Timeline is easy to find: an agent can pull the full event history for one AWB in under 30 seconds, including timestamps and location scans.
- Delivered matches money and returns: delivered shipments reconcile with COD remittance reports and return/RTO data, so finance isn’t chasing mismatches at week-end.
- There’s a safe manual override: you can correct an address, reschedule a delivery, or reassign to another courier when needed, and every manual change is logged.
If you’re building internal screens for this, keep the first version boring: one shipment search box, one clean timeline, and two buttons (manual note and override).
Tools like Koder.ai can help you prototype that ops dashboard quickly and export the source code when you’re ready to own it. If you want to explore it later, you can find it on Koder.ai.
Example: a D2C team scaling from 20 to 150 orders/day
A mid-size D2C brand starts at about 20 orders a day, shipping mostly in one metro. They use two courier partners. The process is simple: export orders, upload a CSV twice a day, then copy-paste tracking numbers back into the store admin.
At 150 orders/day across three couriers, that routine starts to crack. Customers ask “where is my parcel?” and support has to check three portals.
The worst part is NDRs. A delivery attempt fails, someone from the courier calls, and the follow-up becomes a WhatsApp thread. Reattempts get missed, and a small delay turns into cancellations and refunds.
They move to a setup that syncs events automatically. Now every shipment update lands in one place, and the team works from a single queue instead of chat screenshots.
Day-to-day changes:
- Tracking events sync to the order automatically (pickup, in-transit, out for delivery, delivered).
- NDRs create a visible queue with a reason (address issue, customer not reachable, payment issue).
- Reattempt reminders fire at a set time, so nothing sits for two days.
- Support sees the latest status without logging into courier portals.
Not everything is automated. They still switch couriers manually for edge PIN codes or peak-season capacity issues. When a customer calls to correct an address, a human verifies it before any reattempt is triggered.
Next steps: choose a scope and build a simple first version
Decide what you need in the first 2-4 weeks. The biggest payoff usually comes from reliable tracking and fewer “where is my order?” tickets, not from building every feature on day one.
Pick a starting scope that matches your pain:
- Tracking-only: fetch events from the courier and keep customers and support in sync.
- Booking + label: create shipments, generate labels, and store AWB numbers automatically.
- Booking + label + pickup: add pickup scheduling and pickup confirmation, so ops isn’t chasing drivers.
Before you write any code, lock the language you’ll use internally. Write your event checklist (pickup, in-transit, NDR, delivered) and map each courier status to one of your own statuses. If you skip this, you’ll end up with five “in transit” variants and unclear rules for when to notify a customer, open an NDR task, or mark an order complete.
Roll out in phases (and keep it boring)
A safe rollout looks like: one courier, one lane (or one warehouse), then expand.
Run your new flow in parallel with your CSV upload process for a short time so ops can compare AWBs, labels, and tracking updates. Keep a simple fallback: if the API call fails, create a task for manual booking instead of blocking dispatch.
Build fast without painting yourself into a corner
If you want to move quickly, prototype the courier API integration with Koder.ai: define the event storage table, the status-mapping rules, and a small ops dashboard (search by order or AWB, last event, next action). When it behaves the way your team expects, export the source code and harden it with retries, logging, and access controls.
A good first version isn’t “complete.” It’s one courier working end-to-end, with clean events, clear ownership for NDR, and a daily view that tells ops what needs attention right now.
Pertanyaan umum
When is a CSV upload workflow actually “good enough”?
CSV cocok ketika volume rendah (misalnya di bawah ~20 pesanan/hari), Anda memakai satu kurir, dan pengecualian jarang terjadi. CSV juga berguna sebagai fallback saat API turun. Risikonya: setiap langkah yang terlewat (unggahan terlambat, template salah, kesalahan copy‑paste) bisa jadi follow‑up support dan keterlambatan pengiriman.
What’s the clearest sign we should move from CSV to a courier API?
API kurir biasanya sepadan ketika Anda mengerjakan 50+ pesanan/hari, memakai 2+ kurir, atau sering menghadapi NDR/percobaan ulang. Anda mendapatkan booking dan label lebih cepat, pelacakan hampir real‑time, dan lebih sedikit pembaruan manual. Biaya utamanya adalah setup dan pemeliharaan berkelanjutan untuk menangani kekhasan kurir dan pemetaan status.
What minimum order data should we standardize before integrating any courier?
Mulailah dengan standarisasi minimal berikut:
- ID order unik (tidak pernah dipakai ulang)
- Alamat lengkap penerima (nama, kode pos/pincode, kota, negara bagian, patokan jika dikumpulkan)
- Nomor telepon dalam format tervalidasi
- Detail item/pengiriman (SKU, kuantitas, berat; dimensi jika tersedia)
- Info pembayaran (prepaid vs COD, jumlah COD)
Jika field‑field ini tidak konsisten saat diekspor, API akan gagal lebih cepat dan lebih sering daripada CSV.
What shipping data should we always store back from the courier?
Simpan setidaknya:
- Nama/kode kurir
- ID pengiriman kurir (jika diberikan)
- Nomor AWB
- Referensi/metadata label
- Tanggal/jendela pickup (jika Anda meminta pickup)
Ini menjadi “pegangan” Anda untuk mengambil pelacakan, merekonsiliasi masalah, dan menjawab support dengan cepat.
Which tracking events matter most to reduce “Where is my order?” tickets?
Lihat pelacakan sebagai timeline, bukan satu status:
- Pickup terjadwal/dicoba/terkonfirmasi (dan alasan kegagalan)
- Scan in‑transit (scan pertama, scan di hub, out for delivery, exception)
- NDR diangkat (kode alasan, aksi yang diambil, percobaan berikutnya/keputusan return)
- Delivered (waktu dan bukti pengiriman jika tersedia)
Untuk setiap event, simpan timestamp, lokasi, teks status mentah, status ter‑normalisasi, kode alasan, dan AWB.
How should we handle NDRs without creating more chaos?
Perlakukan NDR sebagai workflow:
- Tangkap kode alasan NDR dan waktu saat diangkat
- Masukkan pengiriman ke antrean internal dengan pemilik
- Catat keputusan (hubungi pelanggan, perbaikan alamat, reattempt, atau return)
- Lacak tanggal/waktu percobaan berikutnya dan hasilnya
Sediakan override manual untuk perubahan alamat dan percobaan ulang COD yang berisiko agar otomatisasi tidak membuat pengulangan buruk.
How do we avoid confusing status mismatches across multiple couriers?
Definisikan sekumpulan status internal kecil (Created, Picked Up, In Transit, Out for Delivery, Delivered, NDR, Returned). Pemetakan tiap event kurir ke salah satu status ini, tapi juga simpan teks status mentahnya secara terpisah. Jangan memetakan hanya dengan teks persis—kurir bisa berbeda menurut zona, tipe layanan, dan wording hub.
What’s the safest way to migrate from CSV to an API integration?
Lakukan secara bertahap:
- Tarik event pelacakan ke sistem Anda (read‑only)
- Normalisasi status dan simpan payload mentah untuk audit
- Tambahkan deteksi NDR + antrean + notifikasi (dengan override manual)
- Baru kemudian otomatiskan booking, label, dan permintaan pickup
Pertahankan CSV sebagai fallback selama beberapa minggu sehingga dispatch tidak terhambat.
What reliability features should we build so tracking doesn’t go stale?
Rencanakan kegagalan sejak dini:
- Gunakan retry dengan backoff untuk error sementara
- Tangani rate limit (lambatkan, jangan spam request)
- Harapkan event terlambat atau datang tidak berurutan dan rekonsiliasi dengan aman
- Log setiap request/response dan jaga idempotensi untuk menghindari duplikasi
- Tentukan fallback operasional (booking manual atau run CSV sementara)
Ini mencegah celah pelacakan diam‑diam yang memicu tiket support.
How do we prevent wrong AWBs, duplicates, and other costly ops mistakes?
Gunakan pengamanan di proses dan data:
- Hasilkan dan paksa kunci pengiriman unik per order/parsel
- Buat booking idempotent jadi retry tidak membuat pengiriman kedua
- Workflow cetak/scan: verifikasi AWB cocok dengan parsel sebelum dispatch
- Blokir penggunaan ulang AWB dan flag duplikat secara otomatis
Sebagian besar paket “hilang” bermula dari kekacauan ID, bukan masalah kurir.