

로컬라이제이션 및 번역 관리를 위한 웹 앱 구축 방법
번역 워크플로우, 로케일 데이터, 검토, QA 검사, 릴리스 관리를 처리하는 웹 앱을 설계하세요. 데이터 모델, UX, 통합 방안까지 포함합니다.
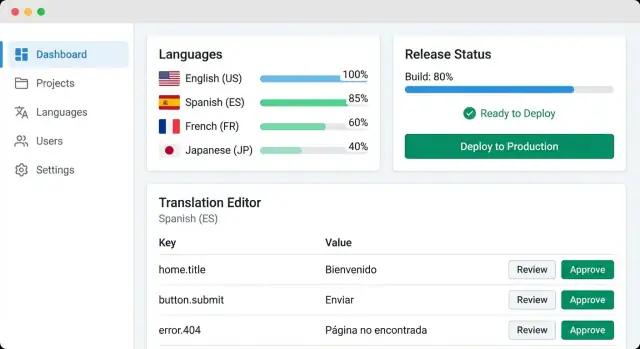
What the Web App Should Solve
Localization management is the day-to-day work of getting your product’s text (and sometimes images, dates, currencies, and formatting rules) translated, reviewed, approved, and shipped—without breaking the build or confusing users.
For a product team, the goal isn’t “translate everything.” It’s to keep every language version accurate, consistent, and up to date as the product changes.
The problems you’re fixing
Most teams start with good intentions and end up with a mess:
- Scattered locale files across repos, folders, and spreadsheets, with no single source of truth.
- Inconsistent wording (“Sign in” vs “Log in”), duplicate strings, and different translations for the same concept.
- Slow review cycles because feedback lives in email threads, comments, or chat messages.
- Unclear status: nobody knows what’s translated, what’s outdated, and what’s safe to release.
- Risky manual steps when exporting/importing files leads to missing keys, broken placeholders, or accidental overwrites.
Who the app is for
A useful localization management web app supports multiple roles:
- Developers want reliable string updates, clean diffs, and fewer merge conflicts.
- Translators need context, terminology guidance, and a focused work queue.
- Reviewers need a clear approval flow and the ability to comment on specific strings.
- PMs and localization leads need progress visibility and deadlines they can trust.
What you’ll build by the end
You’ll build an MVP that centralizes strings, tracks status per locale, and supports basic review and export. A fuller system adds automation (sync, QA checks), richer context, and tools like glossary and translation memory.
Define Scope and MVP Features
Before you design tables or screens, decide what your localization management web app is actually responsible for. A tight scope makes the first version usable—and keeps you from rebuilding everything later.
Start by listing content types
Translations rarely live in one place. Write down what you need to support from day one:
- UI strings (product labels, buttons, error messages)
- Transactional emails (subjects and templates)
- Docs snippets (short reusable blocks, not full documentation sites)
- Marketing pages (often owned by a different team with different review needs)
This list helps you avoid a “one workflow fits all” approach. For example, marketing copy may need approvals, while UI strings may need fast iteration.
Decide which file formats to support
Pick 1–2 formats for the MVP, then expand. Common options include JSON, YAML, PO, and CSV. A practical MVP choice is JSON or YAML (for app strings), plus CSV only if you already rely on spreadsheet imports.
Be explicit about requirements like plural forms, nested keys, and comments. These details affect your locale file management and your future import/export reliability.
Choose locales and fallback rules
Define a source language (often en) and set fallback behavior:
- Missing strings fall back to en
- Optionally fall back to a parent locale (e.g.,
pt-BR → pt → en)
Also decide what “done” means per locale: 100% translated, reviewed, or shipped.
MVP vs later features
For the MVP, focus on the translation review process and basic i18n workflow: create/edit strings, assign work, review, and export.
Plan later add-ons—screenshots/context, glossary, translation memory basics, and integrating machine translation—but don’t build them until you’ve validated your core workflow with real content.
Design the Data Model
A translation app succeeds or fails on its data model. If the underlying entities and fields are clear, everything else—UI, workflow, integrations—becomes simpler.
Start with the core entities
Most teams can cover 80% of their needs with a small set of tables/collections:
- Project: a product/app or a specific space of strings.
- Locale: languages and regional variants (e.g.,
en,en-GB,pt-BR). - Key: the stable identifier used in code (
checkout.pay_button). - Source string: the “reference” text (usually the base language) attached to a key.
- Translation: a localized value for a key + locale.
- Version: a snapshot boundary for releases, imports, or file revisions.
Model the relationships explicitly: a Project has many Locales; a Key belongs to a Project; a Translation belongs to a Key and a Locale.
Encode workflow with status fields
Add a status to each translation so the system can guide humans:
draft→in_review→approvedblockedfor strings that shouldn’t ship yet (legal review, missing context, etc.)
Keep status changes as events (or a history table) so you can answer “who approved this and when?” later.
Store metadata that prevents mistakes
Translations need more than plain text. Capture:
- Placeholders (e.g.,
{name},%d) and whether they must match the source - Max length (for buttons and UI constraints)
- Context notes (where it appears, meaning, tone)
- Tags (feature area, platform, urgency)
Don’t skip audit fields
At minimum, persist: created_by, updated_by, timestamps, and a short change_reason. This makes reviews faster and builds trust when teams compare what’s in the app vs. what shipped.
Plan Storage and Versioning
Storage decisions will shape everything: editing UX, import/export speed, diffing, and how confidently you can ship.
Store strings: row-per-key vs. document-per-file
Row-per-key (one DB row per string key per locale) is great for dashboards and workflows. You can easily filter “missing French” or “needs review,” assign owners, and compute progress. The downside: reconstructing a locale file for export requires grouping and ordering, and you’ll need extra fields for file paths and namespaces.
Document-per-file (store each locale file as a JSON/YAML document) maps cleanly to how repositories work. It’s faster to export and easier to keep formatting identical. But searching and filtering becomes harder unless you also maintain an index of keys, statuses, and metadata.
Many teams use a hybrid: store row-per-key as the source of truth, plus generated file snapshots for export.
Versioning: revisions per translation and per release
Keep revision history at the translation unit level (key + locale). Every change should record: previous value, new value, author, timestamp, and comment. This makes reviews and rollbacks simple.
Separately, track release snapshots: “what exactly shipped in v1.8.” A snapshot can be a tag that points to a consistent set of approved revisions across locales. This prevents late edits from silently altering a released build.
Plurals and gender rules
Don’t treat “plural” as a single boolean. Use ICU MessageFormat or CLDR categories (e.g., one, few, many, other) so languages like Polish or Arabic aren’t forced into English rules.
For gender and other variations, model them as variants of the same key (or message) rather than separate ad-hoc keys, so translators see the full context.
Search and filters that scale
Implement full-text search over key, source text, translation, and developer notes. Pair it with filters that match real work: status (new/translated/reviewed), tags, file/namespace, and missing/empty.
Index these fields early—search is the feature people use hundreds of times a day.
Choose an Architecture That Scales
A localization management web app usually starts simple—upload a file, edit strings, download it again. It gets complicated when you add multiple products, many locales, frequent releases, and a steady stream of automation (sync, QA, machine translation, reviews).
The easiest way to stay flexible is to separate concerns early.
A practical stack
A common, scalable setup is API + web UI + background jobs + database:
- Web UI: your translation editor, review screens, and project settings.
- API: the single source of truth used by the UI, CLI tools, and integrations.
- Background jobs: long-running work (imports/exports, QA scans, sync) that shouldn’t block the UI.
- Database: stores projects, keys, translations, history, and permissions.
This split helps you add more workers for heavy tasks without rewriting the whole app.
If you want to move faster on the first working version, a vibe-coding platform like Koder.ai can help you scaffold the web UI (React), API (Go), and PostgreSQL schema from a structured spec and a few iterations in chat—then export the source code when you’re ready to own the repo and deployment.
How to structure the API
Keep your API centered on a few core resources:
- Projects: container for an app/product.
- Locales: languages/regions enabled per project.
- Keys: stable identifiers (e.g.,
checkout.button.pay). - Translations: the actual text per key+locale, plus status (draft/approved), author, timestamps.
Design endpoints so they support both human editing and automation. For example, listing keys should accept filters like “missing in locale”, “changed since”, or “needs review”.
Background jobs you’ll need
Treat automation as asynchronous work. A queue typically handles:
- Imports (parse locale files, validate, create/update keys)
- Exports (build locale bundles for a release)
- QA checks (placeholders, length, HTML, forbidden terms)
- Sync jobs (pull/push to Git, CI, or other systems)
Make jobs idempotent (safe to retry) and record job logs per project so teams can self-diagnose failures.
Performance basics that matter early
Even small teams can create big datasets. Add pagination for lists (keys, history, jobs), cache common reads (project locale stats), and apply rate limits to protect import/export endpoints and public tokens.
These are boring details that prevent your translation management system from slowing down right when adoption grows.
Add Authentication Roles and Permissions
If your app stores source strings and translation history, access control isn’t optional—it’s how you prevent accidental edits and keep decisions traceable.
Pick roles that match real work
A simple set of roles covers most teams:
- Admin: manages org settings, locales, integrations, and user access.
- Developer: edits source strings, creates keys, triggers imports/exports.
- Translator: edits translations in assigned locales.
- Reviewer: approves or rejects translations and locks final wording.
- Viewer: read-only access for stakeholders.
Define permissions (not just titles)
Treat each action as a permission so you can evolve later. Common rules:
- Edit source: Admin, Developer only (prevents translators from changing meaning).
- Approve: Reviewer (and optionally Admin) to enforce a clear translation review process.
- Export: Developer/Admin, or allow Reviewer if they own releases.
- Manage locales: Admin only (adding a locale affects workflows and budgets).
- Edit translations: Translator/Reviewer within assigned locale(s) and projects.
This maps cleanly to a translation management system while staying flexible for contractors.
Login: SSO vs. email
If your company already uses Google Workspace, Azure AD, or Okta, single sign-on (SSO) reduces password risk and makes offboarding instant. Email/password can work for small teams—just require strong passwords and reset flows.
Session security basics
Use secure, short-lived sessions (HTTP-only cookies), CSRF protection, rate limiting, and 2FA where possible.
Activity logs for accountability
Record who changed what and when: edits, approvals, locale changes, exports, and permission updates. Pair the log with “undo” via version history so rollbacks are safe and fast (see /blog/plan-storage-and-versioning).
Build the Core UI Screens
Your UI is where localization work actually happens, so prioritize the screens that reduce back-and-forth and make status obvious at a glance.
1) Project overview (the “control room”)
Start with a dashboard that answers three questions quickly: what’s done, what’s missing, and what’s blocked.
Show progress by locale (percent translated, percent reviewed), plus a clear “missing strings” count. Add a review queue widget that highlights items waiting on approval, and a “recently changed” feed so reviewers can spot risky edits.
Filters matter more than charts: locale, product area, status, assignee, and “changed since last release.”
2) Translation editor (fast, contextual, auditable)
A good editor is side-by-side: source on the left, target on the right, with context always visible.
Context can include the key, screenshot text (if you have it), character limits, and placeholders (e.g., {name}, %d). Include history and comments in the same view so translators don’t need a separate “discussion” screen.
Make the status workflow one click: Draft → In review → Approved.
3) Bulk actions (for managers and leads)
Localization work is often “many small changes.” Add bulk select with actions like assign to user/team, change status, and export/import for a locale or module.
Keep bulk actions gated by roles (see /blog/roles-permissions-for-translators if you cover it elsewhere).
4) Accessibility and keyboard shortcuts
Heavy translators live in the editor for hours. Support full keyboard navigation, visible focus states, and shortcuts like:
- Next/previous string
- Save and mark “In review”
- Copy source to target
Also support screen readers and high-contrast mode—accessibility improves speed for everyone.
Create a Translation Workflow
A localization management web app succeeds or fails on workflow. If people can’t tell what to translate next, who owns a decision, or why a string is blocked, you’ll get delays and inconsistent quality.
Assignment flow: who translates what and by when
Start with a clear unit of work: a set of keys for a locale in a specific version. Let project managers (or leads) assign work by locale, file/module, and priority, with an optional due date.
Make assignments visible in a “My Work” inbox that answers three questions: what’s assigned, what’s overdue, and what’s waiting on others. For larger teams, add workload signals (items count, word count estimate, last activity) so assignments are fair and predictable.
Review flow: comments, suggestions, approvals, and rejections
Build a simple status pipeline, for example: Untranslated → In progress → Ready for review → Approved.
Review should be more than a binary check. Support inline comments, suggested edits, and approve/reject with reason. When reviewers reject, keep the history—don’t overwrite.
This makes your translation review process auditable and reduces repeated mistakes.
Conflict handling: source changes and “needs update” flags
Source text will change. When it does, mark existing translations as Needs update and show a diff or “what changed” summary. Keep the older translation as a reference, but prevent it from being re-approved without an explicit decision.
Notifications: email/in-app for assignments and review requests
Notify on events that block progress: new assignment, review requested, rejection, due date approaching, and source change affecting approved strings.
Keep notifications actionable with deep links like /projects/{id}/locales/{locale}/tasks so people can resolve issues in one click.
Automate Imports, Exports, and Sync
Manual file juggling is where localization projects start to drift: translators work on stale strings, developers forget to pull updates, and releases ship with half-finished locales.
A good localization management web app should treat import/export as a repeatable pipeline, not a one-off task.
Build an import/export pipeline
Support the common paths teams actually use:
- Pull from repo (GitHub/GitLab/Bitbucket): fetch locale files on a schedule or on demand.
- Push back to repo: open a PR with updated translations instead of writing directly to main.
- Manual uploads/downloads: still essential for vendors or legacy projects.
When exporting, allow filtering by project, branch, locale, and status (e.g., “approved only”). That keeps partially reviewed strings from leaking into production.
String extraction and stable keys
Sync only works if keys stay consistent. Decide early how strings are generated:
- If you use human-readable keys (e.g.,
checkout.button.pay_now), protect them from accidental renames. - If you use hash-based keys, store the source string and context so updates don’t silently create duplicates.
Your app should detect when a source string changed but the key didn’t, and mark translations as needs review rather than overwriting them.
Webhooks for commits and releases
Add webhooks so sync happens automatically:
- New commit to
main→ import updated source strings. - Release tag created → export “approved” translations and open a PR.
Webhooks should be idempotent (safe to retry) and produce clear logs: what changed, what was skipped, and why.
Integration callout
If you’re implementing this, document the simplest end-to-end setup (repo access + webhook + PR export) and link it from the UI, for example: /docs/integrations.
Add Localization QA Checks
Localization QA is where a translation management web app stops being a simple editor and starts preventing production bugs.
The goal is to catch issues before strings ship—especially the ones that only appear in a specific locale file.
1) Validation (hard errors)
Start with checks that can break the UI or crash formatting:
- Missing or mismatched placeholders (e.g.,
{count}present in English but missing in French, or plural forms inconsistent). - Invalid HTML in strings that allow markup (broken tags, unclosed entities).
- Unescaped characters for the file format (quotes in JSON, stray
%in printf-style strings, malformed ICU messages).
Treat these as “block release” by default, with a clear error message and a pointer to the exact key and locale.
2) Consistency checks (soft warnings)
These don’t always break the app, but they hurt quality and brand consistency:
- Glossary terms: flag when a required term isn’t used or is translated inconsistently.
- Punctuation, whitespace, and casing: double spaces, trailing spaces, missing final punctuation, or mismatched quotes.
3) Visual checks (context-aware)
Text can be correct and still look wrong. Add a way to request screenshot context per key (or attach a screenshot to a key), so reviewers can validate truncation, line breaks, and tone in real UI.
4) Reporting (release-ready summary)
Before each release, generate a QA summary per locale: errors, warnings, untranslated strings, and top offenders.
Make it easy to export or link internally (e.g., /releases/123/qa) so the team has a single “go/no-go” view.
Support Glossary, Translation Memory, and MT
Adding a glossary, translation memory (TM), and machine translation (MT) can dramatically speed up localization—but only if your app treats them as guidance and automation, not as “publish-ready” content.
Glossary: approved terms per locale
A glossary is a curated list of terms with approved translations per locale (product names, UI concepts, legal phrases).
Store entries as term + locale + approved translation + notes + status.
To enforce it, add checks where translators work:
- Highlight glossary matches inside the source string and suggest the approved target term.
- Warn (or block, depending on project settings) when a translation deviates from required glossary terms.
- Support inflections/variants via simple rules (e.g., case-insensitive matching) so enforcement isn’t overly strict.
Translation memory basics
TM reuses previously approved translations. Keep it simple:
- Index by (normalized source text, context key, locale).
- Prefer “approved” segments first; fall back to “reviewed” or “imported”.
- Show match quality (exact vs. fuzzy) and the original context so users trust suggestions.
Treat TM as a suggestion system: users can accept, edit, or reject matches, and only accepted translations should feed back into TM.
Machine translation as an assist
MT is useful for drafts and backlogs, but it shouldn’t be the default final output.
Make MT opt-in per project and per job, and route MT-filled strings through the normal review process.
Costs and privacy: let admins choose
Different teams have different constraints. Allow admins to select providers (or disable MT entirely), set usage limits, and choose what data is sent (e.g., exclude sensitive keys).
Log requests for cost visibility and auditing, and document options in /settings/integrations.
Ship Releases and Keep Them Reliable
A localization app shouldn’t just “store translations”—it should help you ship them safely.
The key idea is a release: a frozen snapshot of approved strings for a specific build, so what gets deployed is predictable and reproducible.
Define what a “release” contains
Treat a release as an immutable bundle:
- Locale + namespace/file + key + final approved text
- Metadata: approval status, reviewer, timestamps, source string hash
- Optional: build number, git commit, and app version
This lets you answer: “What did we ship in v2.8.1 for fr-FR?” without guessing.
Support environments (staging vs. production)
Most teams want to validate translations before users see them. Model exports by environment:
- Staging export: includes newly approved strings and possibly “candidate” translations for preview
- Production export: only fully approved content, tied to a release ID
Make the export endpoint explicit (for example: /api/exports/production?release=123) to prevent accidental leaks of unreviewed text.
Plan rollback from day one
Rollback is easiest when releases are immutable. If a release introduces issues (broken placeholders, wrong terminology), you should be able to:
- Revert the app to a previous release export
- Re-open problematic strings, fix them, and cut a new release
Avoid “editing production in place”—it breaks audit trails and makes incidents harder to analyze.
Notably, this “snapshot + rollback” mindset maps well to how modern build platforms operate. For example, Koder.ai includes snapshots and rollback as a first-class workflow for applications you generate and host, which is a useful mental model when you design immutable localization releases.
Post-deploy checklist and monitoring
After deployment, run a small operational checklist:
- Export succeeded for all locales; no missing files
- Basic runtime smoke test for top user paths
- Monitor translation error signals (missing keys, placeholder mismatches, sudden fallback spikes)
If you show release history in the UI, include a simple “diff vs. previous release” view so teams can spot risky changes quickly.
Security, Analytics, and Next Steps
Security and visibility are the difference between a useful localization tool and one teams can trust. Once your workflow is running, lock it down and start measuring it.
Security basics to bake in
Follow least privilege by default: translators shouldn’t be able to change project settings, and reviewers shouldn’t have access to billing or admin-only exports. Make roles explicit and auditable.
Store secrets safely. Keep database credentials, webhook signing keys, and third-party tokens in a secrets manager or encrypted environment variables—never in the repo. Rotate keys on a schedule and when someone leaves.
Backups aren’t optional. Take automated backups of your database and object storage (locale files, attachments), test restores, and define retention. A “backup that can’t be restored” is just extra storage.
PII considerations (especially for user-generated strings)
If strings might include user content (support tickets, names, addresses), avoid storing it in the translation system. Prefer placeholders or references, and strip logs of sensitive values.
If you must process such text, define retention rules and access restrictions.
Basic analytics that actually help
Track a few metrics that reflect workflow health:
- Throughput: strings translated per day/week
- Review time: average time from “translated” to “approved”
- Top changed keys: identify unstable UI areas that churn and rework
A simple dashboard plus CSV export is enough to start.
Next steps to expand capability
Once the foundation is steady, consider:
- A developer CLI for push/pull and status checks
- An in-context editor for previewing strings in UI
- API keys for integrations (CI, GitHub/GitLab, Slack)
If you’re planning to offer this as a product, add a clear upgrade path and call-to-action (see /pricing).
If your immediate goal is to validate the workflow quickly with real users, you can also prototype the MVP on Koder.ai: describe the roles, status flow, and import/export formats in planning mode, iterate on the React UI and Go API via chat, and then export the codebase when you’re ready to harden it for production.
자주 묻는 질문
로컬라이제이션 관리 웹 앱이란 무엇이며 어떤 문제를 해결하나요?
로컬라이제이션 관리 웹 앱은 문자열을 중앙에서 관리하고 번역, 검토, 승인, 내보내기 등의 워크플로우를 조율합니다. 이를 통해 키 누락, 잘못된 플레이스홀더, 불명확한 상태로 인한 릴리스 사고를 줄이고 팀이 안정적으로 업데이트를 배포할 수 있게 합니다.
MVP 로컬라이제이션 관리 앱의 범위는 어떻게 결정하나요?
다음 항목을 먼저 확정하세요:
- 콘텐츠 종류 (UI 문자열, 이메일, 스니펫, 마케팅)
- 파일 포맷 (MVP는 JSON/YAML 등 1–2개 선택)
- 로케일과 폴백 규칙 (예:
pt-BR → pt → en) - 완료 정의(로케일별로 번역됨/검토됨/배포됨 중 무엇을 ‘완료’로 볼지)
범위를 좁게 잡으면 “모든 워크플로우를 한 번에” 하려는 실수를 피하고 MVP를 실사용 가능하게 유지할 수 있습니다.
번역과 워크플로우를 위해 어떤 데이터 모델로 시작해야 하나요?
대부분의 팀은 다음 핵심 엔티티로 핵심 워크플로우의 80%를 커버할 수 있습니다:
- Project, Locale, Key, Source string, Translation
- 번역 단위별 상태(예:
draft → in_review → approved) - 버전/릴리스 스냅샷(무엇이 언제 배포됐는지)
이 엔티티들이 명확하면 UI, 권한, 통합 설계가 훨씬 단순해집니다.
번역 실수를 피하려면 어떤 메타데이터를 저장해야 하나요?
생산 버그와 검토 반복을 줄이려면 다음 메타데이터를 저장하세요:
- 플레이스홀더(예:
{name},%d)와 원문과의 일치 규칙 - 최대 길이(버튼 등 UI 제약)
- 컨텍스트 노트(어디에 표시되는지, 의미, 톤)
- 태그(기능 영역, 긴급도, 플랫폼)
- 감사 필드(
created_by,updated_by, 타임스탬프, 변경 이유)
이 정보가 있으면 단순한 텍스트 편집기와 신뢰할 수 있는 시스템의 차이가 납니다.
번역을 데이터베이스 행으로 저장해야 하나요, 전체 로케일 파일로 저장해야 하나요?
무엇을 우선시하느냐에 따라 다릅니다:
- **Key당 행(row-per-key)**은 필터, 큐, 진행률 리포팅에 유리합니다.
- **파일 단위 문서(document-per-file)**는 리포지토리 파일과 매핑이 쉬워 포맷을 유지하기 좋습니다.
일반적인 접근은 하이브리드입니다: row-per-key를 진실의 원천으로 삼고, 내보낼 때는 생성된 파일 스냅샷을 함께 유지합니다.
버전 관리와 릴리스는 로컬라이제이션 앱에서 어떻게 설계해야 하나요?
두 계층을 사용하세요:
- 번역 단위별 리비전(키+로케일): 누가 언제 무엇을 바꿨는지 기록하면 롤백이 쉬워집니다.
- 릴리스 스냅샷: 승인된 리비전들의 불변 번들로, 빌드에 무엇이 포함됐는지 확실히 해줍니다.
이렇게 하면 이미 배포된 내용이 “조용히” 변경되는 것을 방지할 수 있습니다.
로컬라이제이션 워크플로우에 필수적인 역할과 권한은 무엇인가요?
업무와 일치하는 역할으로 시작하세요:
- Admin(설정, 로케일, 통합, 사용자 관리)
- Developer(원문 편집, 키 생성, 임포트/익스포트 트리거)
- Translator(할당된 로케일에서 번역 편집)
- Reviewer(승인/거부)
- Viewer(읽기 전용)
권한은 작업 단위로 정의하세요(예: 소스 편집, 승인, 익스포트, 로케일 관리). 이렇게 하면 이후에도 계약직이나 외부팀을 안전하게 관리할 수 있습니다.
UI와 자동화를 모두 지원하도록 API 엔드포인트를 어떻게 설계해야 하나요?
핵심 자원 중심으로 설계하세요:
Projects,Locales,Keys,Translations
그런 다음 실제 작업에 필요한 필터를 리스트 엔드포인트에 추가합니다(예: 로케일에서 누락, 변경 이후, 검토 필요). 이렇게 하면 UI의 사람들 작업과 CLI/CI를 통한 자동화 모두를 지원할 수 있습니다.
초기에 어떤 백그라운드 작업을 계획해야 하나요?
비동기 처리가 필요한 긴 작업들을 미리 계획하세요:
- 임포트/익스포트
- 레포 동기화(풀/푸시 + PR 생성)
- QA 스캔(플레이스홀더, 길이, HTML, ICU 등)
작업은 멱등성(idempotent) 을 보장해 재시도해도 안전하게 만들고, 프로젝트별 로그를 남겨 팀이 서버 로그를 파헤치지 않고 실패를 진단할 수 있게 하세요.
릴리스를 차단해야 하는 로컬라이제이션 QA 검사에는 어떤 것이 있나요?
릴리스를 막는 것부터 시작하세요. 우선순위는 UI를 망가뜨리는 문제들입니다:
- 플레이스홀더 불일치(
{count},%d)와 복수형 커버리지 - 포맷 유효성(JSON 이스케이프, ICU 문법)
- 허용된 마크업에서의 HTML 유효성
기본적으로 이들은 릴리스 차단 항목으로 취급하고, 용어집 일관성이나 공백/대소문자 같은 항목은 경고로 두어 품질을 개선할 기회를 제공합니다.