Oct 14, 2025·8 min
Apple Pay in Mobile Apps: What It Is and How It Works
Learn what Apple Pay in mobile apps is, how it works behind the scenes, and how to integrate it securely to speed up checkout and improve conversion.
Learn what Apple Pay in mobile apps is, how it works behind the scenes, and how to integrate it securely to speed up checkout and improve conversion.
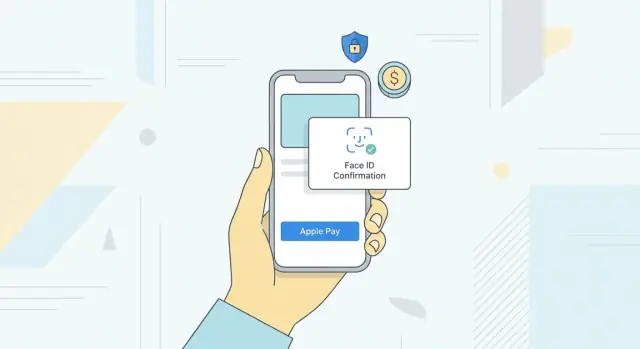
Apple Pay is Apple’s digital wallet and payment service. It lets users store credit, debit, and some prepaid and store cards securely on their iPhone, Apple Watch, iPad, or Mac and pay with a single tap or glance.
Instead of entering card numbers and billing details, the user authenticates with Face ID, Touch ID, or a device passcode. Apple generates a device-specific token so the actual card number is not shared with the merchant.
Apple Pay works in three main contexts:
This guide focuses on in‑app Apple Pay, where the entire payment experience stays inside the app.
Typing card details on a small screen is slow and error‑prone. Apple Pay replaces multiple form fields with one interaction, which typically:
Because cards and addresses are already stored on the device, Apple Pay also reduces friction for first‑time customers.
Apple Pay works on recent iPhone, iPad, Apple Watch, and Mac models in supported regions, with major networks such as Visa, Mastercard, American Express, and many local schemes, depending on the issuing bank.
Apple Pay is most suitable when:
It should sit alongside traditional card forms and other wallets, not replace them entirely, so users without Apple Pay can still pay.
Apple Pay hides a lot of complexity behind a simple “double-click to pay” experience. Under the hood, several parties and security layers coordinate to move money safely.
A typical Apple Pay transaction involves:
When a user adds a card to Apple Wallet, the real card number (the FPAN, or Funding Primary Account Number) is sent securely to the card network and issuer. They respond with a DPAN (Device Primary Account Number) plus cryptographic keys unique to that device.
The DPAN is what Apple Pay uses during transactions. Your app and backend never see the FPAN. This is the core of Apple Pay’s tokenization model: the device uses a surrogate card number and one-time cryptograms instead of exposing the real card.
On supported devices, payment credentials and keys live in the Secure Element (or are protected via the Secure Enclave). When the user authenticates (Face ID, Touch ID, or passcode), the Secure Element:
Your app receives this opaque, encrypted token via Apple Pay APIs and sends it to your backend, which forwards it to the PSP or gateway.
The PSP decrypts the token, extracts DPAN and cryptogram, and submits an authorization request through the card network to the issuing bank. The issuer validates the cryptogram and card status, then approves or declines.
Later, during settlement, the authorized amount is captured, batched, and moved from the issuing bank to the merchant’s acquiring bank. To your app, this is just capture or sale completion, but behind the scenes it’s coordinated between acquirer, card network, and issuer using the DPAN—not the customer’s real card number.
Before you add Apple Pay to your app, you need to satisfy a set of technical, business, and regional requirements.
On the merchant side you must have:
Many merchants also create a Merchant Identity certificate for merchant validation during web-based or hybrid flows.
Apple Pay in apps is supported on:
Check Apple’s current documentation for minimum OS support, especially if you rely on newer APIs.
Apple Pay is not available in every country or for every bank. You need to confirm:
Apple may restrict certain merchant categories and use cases (e.g., illegal goods, some digital content or services, high‑risk industries). Verify that:
Finally, you need a PSP or payment gateway that supports Apple Pay tokenization and decryption. Confirm that your provider:
A smooth Apple Pay flow feels almost invisible to the user. Here’s what it typically looks like, step by step.
The journey usually starts on a product page or cart screen. Once the user has chosen items and options (size, color, quantity), they move to checkout.
On the checkout or cart screen, show the standard Apple Pay button provided by Apple. It should:
When the user taps the button, the Apple Pay sheet slides up from the bottom of the screen.
This sheet typically includes:
The user can adjust details (card, shipping, contact) directly in the sheet before confirming.
To authorize the payment, the user authenticates with:
The sheet clearly prompts the user, for example: “Double-click to pay” on Face ID devices.
After authentication, the sheet indicates progress and then disappears, returning the user to your app.
Your app should immediately show a clear state:
Keeping these states clear and consistent reassures users that their payment status is unambiguous and that they stay in control throughout the flow.
Implementing Apple Pay on iOS centers around the PassKit framework and a few key classes. Here’s the end‑to‑end flow at app level.
This wires your app bundle to your merchant identity so Apple Pay tokens can be generated for your server.
PKPaymentRequestimport PassKit
func createPaymentRequest() -> PKPaymentRequest? {
guard PKPaymentAuthorizationController.canMakePayments() else { return nil }
let request = PKPaymentRequest()
request.merchantIdentifier = "merchant.com.yourcompany.app"
request.countryCode = "US"
request.currencyCode = "USD"
request.supportedNetworks = [.visa, .masterCard, .amex]
request.merchantCapabilities = [.capability3DS]
request.paymentSummaryItems = [
PKPaymentSummaryItem(label: "Pro Subscription", amount: 9.99),
PKPaymentSummaryItem(label: "Your Company", amount: 9.99)
]
return request
}
merchantIdentifier, countryCode, and currencyCode must match your merchant setup. supportedNetworks reflects the card schemes you and your PSP support. At minimum, include .capability3DS in merchantCapabilities.
PKPaymentButtonUse PKPaymentButton rather than custom buttons so you comply with Apple’s UI guidelines:
let payButton = PKPaymentButton(paymentButtonType: .buy, paymentButtonStyle: .black)
Place it where purchase intent is strongest: product screen, cart, and final checkout. Disable or hide it if PKPaymentAuthorizationController.canMakePayments() is false.
PKPaymentAuthorizationController and Handle CallbacksCreate a controller from the request and conform to PKPaymentAuthorizationControllerDelegate:
func startApplePay() {
    guard let request = createPaymentRequest() else { return }
    let controller = PKPaymentAuthorizationController(paymentRequest: request)
    controller.delegate = self
    controller.present(completion: nil)
}

extension CheckoutViewController: PKPaymentAuthorizationControllerDelegate {
    func paymentAuthorizationController(_ controller: PKPaymentAuthorizationController,
                                        didAuthorizePayment payment: PKPayment,
                                        handler completion: @escaping (PKPaymentAuthorizationResult) -> Void) {
        // Send payment.token to your server for processing
        // Then call completion(.init(status: .success, errors: nil)) or .failure
    }

    func paymentAuthorizationControllerDidFinish(_ controller: PKPaymentAuthorizationController) {
        controller.dismiss(completion: nil)
    }
}
The didAuthorizePayment method is where you pass the payment.token to your backend for actual charging. After your server responds, complete with .success or .failure, then dismiss the sheet in paymentAuthorizationControllerDidFinish.
Server-side logic is what turns an Apple Pay sheet into real money movement. The app collects user authorization; your backend validates the merchant, processes the token, and talks to your payment gateway.
Before showing the Apple Pay sheet, your app must obtain a merchant session from Apple.
PKPaymentAuthorizationController.This flow proves to Apple that the app is associated with your merchant identity and domain.
After the user authorizes payment, the app receives an encrypted payment token (PKPaymentToken) and sends it to your backend over HTTPS.
On the server:
The gateway decrypts the token (using network tokens or DPANs) and runs the card authorization with the card networks.
Gateways usually give you two flows:
Your backend should persist the gateway’s transaction ID, amount, currency, and status—but not raw card data or decrypted token contents.
Store only what you truly need for reconciliation, refunds, and customer support:
Never store full card numbers, CVV, or unencrypted payment tokens on your own servers. Offload sensitive handling to PCI-compliant gateways, and ensure all communication is over TLS with strict logging and access controls.
Apple Pay is designed so your app never touches raw card numbers, but you still need to understand the security model and your responsibilities.
When a user adds a card to Apple Pay, the issuer and network replace the actual PAN (card number) with a Device Account Number (DAN).
During a payment:
Your app and backend only see tokens and transaction metadata, not the underlying card details.
Sensitive keys and payment credentials are stored and processed inside the Secure Enclave, a hardware-isolated coprocessor.
Authorization is tied to user verification:
Your app simply receives a success or failure signal from the system sheet; it never accesses biometric data or Secure Enclave contents.
Each Apple Pay transaction uses:
Networks and issuers validate these values, helping detect cloning, replay, and tampering.
Apple Pay can significantly reduce the PCI DSS scope of your app because:
However:
For formal guidance, consult your acquiring bank, PSP, and a qualified security assessor.
Apple Pay reduces risk, but careless integrations can reintroduce exposure.
Practical tips:
By respecting these boundaries, you leverage Apple Pay’s built-in protections while keeping your own compliance burden manageable.
Thorough testing is the only way to be confident your Apple Pay integration behaves correctly for real customers. That starts with a proper sandbox setup and a clear plan of what to test.
In your Apple Developer / App Store Connect account, create sandbox tester accounts under Users and Access → Sandbox. These special Apple IDs are used on test devices to simulate real users without charging real cards.
On your test devices:
Use separate sandbox testers for different user profiles (regions, currencies, card schemes) so you can reproduce edge cases consistently.
The iOS Simulator supports basic Apple Pay testing, which is useful for quick UI validation and early development. You can simulate authorization and check that your PKPaymentAuthorizationController flow works.
However, always validate on physical devices because only they provide:
Treat Simulator as a convenience, not a replacement.
Cover at least the following flows end-to-end (client and server):
Use gateway-specific test card numbers and triggers to force declines and error codes.
Log enough to trace issues, but never log sensitive payment data. Avoid:
Instead, log:
created → authorized → captured → failed)Correlate client logs with server logs via a shared correlation ID passed from app to backend.
While running test cycles, keep an eye on:
If you see intermittent errors or slow authorizations, check both your gateway’s status and Apple’s status before assuming an integration bug. This saves time and avoids chasing transient platform issues as code problems.
Thoughtful Apple Pay design can turn a “nice-to-have” into a major conversion driver. Small placement and copy decisions have a big impact on how often users choose it.
Use Apple Pay where intent to buy is strongest:
Avoid hiding Apple Pay behind extra taps such as “More payment options”. Every extra step reduces use.
Offer Apple Pay as an express checkout from:
When used as express checkout, make it clear that shipping and contact details will be handled during Apple Pay authorization.
Follow Apple’s Human Interface Guidelines:
Avoid custom colors or icons that dilute recognition or violate brand rules.
Let Apple Pay do the heavy lifting:
The goal is a single decisive tap, not a multi-screen funnel.
The fastest way to lose a sale is a confusing failure state. Plan for errors with:
Log error details silently for your team, but show users only what they need to understand what happened and what to do next.
Most Apple Pay problems stem from misconfiguration.
The first thing to confirm is that the merchant ID used in code exactly matches the one in the Apple Developer account and in your payment gateway settings. A single character mismatch (or a sandbox merchant ID in production) will break the flow.
Next, verify entitlements and capabilities:
If Apple Pay buttons do not appear or the sheet never presents, configuration is the prime suspect.
Apple Pay may be available in some countries, issuers, or devices but not others.
Use PKPaymentAuthorizationController.canMakePayments() and canMakePayments(usingNetworks:) before showing the Apple Pay button. If they return false, hide the button and present a clear explanation plus an alternative payment method.
When users report that cards are “not supported,” check:
Merchant validation failures usually show up as the Apple Pay sheet dismissing quickly or never appearing.
For native apps, they are often caused by:
On the server or validation endpoint, log:
These logs usually point straight to the misconfigured element.
Not every failure is technical; many are issuer declines.
Always inspect the gateway or processor response. Distinguish between:
Map these categories to user-friendly messages such as:
Avoid exposing raw gateway error codes or unnecessary technical detail.
To keep Apple Pay stable in production, invest in structured logging around every payment attempt:
Set up dashboards and alerts for spikes in declines, merchant validation errors, or timeouts. Correlate client-side events with server logs to quickly trace where failures occur.
This level of observability dramatically shortens debugging time when issues surface in live traffic.
Once Apple Pay is live in your mobile app, you need to prove it actually improves checkout, not just looks modern. That means tracking the right events, watching key metrics, and running structured experiments.
Start with a clear funnel and log events at each step:
Correlate these events with context:
This lets you see where users drop off and whether issues are UX‑related (cancellations), technical (authorization failures), or backend (capture failures).
A focused metric set makes it easier to judge impact:
Track these over time and across app versions to see whether Apple Pay integration and UX changes are moving the needle.
Run experiments to optimize Apple Pay’s impact:
Measure differences in adoption, success rate, time to pay, and conversion. Even small layout changes can yield meaningful gains.
Integrate analytics carefully so you respect Apple Pay’s privacy guarantees and broader regulations:
Major analytics platforms (e.g., Mixpanel, Amplitude, Firebase) can handle these Apple Pay events as long as you keep payloads free of sensitive payment details.
Insights from Apple Pay extend beyond that one button:
Over time, these measurements help you refine not just Apple Pay in mobile apps, but the entire checkout experience, making each step faster, clearer, and more trustworthy for users.
Supporting Apple Pay rarely stops at a single iOS app. Users expect to pay the same way across devices and channels, and your implementation choices should reflect that.
Native apps use PKPaymentAuthorizationController and pass payment tokens directly to your backend. This gives you:
Apple Pay on the web (Safari) uses JavaScript and the Payment Request API. It’s ideal when you:
For many teams, the sweet spot is: native Apple Pay in the app, Apple Pay on the web in Safari, with a shared backend payment pipeline.
If you also support Google Pay, PayPal, or similar wallets, align the high-level flow:
That way, switching devices or payment methods doesn’t feel like learning a new system.
For React Native, Flutter, and similar frameworks, you’ll typically rely on:
Test on iPhone, iPad, and Apple Watch where relevant:
Aim for a single design system and checkout logic that spans iOS, web, and other platforms, with thin integration layers for each channel rather than one-off implementations.
Keeping Apple Pay healthy is less about big rewrites and more about disciplined maintenance.
Apple Pay relies on merchant IDs and payment processing certificates that expire.
Create an ownership map: who holds the Apple Developer account, where certificates live, and how they’re used in CI/CD and on servers.
Then:
Each major iOS release should trigger a test cycle for Apple Pay flows on beta and final builds. Focus on:
Monitor:
Plan a design review at least yearly to align wording, button placement, and accessibility with the latest guidance.
Card networks, currencies, and supported regions change over time. Keep them configurable:
Coordinate with your payment gateway when they add networks or local methods, and update your PKPaymentRequest accordingly.
For gateway changes, app restructures, or token format updates:
Document these flows so new team members can maintain them without reverse-engineering.
Expect deeper tokenization with networks, richer receipts and order updates in Wallet, and tighter links between in-app, web, and in-store Apple Pay. Features like Tap to Pay on iPhone and regional financing options will keep expanding, so design your integration to be configuration-driven and ready to adopt new capabilities without redoing the core flow.
Apple Pay is Apple’s digital wallet that lets users pay with cards stored on their iPhone, iPad, Apple Watch, or Mac.
In mobile apps, it replaces manual card entry with a secure system sheet where users confirm payment via Face ID, Touch ID, or passcode. The app receives an encrypted payment token instead of raw card data, which it sends to your backend and payment gateway to complete the charge.
This makes checkout faster, reduces errors, and keeps card numbers out of your app’s infrastructure.
You should add Apple Pay when:
Apple Pay works best as an additional option alongside cards, PayPal, etc. Don’t remove other payment methods; instead, offer Apple Pay as the fastest path for eligible users.
At a minimum you need:
On iOS you:
The device creates an encrypted payment token that contains:
This token is encrypted for your payment processor, so your app and backend treat it as an opaque blob. Your backend forwards it to the gateway, which decrypts it, sends an authorization request to the card network and issuer, then returns success or failure.
You never see the actual PAN or cryptographic keys; you only see transaction metadata and status.
Your backend should:
Do try to decrypt tokens yourself or store them long‑term. Let your PCI‑compliant gateway handle all sensitive card processing.
Common failure points include:
Start by checking configuration in the Apple Developer portal, Xcode entitlements, and your gateway settings, then inspect your server logs for merchant validation and gateway error codes.
To test Apple Pay safely:
Use the Simulator for quick UI checks, but always validate on to test Wallet setup, biometrics, and real network conditions.
For better conversion:
PKPaymentButton with correct branding and clear nearby copy (e.g., “Pay instantly with Apple Pay”).Track Apple Pay as its own funnel. Useful signals include:
Use A/B tests for button placement and messaging, and compare Apple Pay users’ completion and cancellation rates against other payment methods to see whether it actually improves checkout performance.
You also must operate in regions and banks where Apple Pay is supported and ensure your merchant category and products comply with Apple’s rules.
PKPaymentRequest with merchant identifier, country, currency, supported networks, and summary items.PKPaymentButton where users decide to pay.PKPaymentAuthorizationController with your request.didAuthorizePayment, send payment.token to your backend for processing..success or .failure and dismiss the sheet.Most of the heavy lifting (biometrics, token creation) is handled by the system UI.
These patterns minimize friction and make Apple Pay feel like a fast, trustworthy shortcut.