

Best LLM for Each Build Task: A Practical Model Map
Best LLM for each build task: compare UI copy, React components, SQL, refactors, and bug fixes by strengths, latency, and cost.
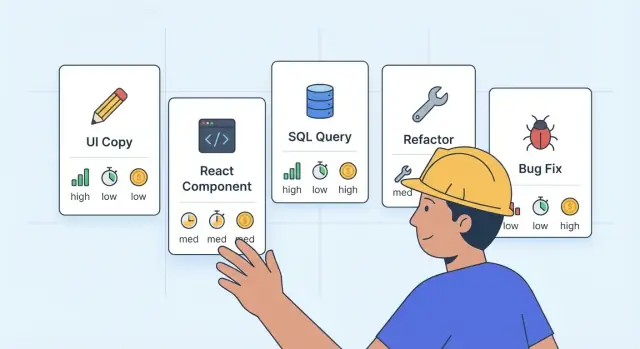
Why using one LLM for everything causes problems
Using one model for every task sounds simple. In practice, it often makes builds slower, more expensive, and harder to trust. The same model that shines at deep reasoning can feel painfully slow for quick UI copy. And the model that’s fast and cheap might quietly introduce risky mistakes when writing SQL or changing core logic.
Teams usually notice the problem through a few repeating symptoms:
- Responses take too long for small tasks, so people start multitasking and lose focus.
- Bills creep up because “simple” requests are handled by an expensive model.
- Code quality swings between great and questionable, even when prompts look similar.
- Developers over-review everything because they don’t know when the model is likely to be wrong.
The goal is not to chase the fanciest model. The goal is to pick the best LLM for each build task based on what you need right now: speed, accuracy, consistency, or careful reasoning.
A quick example: imagine you’re building a small React dashboard. You ask the same top-tier model to (1) write button labels, (2) generate a React component, (3) craft a SQL migration, and (4) fix a tricky bug. You’ll pay premium prices for the labels, wait longer than needed for the component, and still need extra checks on the SQL and bug fix.
Platforms like Koder.ai make this easier because you can treat model choice like any other tool choice: match the tool to the job. No single model wins on quality, latency, and cost at the same time, and that’s normal. The win is having a simple “default per task” so most work moves faster with fewer surprises.
The three tradeoffs: quality, latency, and cost
Most builders want one model that is fast, cheap, and always right. In practice you get to pick two, and even that depends on the task. If you’re aiming for the best LLM for each build task, it helps to name the tradeoffs in plain terms.
Quality means you get a correct and usable result with fewer retries. For code, that is correct logic, valid syntax, and fewer hidden side effects. For writing, it is clear wording that matches your product and avoids awkward claims. High quality also means the model follows your constraints, like “only change this file” or “do not touch the database schema.”
Latency is the time to first useful output, not the total time to finish a perfect answer. A model that replies in 3 seconds with something you can edit may beat a slower model that takes 25 seconds to produce a longer response you still need to rewrite.
Cost is not just the price per request. The hidden cost is what you pay when the first answer is wrong or vague.
- Extra retries and longer chats
- Debugging time and production fixes
- Re-running tests or rebuilding deployments
- Context you have to paste again
Picture a triangle: quality, latency, cost. Pushing one corner usually pulls the others. For example, if you pick the cheapest and fastest option to generate SQL, one subtle join mistake can burn more time than you saved.
A simple way to decide: for UI copy, tolerate a bit less quality and optimize for speed. For SQL, refactors, and bug fixes, pay for higher quality even if latency and cost rise. Platforms like Koder.ai make this easier because you can switch models per chat and match the model to the task instead of forcing one model to do everything.
What model strengths actually mean in day-to-day work
When people say a model is “good at X,” they usually mean it saves time on that kind of work with fewer retries. In practice, most strengths fall into a few buckets.
- Writing: clear, natural wording, good tone, fewer awkward phrases
- Coding: correct syntax, good patterns, fewer broken imports or missing edge cases
- Reasoning: can keep many constraints in mind and explain tradeoffs without guessing
- Tool use: follows a format, calls functions cleanly, and sticks to strict instructions
Context length matters more than many builders expect. If your prompt is short and focused (one component, one query, one bug), fast models often do fine. If you need the model to use lots of existing code, requirements, or earlier decisions, long context helps because it reduces “forgotten” details. The catch is that long context can increase cost and latency, so use it only when it actually prevents mistakes.
Reliability is a hidden strength. Some models follow instructions (format, style, constraints) more consistently. That sounds boring, but it reduces rework: fewer “please redo this in TypeScript,” fewer missing files, fewer surprises in SQL.
A simple rule that works: pay for quality when mistakes are expensive. If an error could break production, leak data, or waste hours of debugging, choose the more careful model even if it’s slower.
For example, writing button microcopy can tolerate a few iterations. But changing a payment flow, a database migration, or an auth check is where you want the model that is cautious and consistent, even if it costs more per run. If you use a platform like Koder.ai that supports multiple model families, this is where switching models pays off fast.
A practical task map (what to use when)
If you want the best LLM for each build task, stop thinking in model names and start thinking in “tiers”: fast-cheap, balanced, and reasoning-first. You can mix tiers inside the same project, even within the same feature.
Here’s a simple map you can keep next to your backlog:
| Task type | Preferred strengths | Cost/latency target | Typical pick |
|---|---|---|---|
| UI copy, microcopy, labels | Speed, tone control, quick variants | Lowest cost, lowest latency | Fast-cheap |
| React components (new) | Correctness, clean structure, tests | Medium latency, medium cost | Balanced or reasoning-first for complex UI |
| SQL generation and migrations | Accuracy, safety, predictable output | Higher cost ok, latency ok | Reasoning-first |
| Refactors (multi-file) | Consistency, caution, follows rules | Medium to higher latency | Reasoning-first |
| Bug fixes | Root-cause reasoning, minimal changes | Higher cost ok | Reasoning-first (then fast-cheap to polish) |
A useful rule: run “cheap” when mistakes are easy to spot, and “strong” when mistakes are expensive.
Safe on faster models: copy edits, small UI tweaks, renaming, simple helper functions, and formatting. Risky on faster models: anything that touches data (SQL), auth, payments, or cross-file refactors.
A realistic flow: you ask for a new settings page. Use a balanced model to draft the React component. Switch to a reasoning-first model to review state handling and edge cases. Then use a fast model to tighten the UI text. In Koder.ai, teams often do this in one chat by assigning different steps to different models so you do not burn credits where you do not need to.
Quick mixing rules
- Draft fast, verify slow.
- Use reasoning-first for anything you cannot easily “eyeball test”.
- Keep one model for a whole refactor pass to avoid style drift.
- After fixes, ask a second model to review for missed side effects.
UI copy and product text: speed first, with quick QA
For UI copy, the goal is usually clarity, not brilliance. Fast, lower-cost models are a good default for microcopy like button labels, empty states, helper text, error messages, and short onboarding steps. You get quick iterations, which matters more than perfect phrasing.
Use a stronger model when the stakes are higher or the constraints are tight. That includes tone alignment across many screens, rewrites that must keep exact meaning, sensitive text (billing, privacy, security), or anything that could be read as a promise. If you are trying to pick the best LLM for each build task, this is one of the easiest places to save time and credits by starting fast, then upgrading only when needed.
Prompt tips that improve results more than switching models:
- Paste 3-5 examples of your brand voice (short is fine).
- List forbidden phrases and words your product never uses.
- Specify reading level and length limits (for example, under 60 characters).
- Provide the exact UI context (screen, user goal, what happens next).
Quick QA takes one minute and prevents weeks of small confusion. Before shipping, check:
- Ambiguity: could a user read it two ways?
- Claims: does it promise outcomes you cannot guarantee?
- Terminology: do you use the same words everywhere (for example, “snapshot” vs “backup”)?
- Tone: is it calm in errors and direct in buttons?
- Localization: will it still make sense when translated?
Example: in Koder.ai, a fast model can draft a “Deploy” button tooltip, then a stronger model can rewrite the pricing screen copy to stay consistent across Free, Pro, Business, and Enterprise without adding new promises.
React components: choose for correctness over creativity
For React components, the fastest model is often “good enough” only when the surface area is small. Think a button variant, a spacing fix, a simple form with two fields, or swapping a layout from flex to grid. If you can review the result in under a minute, speed wins.
As soon as state, side effects, or real user interaction shows up, pick a stronger coding model even if it costs more. The extra time is usually cheaper than debugging a flaky component later. This matters most for state management, complex interactions (drag and drop, debounced search, multi-step flows), and accessibility, where a confident but wrong answer wastes hours.
Before the model writes code, give it constraints. A short spec prevents “creative” components that do not match your app.
- Use TypeScript and your target React version
- Define the component API (props, events, default values)
- List UI states (loading, empty, error, disabled)
- Call out accessibility needs (keyboard, ARIA, focus order)
- Mention edge cases (long text, slow network, double clicks)
A practical example: building a “UserInviteModal”. A fast model can draft the modal layout and CSS. A stronger model should handle form validation, async invite requests, and preventing duplicate submits.
Require the output format so you get something you can ship, not just code blobs.
- Component code only (no placeholders you cannot compile)
- A brief explanation of tricky parts (state, effects, memoization)
- A small test plan (what to click and what should happen)
- Notes on accessibility checks (tab order, focus trap, labels)
If you use Koder.ai, ask it to generate the component, then take a snapshot before integrating. That way, if the “correctness” model introduces a subtle regression, rollback is one step instead of a cleanup project. This approach fits the best LLM for each build task mindset: pay for depth only where mistakes are expensive.
SQL tasks: prioritize accuracy and safety
SQL is where a small mistake can become a big problem. A query that “looks right” can still return the wrong rows, run slowly, or edit data you did not mean to touch. For SQL work, default to accuracy and safety first, then worry about speed.
Use a stronger model when the query has tricky joins, window functions, CTE chains, or anything performance-sensitive. The same goes for schema changes (migrations), where ordering and constraints matter. A cheaper, faster model is usually fine for simple SELECTs, basic filtering, and CRUD scaffolds where you can quickly eyeball the result.
Prompting that prevents wrong SQL
The fastest way to get correct SQL is to remove guesswork. Include the schema (tables, keys, types), the output shape you need (columns and meaning), and a couple of sample rows. If you are building in a PostgreSQL app (common on Koder.ai projects), say so, because syntax and functions differ across databases.
A small example prompt that works well:
“PostgreSQL. Tables: orders(id, user_id, total_cents, created_at), users(id, email). Return: email, total_spend_cents, last_order_at for users with at least 3 orders in the last 90 days. Sort by total_spend_cents desc. Include indexes if needed.”
Before you run anything, add quick safety checks:
- Ask for a SELECT preview before any UPDATE/DELETE.
- Require a WHERE clause for writes (or explicitly allow a full-table change).
- Request a transaction and rollback plan for migrations.
- Ask for edge cases (NULLs, duplicates, time zones).
- Have the model explain why the join keys are correct.
This approach saves more time and credits than chasing “fast” answers that you later have to undo.
Refactors: pick models that are careful and consistent
Refactors look easy because nothing “new” is being built. But they are risky because the goal is the opposite of a feature: change the code while keeping behavior exactly the same. A model that gets creative, rewrites too much, or “improves” logic can quietly break edge cases.
For refactors, favor models that follow constraints, keep their edits small, and explain why each change is safe. Latency is less important than trust. Paying a bit more for a careful model often saves hours of debugging later, which is why this category matters in any best LLM for each build task map.
How to prompt for safe refactors
Be explicit about what must not change. Don’t assume the model will infer it from context.
- List hard constraints: public APIs, props shape, routes, DB schema, outputs, and error messages
- State what “same behavior” means: same tests passing, same UI states, same query results
- Ask for a minimal diff: “no renames unless required” and “no formatting-only changes”
- Require a quick self-check: “call out any behavior change risk before coding”
Ask for a plan first (then code)
A short plan helps you spot danger early. Ask for: steps, risks, what files will change, and a rollback approach.
Example: you want to refactor a React form from mixed state logic into a single reducer. A careful model should propose a step-by-step migration, note risk around validation and disabled states, and suggest running existing tests (or adding 2-3 small ones) before the final sweep.
If you are doing this in Koder.ai, take a snapshot before the refactor and another after the tests pass, so rollback is one click if something feels off.
Bug fixes: reasoning beats speed
When you are fixing a bug, the fastest model is rarely the fastest path to done. Bug fixing is mostly reading: you need to understand existing code, connect it to the error, and change as little as possible.
A good workflow stays the same no matter the stack: reproduce the bug, isolate where it happens, propose the smallest safe fix, verify it, then add one small guard so it does not come back. For the "best LLM for each build task", this is where you pick models known for careful reasoning and strong code reading, even if they cost a bit more or respond slower.
To get a useful answer, feed the model the right inputs. A vague "it crashes" prompt usually leads to guesswork.
- Exact error text and stack trace (full, not paraphrased)
- Steps to reproduce (click-by-click or API calls)
- Expected vs actual behavior
- Relevant code files or functions (and config/env details)
- What you already tried (so it does not repeat you)
Ask the model to explain its diagnosis before it edits code. If it cannot clearly point to the failing line or condition, it is not ready to patch.
After it suggests a fix, request a short verification checklist. For example, if a React form submits twice after a refactor, the checklist should include both UI and API behavior.
- Confirm the bug is gone using the same repro steps
- Run the nearest unit or integration tests (or add one small test)
- Check related flows that share the same code path
- Review logs for new warnings or errors
- Try one edge case that used to be risky
If you use Koder.ai, take a snapshot before applying changes, then verify and roll back quickly if the fix causes a new issue.
Step-by-step: how to pick a model for a specific task
Start by naming the job in plain words. “Write onboarding copy” is different from “fix a flaky test” or “refactor a React form.” The label matters because it tells you how strict the output must be.
Next, pick your main goal for this run: do you need the fastest answer, the lowest cost, or the fewest retries? If you are shipping code, “fewer retries” often wins, because rework costs more than a slightly pricier model.
A simple way to choose the best LLM for each build task is to begin with the cheapest model that could succeed, then move up only when you see clear warning signs.
- Classify the task by risk: low risk (copy, labels), medium (new UI components), high (SQL changes, auth, payments), or “unknown” (bugs).
- Decide what you optimize today: speed, cost, or correctness with fewer back-and-forth prompts.
- Run the first attempt with a budget model, but escalate if you see: missing edge cases, shaky assumptions, inconsistent formatting, or repeated small mistakes.
- Keep one standard prompt per task type plus a short acceptance check (what must be true before you paste it into your app).
- Write down the winner: model used, prompt, and what failed before it worked.
For example, you might start a new “Profile Settings” React component with a cheaper model. If it forgets controlled inputs, breaks TypeScript types, or ignores your design system, switch to a stronger “code correctness” model for the next pass.
If you are using Koder.ai, treat model choice like a routing rule in your workflow: do the first draft fast, then use planning mode and a stricter acceptance check for the parts that can break prod. When you find a good route, save it so the next build starts closer to done.
Common mistakes that waste time and credits
The fastest way to burn budget is treating every request like it needs the most expensive model. For small UI tweaks, renaming a button, or writing a short error message, a premium model often adds cost without adding value. It feels “safe” because the output is polished, but you are paying for horsepower you do not need.
Another common trap is vague prompts. If you do not say what “done” means, the model has to guess. That guess turns into extra back-and-forth, more tokens, and more rewrites. The model is not “bad” here, you just did not give it a target.
Here are the mistakes that show up most in real build work:
- Paying top-tier prices for easy work like copy edits, simple React markup, or formatting JSON
- Asking for “fix this bug” without steps to reproduce, expected behavior, and the exact error message
- Skipping verification (no unit test run, no UI click-through, no SQL EXPLAIN or result spot-check)
- Letting the model refactor multiple files at once, which makes review slow and rollbacks risky
- Mixing goals in one prompt (new copy + new architecture + new code), then getting muddled output
A practical example: you ask for a “better checkout page” and paste a component. The model updates the UI, changes state management, edits copy, and adjusts API calls. Now you cannot tell what caused the new bug. A cheaper, faster path is to split it: first request copy variants, then request a small React change, then request a separate bug fix.
If you are using Koder.ai, use snapshots before large edits so you can roll back quickly, and keep planning mode for the bigger architectural decisions. That habit alone helps you follow the best LLM for each build task, instead of using one model for everything.
Quick checklist, plus a realistic example and next steps
If you want the best LLM for each build task, a simple routine beats guessing. Start by splitting the job into small parts, then match each part to the model behavior you need (fast drafting, careful coding, or deep reasoning).
Quick checklist before you hit “run”
Use this as a last-minute guardrail so you do not burn time and credits:
- Define the output: copy, UI, SQL, or a fix (one goal per prompt).
- Pick the model by risk: low-risk drafts can be fast; data and logic should be careful.
- Ask for “diff-style changes” and edge cases (empty state, errors, loading).
- Add one safety check for data work (params, constraints, reversible migrations).
- Re-run the same prompt on a stronger model if the result will ship today.
Realistic example: adding a Settings page
Say you need a new Settings page with: (1) updated UI copy, (2) a React page with form states, and (3) a new database field like marketing_opt_in.
Start with a fast, low-cost model to draft the microcopy and labels. Then switch to a stronger “correctness-first” model for the React component: routing, form validation, loading and error states, and disabled buttons while saving.
For the database change, use a careful model for the migration and query updates. Ask it to include a rollback plan, default values, and a safe backfill step if existing rows need it.
Acceptance checks to keep it safe: confirm keyboard focus and labels, test empty and error states, verify queries are parameterized, and run a small regression pass on any screens that read user settings.
Next steps: in Koder.ai, try OpenAI, Anthropic, and Gemini models per task instead of forcing one model for everything. Use Planning Mode for higher-risk changes, and lean on snapshots and rollback when you experiment.
FAQ
Should I use one LLM for every development task?
Use a fast, lower-cost model for work you can review in seconds, such as button labels, copy edits, formatting, and simple UI tweaks. Move to a stronger model when a mistake could affect data, security, payments, or several files.
How do I choose an LLM for a task?
Start with the risk of being wrong. Low-risk copy can favor speed and price, while SQL, authentication, migrations, and tricky bugs should favor careful reasoning and consistent instruction-following.
Which model type should I use for React components?
For small components with simple markup, a balanced or fast model often works well. Choose a stronger coding model when the component has async state, complex interactions, accessibility requirements, validation, or several UI states.
Are cheaper models good enough for UI copy?
Choose a fast model for labels, empty states, helper text, and short error messages. Give it the screen context, character limit, tone examples, and any phrases your product avoids, then review the result for clarity and accidental promises.
Why should SQL use a stronger model?
Use a reasoning-first model for migrations, complex joins, window functions, CTEs, and performance-sensitive queries. Include your schema, database type, expected output, sample data, and edge cases so the model does not invent details.
What checks should I make before running AI-generated SQL?
Ask for a SELECT preview before any UPDATE or DELETE, require an explicit WHERE clause for writes, and request a transaction plus rollback plan for migrations. Check NULLs, duplicate rows, time zones, and join conditions before you run the query.
How can I make AI-assisted refactors safer?
Keep the refactor scope narrow and state what must remain unchanged, such as public APIs, routes, output, schema, and error messages. Ask for a short plan and minimal diff first, then run the closest tests after each small change.
What should I include when asking an LLM to fix a bug?
Give the model the exact error, full stack trace, reproduction steps, expected and actual behavior, relevant code, and what you already tried. Ask it to explain the suspected cause before it changes code, then verify the fix with the original reproduction steps.
When should I switch to a more expensive model?
You can usually use a faster model for small drafts and obvious changes. Escalate when it misses constraints, repeats mistakes, makes unsupported assumptions, or produces code that you cannot quickly test by eye.
How could I use multiple models for one Settings page?
Try a balanced model for the first React draft, a careful model for state handling and edge cases, and a fast model for labels and polish. For the database field, use the careful model again and request a reversible migration with safe defaults.