Aug 21, 2025·8 min
Building a Web App for Centralized Access Request Reviews
Learn how to design and build a web app that centralizes access requests, routes approvals, records decisions, and supports audits with clear roles and controls.
Learn how to design and build a web app that centralizes access requests, routes approvals, records decisions, and supports audits with clear roles and controls.
Access requests tend to show up everywhere: a quick Slack message to “add me to the project,” an email thread with three managers CC’d, a ticket in one of several queues, and sometimes a spreadsheet someone updates “for now.” The result is predictable: requests get missed, approvals are inconsistent, and nobody can confidently answer who approved what (or why).
A centralized access review app fixes this by giving access requests a single, structured home.
Centralized review means every request flows into one inbox (or queue) with consistent rules for what information is required, who must approve, and how decisions are recorded.
Instead of asking reviewers to interpret free-form messages, the app guides requesters through a standard form, routes the request to the right approvers, and captures a traceable decision trail. Think: one system of record for access decisions, not a collection of screenshots and chat history.
This guide isn’t about building a full identity platform from scratch. It focuses on the practical core: designing an access request workflow, the data model behind resources and entitlements, and safety basics like approvals, traceability, and sensible controls. By the end, you should have a clear picture of what the app needs to do before you choose frameworks or start coding.
A centralized access review app lives or dies by clarity: who is involved, what they’re allowed to do, and what they’re explicitly prevented from doing. Start by defining a small set of roles, then map every screen and action to those roles.
Requester (employee/contractor): Submits the request, provides business justification, and tracks status. They should be able to view their own requests, add comments, and cancel a pending request—but not see internal reviewer notes meant for approvers.
Manager: Confirms the request aligns with the person’s job and that the timing makes sense. Managers typically can approve/reject, comment, request changes, and view direct reports’ requests.
Resource owner (system/app/data owner): Validates whether the requested entitlement is appropriate for the resource and can approve/reject based on risk, licensing, and operational constraints.
IT admin / fulfillment team: Implements approved access (or triggers automation). They should be able to view approved requests, perform fulfillment steps, attach evidence (screenshots/log extracts), and mark fulfillment complete—without changing approvals.
Security/Compliance reviewer (optional step): Reviews higher-risk access (e.g., admin roles, sensitive datasets). They can approve/reject, add required controls (MFA, ticket references), or require time-bound access.
Auditor: Read-only access to search, filter, and export evidence. No ability to comment in-line on live requests.
Define permissions at the action level: view, approve/reject, delegate, comment, and export. Keep it strict: reviewers should only see requests they’re assigned to, plus any policy-driven visibility (e.g., managers see their team).
Prevent self-approval and circular approval chains. Common rules:
Plan for out-of-office from day one. Support time-bound delegations (start/end dates), with an audit record of who delegated to whom. Show delegations clearly in the approval UI and allow emergency reassignment by an admin—with a reason required.
A centralized access review app works best when it treats requests as structured objects, not free-form messages. Standardized inputs make routing predictable, reduce back-and-forth, and improve your audit trail.
Most teams can cover the majority of needs with four request types:
Each type should map cleanly to your RBAC model (role, group, permission set) so fulfillment is unambiguous.
At minimum, capture:
For higher-risk resources, require extra fields to support consistent access governance:
Define a clear lifecycle so reviewers, fulfillers, and requesters always know what’s next:
Draft → Submitted → In Review → Approved/Denied → Fulfillment In Progress → Fulfilled → Expired/Revoked
Keeping “Fulfilled” separate is critical: an approval isn’t complete until access is actually provisioned (manually or via SSO/provisioning integration). “Expired” (or “Revoked”) helps enforce least privilege for time-bound grants.
A good workflow does two things at once: it moves routine requests quickly, and it slows down only when risk or ambiguity is high. The key is making “who approves what” explicit, predictable, and easy to audit.
Start with a default approval chain that matches how decisions are typically made. A common pattern is:
Keep the path visible in the request view so reviewers know what happens next and requesters know what to expect.
Hard-coding approval routes leads to constant exceptions and admin work. Instead, define routing rules based on:
Rules should be understandable by non-engineers. Use a “when/then” style editor (or a simple table) and include a safe fallback route when no rule matches.
Approvals stall unless you design for human behavior. Define SLAs per step (e.g., manager: 2 business days; owner: 3 days) and implement:
You’ll need exceptions, but they must be structured:
Treat exceptions as first-class workflow states, not side conversations in chat. That’s how you preserve speed without losing accountability.
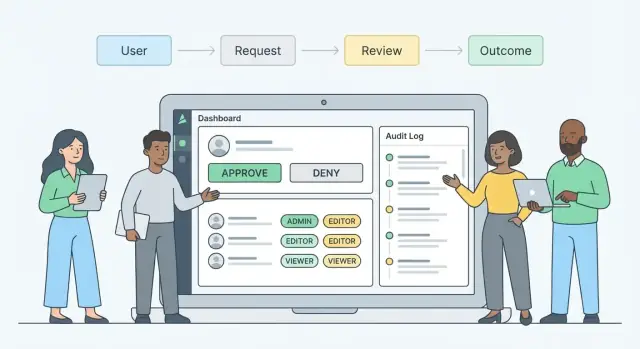
A centralized review app succeeds or fails on how quickly reviewers can make a confident decision. The UI should minimize hunting for context, reduce back-and-forth, and make “the safe choice” obvious.
Request form should feel like a guided checkout: pick the resource, select the access level, add a clear business justification, choose duration (if applicable), and attach supporting links or files. Use progressive disclosure—only show advanced fields when needed (e.g., emergency access or temporary access).
Reviewer inbox is the daily workspace. Keep it scannable: requester, resource, entitlement, due date/SLA, and a simple risk badge. Useful filters include: “High risk,” “Due soon,” “My team,” and “Waiting for info.”
Request detail is where decisions happen. Put decision controls at the top, and the evidence directly underneath.
Admin settings should let admins manage forms, routing rules, templates, and UI labels without redeploying.
Reviewers should see:
Present this in a consistent “Context” panel so reviewers learn where to look.
Support common real-world outcomes:
Use clear labels (avoid internal acronyms), large click targets, and keyboard navigation for inbox triage and decision buttons. Provide strong focus states, high-contrast status badges, and mobile-safe layouts for quick approvals. Keep confirmations explicit (“You are approving Admin access to X”) and prevent accidental double-submits with visible loading states.
A clean data model is what keeps an access review app understandable as it scales. If reviewers can’t tell what’s being requested, why, and what happened next, the UI and audit trail will both suffer.
Start by separating the thing being protected from the specific access you can grant:
This lets you model common patterns like “one app, many roles” or “one database, many schemas” without forcing everything into a single “role” concept.
At minimum, you want these core relationships:
Keep approvals as first-class records, not fields on the request. That makes routing, re-approvals, and evidence collection much easier.
Store access timing at the request-item level:
This structure supports least privilege and prevents “temporary” access from becoming permanent by accident.
Plan retention by record type: requests and approvals often need long-term retention; transient notifications usually don’t. Add export-friendly identifiers (request number, resource key, entitlement key) so auditors can filter and reconcile data without custom queries.
Your app can’t review access requests reliably if it doesn’t know who people are, where they sit in the org, and what they already have. Identity and directory integrations become the source of truth for that context—and they prevent approvals from being based on stale spreadsheets.
Start by deciding which system owns which facts:
Many teams use a hybrid model: HR for employment status and department, directory for manager relationships and group memberships.
At minimum, sync:
Design syncs as incremental (delta) pulls when possible, and store “last verified” timestamps so reviewers can see how fresh the data is.
Your workflow should react to changes automatically: new hires may need baseline access packages; transfers can trigger re-review of existing entitlements; terminations and contractor expiry should queue immediate revocation tasks and block new requests.
Document what happens when data is messy: stale manager info (route to department approver), missing users (allow manual identity linking), duplicate identities (merge rules and safe blocking), and directory outages (graceful degradation plus retry queues). Clear failure paths keep approvals credible and auditable.
Approvals are only half the job. Your app also needs a clear path from “Approved” to “Access is actually granted,” plus a reliable way to remove access later.
Most teams use one (or a mix) of these models:
The best choice depends on your systems and risk tolerance. For high-impact access, ticket-based fulfillment with a second set of eyes can be a feature, not a limitation.
Design your workflow so Approved ≠ Granted. Track fulfillment as its own state machine, for example:
This separation prevents false confidence and gives stakeholders an honest view of what’s pending.
After fulfillment, add a verification step: confirm the access was applied in the target system. Store lightweight evidence such as a reference ID (ticket number), timestamp, and “verified by” user or automation run. This turns access governance into something you can prove, not just claim.
Treat removal as a first-class feature:
When revocation is easy and visible, least privilege stops being a slogan and becomes daily practice.
A centralized access review app is only as credible as its evidence. Approvals and denials need to be explainable months later—without relying on someone’s memory or a screenshot in an email thread.
Treat every meaningful action as an event and write it to an append-only audit log. At minimum, record who acted, what they did, when they did it, from where they did it, and why.
That typically includes:
Auditors often ask, “What information did the reviewer have when they approved this?” Store the decision context alongside the event:
Keep attachments versioned and linked to the specific request step so they don’t get separated later.
Make the audit log append-only in storage (for example, write-once tables, immutable object storage, or a separate logging service). Limit admin abilities to adding corrective events rather than editing history.
If configuration changes affect reviews (routing rules, approver groups, escalation timers), log those as well with clear before/after values. That change history often matters as much as the access decision.
Provide audit-friendly screens and exports with practical filters: by user, resource, entitlement, date range, request status, and approver. Exports should be consistent and complete (CSV/PDF), include time zone handling, and preserve identifiers so records can be matched to directory or ticketing systems.
The goal is simple: every approval should tell a complete story, quickly, with evidence you can trust.
A centralized access review app quickly becomes a high-value target: it contains who has access to what, why they requested it, and who approved it. Security and privacy can’t be “added later”—they shape how you design roles, screens, and data storage.
Start by locking down visibility, not just actions. Many requests include sensitive context (customer names, incident IDs, HR notes).
Define clear application roles (e.g., requester, reviewer, resource owner, auditor, admin) and scope what each role can see:
Treat admin access as exceptional: require MFA, limit it to a small group, and log every privileged action.
Encrypt in transit (TLS everywhere) and at rest (database and backups). Store secrets (DB passwords, signing keys, webhook tokens) in a secrets manager, not environment files committed to repos.
Be deliberate about what you store:
Add baseline controls early:
Set retention periods for requests, comments, and attachments based on policy (e.g., 1–7 years for audit evidence, shorter for personal notes). Keep an access-controlled audit log with immutable events (who/what/when), and restrict log access to auditors and security staff only. When in doubt, store less—and document why you keep what you keep.
Notifications are the nervous system of an access request workflow. When they’re clear and timely, requests move quickly and reviewers stay confident. When they’re noisy or vague, people ignore them—and approvals stall.
At minimum, cover three moments:
Keep the message content consistent across channels so people don’t have to hunt for details.
Use a tiered approach:
Avoid spam by batching non-urgent updates (e.g., a daily digest) and reserving real-time pings for approvals and escalations.
Reminders should be predictable and fair: send the first reminder after a defined SLA window, then escalate only if there’s no action. Apply working hours and local time zones so a reviewer in Sydney doesn’t get “overdue” alerts at 2 a.m. Let teams configure quiet hours and holiday calendars.
Create notification templates that always include:
Well-designed notifications reduce back-and-forth, speed up the approval process, and improve audit readiness without overwhelming people.
A centralized access review app only earns trust when it behaves predictably under real pressure: urgent requests, complex routing, and strict separation of duties. Before you invite the whole company, define what “done” means so everyone is testing toward the same finish line.
Start with the core flows you must support on day one: create request → route to the right reviewer(s) → approve/deny → fulfill/revoke → record evidence.
Then list the admin settings you consider non-negotiable (routing rules, approver groups, delegation, escalation timing, expiry defaults) and the reporting views you need (open backlog, aging requests, cycle time by team, and basic export for audit).
Focus testing on scenarios that can silently produce the wrong outcome:
Add a small set of “evil tests” (duplicate clicks, partial failures, retries) to ensure you don’t create double approvals or contradictory states.
Launch with a pilot group that represents reality: one business team, one IT/provisioning team, and at least one high-risk resource owner. Keep a short feedback loop (weekly review of pain points) and publish simple guidance on where requests should go during the transition.
If you’re migrating from email or ticketing, plan a cutoff rule: new requests must be created in the app after date X; older items can be imported as read-only references or closed with a documented decision.
Track a few metrics consistently: median cycle time, number of pending requests, approval/denial rates, and common denial reasons. Denial reasons are especially valuable—they point to missing prerequisites, unclear resource descriptions, or overly broad request types.
Use these signals to refine routing, tighten least privilege defaults, and improve forms and notifications without changing the underlying policy every week.
Once the workflow, roles, and data model are clear, the main risk becomes execution drift: inconsistent screens, missing audit events, or “temporary” shortcuts that turn into permanent gaps.
If you want to accelerate delivery while keeping the architecture disciplined, a vibe-coding workflow can help. With Koder.ai, teams can build the core of an access review app from a structured spec (roles, request states, routing rules, and audit events) through a chat-driven interface—then iterate safely with Planning Mode, snapshots and rollback, and source code export when you’re ready to bring it into your standard SDLC. Koder.ai’s default stack (React for web, Go + PostgreSQL for backend) maps well to the typical needs here: inbox-style UIs, strongly-typed approval workflows, and append-only audit logging.
Whether you use Koder.ai or a traditional build, the sequencing stays the same: lock down the roles and SoD rules, make approvals and fulfillment separate, and treat auditability as a product feature—not an afterthought.
A centralized access review app is a single system where all access requests are submitted, routed for approval, and recorded.
It replaces ad-hoc Slack/email/tickets with a structured workflow so you can answer: who requested what, who approved/denied, when, and why.
Because access requests scattered across chat, email, and multiple ticket queues lead to missed requests, inconsistent approvals, and weak evidence.
Centralization improves:
Common roles include:
At minimum, capture:
Most teams can cover nearly all cases with:
Keeping types limited makes routing and fulfillment predictable and auditable.
A clear lifecycle avoids confusion about what happens next. A practical model is:
Key idea: Approved ≠ Granted. Track fulfillment separately so stakeholders know whether access has actually been provisioned.
Use rule-based routing so approval chains adapt to context (resource, risk, requester attributes) without constant manual exceptions.
A common baseline is:
Always include a safe fallback route when no rule matches.
Plan SLAs and escalation mechanisms so requests don’t stall:
Make escalations auditable (who was escalated, when, and why).
Enforce SoD to prevent self-approval and risky circular chains. Common guardrails:
Also support time-bound delegations with start/end dates and clear audit records.
A strong audit trail should be append-only and capture both decisions and context:
Provide exportable views (CSV/PDF) with stable identifiers so auditors can reconcile records.
For higher-risk access, add fields like ticket links, training confirmation, and data sensitivity indicators.