

How to Build a Website That Validates a SaaS Before Coding
Learn how to build a validation website that tests demand, messaging, and pricing before coding a SaaS—using waitlists, smoke tests, and analytics.
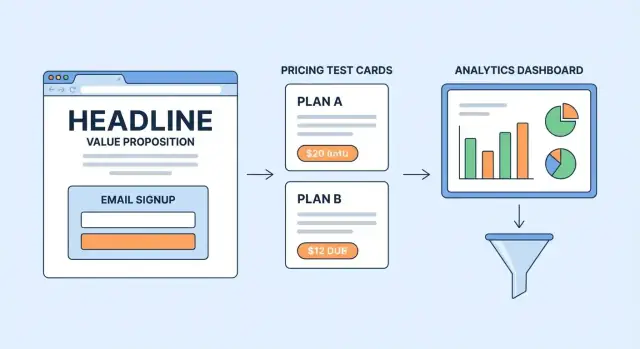
What a Pre-SaaS Validation Website Should Prove
“Pre-SaaS validation” means using a simple website to collect evidence that your idea is worth building—before you invest months in product development. Instead of shipping features, you’re testing whether a specific group of people cares enough to take a meaningful action.
The goal: decisions, not vanity metrics
A validation site should help you make clear go/no-go decisions in four areas:
- Market: Is the problem common and painful enough to justify a product?
- Audience: Are you attracting the right type of person or company, not just curious visitors?
- Positioning: Does your promise make sense quickly, and does it feel differentiated?
- Pricing: Do people accept the value level implied by your price point or plan structure?
Good validation data is tied to behavior: email signups, demo requests, “notify me” clicks, survey completions, or replies to a follow-up message. Page views and time-on-site can add context, but they rarely answer the hard questions.
What it should not promise
Validation reduces risk—it doesn’t guarantee a successful SaaS. A landing page can’t prove retention, long-term willingness to pay, or whether your product will beat competitors once they respond. What it can do is prevent you from building something nobody wants.
Building software vs. building evidence
When you build software, you’re creating functionality. When you build evidence, you’re testing assumptions.
A pre-SaaS validation website is a structured experiment: one clear problem, one specific audience, one crisp value proposition, and one call-to-action. Weak results aren’t failure—they’re a fast, inexpensive signal to revise the idea, narrow the audience, adjust messaging, or rethink pricing before writing real code.
Start With a Clear Hypothesis and Target User
A validation website only works when it’s built around a specific bet. If you try to “appeal to everyone,” you won’t know who the page worked for—or why.
Pick one persona and one painful job-to-be-done
Choose a single primary persona you can describe in one sentence (role + context). Example: “Operations managers at 50–200 person logistics companies who coordinate deliveries with spreadsheets.”
Then define one job-to-be-done that is clearly painful and frequent. Not “be more productive,” but “reduce late deliveries caused by last-minute route changes.” This keeps your copy focused and your results interpretable.
Write a crisp hypothesis: who, what, why now
Your hypothesis should read like a testable claim:
- Who: the persona
- What: the outcome they want (and your proposed approach)
- Why now: the trigger that makes it urgent (new regulation, rising costs, team growth, tool migration)
Example: “Ops managers at mid-size logistics firms will join a waitlist for a tool that automates route-change alerts because customer penalties for late deliveries have increased.”
Identify 3–5 assumptions you must test
List the riskiest assumptions behind your idea, such as:
- Urgency: Is this a top-3 problem or just annoying?
- Willingness to pay: Would they pay enough to sustain the business?
- Channel: Can you reach them with a predictable acquisition channel?
- Current alternatives: Are they already satisfied with spreadsheets or an incumbent tool?
- Buying constraints: Do they need approvals, a security review, or integrations?
Define pass/fail signals before you publish
Decide what outcomes would make you proceed or stop. For example: “At least 20 qualified signups in two weeks from one channel, and 30% of them agree to a 15-minute call.” Pre-defining this prevents you from “interpreting” weak signals as success.
Design the Page as a Test, Not a Brochure
A pre-SaaS validation page isn’t there to “look complete.” It’s there to answer a specific question: Will the right people take the next step when they see this offer? That means every element should support a clear experiment—not a feature tour.
A simple one-page structure that tests intent
Keep the page tight and predictable, so visitors don’t get lost and your results aren’t muddy.
- Promise (above the fold): one sentence that names the outcome and the audience. Example: “Close your monthly books in 2 hours—without chasing receipts—built for small agencies.”
- Proof: lightweight credibility signals that reduce doubt (what you’ve done, what you’ve learned, why you’re qualified), plus specifics that show you understand the job.
- Path to action: one primary button that asks for a commitment appropriate to your stage.
If you add extra sections, make them answer objections (time, risk, switching, privacy) rather than expanding into a “full product page.”
Pick one primary CTA—and make everything point to it
Choose a single main call-to-action so your data stays clean:
- Waitlist if you’re validating demand and use cases.
- Demo request if you can manually deliver part of the value or want higher-intent conversations.
- Pre-order if you’re ready to test willingness to pay.
Use secondary links sparingly (e.g., “See how it works”) and keep them from competing with the main CTA.
Avoid feature dumps; sell outcomes through concrete use cases
Feature lists often attract “nice idea” interest, not real commitment. Instead, describe the outcome with a specific scenario your user recognizes:
“Automatically categorize expenses” becomes: “Upload a card statement and get a client-ready expense report—tagged by project—before your next invoicing run.”
Use plain language your user already uses
Write the way your target customer talks in emails, tickets, or job posts. Replace internal jargon with observable results, time saved, mistakes avoided, and moments of relief. The goal is not to sound impressive—it’s to be instantly understood and easy to say yes to.
Craft Messaging That Can Be Measured
If your validation website is a test, your messaging is the measurement tool. The goal isn’t to sound impressive—it’s to make visitors self-select quickly so you can compare conversion rates across different promises.
Use a headline formula you can A/B test
A practical structure is:
Outcome + audience + time/effort saver
Examples:
- “Book 3 more qualified sales calls per week for boutique agencies—without daily follow-ups.”
- “Close your month-end books in 2 days for ecommerce brands—without messy spreadsheets.”
This format is measurable because it sets a clear expectation. If the promise resonates, you’ll see higher click-through to your call-to-action (CTA) and more signups.
Add a subheadline that names the problem and your approach
Your subheadline should clarify two things:
-
What pain you’re addressing (in the user’s words)
-
How you solve it (at a high level, not features)
Example:
“Stop losing leads to slow replies. We route inbound requests to the right teammate and send follow-up messages automatically until the prospect books.”
Avoid vague claims like “all-in-one” or “best solution.” They’re hard to test and don’t help a visitor decide.
Write 2–3 benefits that can be verified
Benefit bullets work best when they’re specific enough to be checked later. Even if you’re not delivering yet, you’re testing what outcomes people want.
- “Cut onboarding time from days to hours with guided checklists.”
- “Reduce no-shows with automatic reminders and rescheduling links.”
- “See weekly progress in a single dashboard (no manual reports).”
If you don’t have real numbers, use directional wording (“reduce,” “save time,” “fewer”) and test which version converts.
Reduce confusion with a simple “How it works” (3 steps)
A short, consistent flow removes friction and makes your offer feel real:
- Connect your existing tool or submit your details
- We analyze/prepare the result (what happens behind the scenes)
- You get the outcome (what the user receives and when)
When you change messaging, keep the rest of the page stable so your conversion tracking reflects the copy—not a redesign.
Pick the Right Call-to-Action for Your Stage
Your call-to-action (CTA) is the measurement device on a validation site. If it asks for too little, you’ll collect vague interest. If it asks for too much, you’ll filter out people who would have been great customers. The right CTA depends on what you’re trying to learn right now.
Choose one validation offer (and make it explicit)
Pick a single “offer” that matches your stage, then build the page around it:
- Waitlist: Best when you’re validating the problem and audience. You’re measuring qualified interest at scale.
- Concierge pilot (done-with-you / manual service): Best when you’re validating the solution approach. You’re measuring willingness to invest time and share context.
- Paid pre-order: Best when you’re testing willingness to pay. You’re measuring real demand, not compliments.
Mixing these (“join the waitlist or book a call or pre-pay”) dilutes the signal and makes conversion rates harder to interpret.
Balance friction: match effort to confidence
A simple rule: the more confident you are in the audience and problem, the more friction you can add to improve lead quality.
- Email only: Lowest friction. Good for early idea validation.
- Short form (3–6 fields): Adds context (role, company size, current tool) without feeling like homework.
- Calendar booking: Highest friction. Great for concierge pilots, but only if your messaging is already resonating.
If you use a form, include one question that helps you segment later (e.g., “What are you trying to accomplish?”). That makes follow-up interviews far more useful.
Use incentives carefully—and keep promises tight
Incentives can help, but they should be specific and safe.
Offer early access or a limited-time discount without implying guaranteed features or dates. Set expectations clearly: what signups will receive (updates, an invitation to a pilot, a short interview request), and a realistic timeline range (e.g., “aiming to start pilots in 4–6 weeks”).
That clarity increases trust and reduces “junk signups” that inflate your numbers but don’t convert later.
Validate Pricing With Ethical Smoke Tests
Pricing isn’t something to “figure out later.” It’s part of the promise you’re making—and it strongly affects who signs up. A pre-SaaS validation site can test willingness to pay without collecting money or misleading anyone.
Put real price anchors on the page
Create 2–3 plan anchors (for example: Starter / Pro / Team) even if the details aren’t final. The point is to learn which range and packaging feels acceptable.
Keep each plan simple: a short description, one main benefit, and a clear monthly price. Avoid fake discounts or “limited time” pressure.
Run an ethical smoke test CTA
Use a high-intent CTA like “Start trial”—but don’t pretend the product exists.
When someone clicks, send them to a page that says the truth:
- “Join the waitlist” (or “Request early access”)
- A short explanation: you’re validating demand, the product is in development, and you’ll follow up with next steps
- An option to share what they expected to do inside the trial
This preserves the signal (they tried to buy) while staying transparent.
Test billing model assumptions
Don’t just test the number—test the structure. Try variants across different traffic runs:
- Per seat (good for teams)
- Per usage (good for metered value)
- Flat monthly (simple and predictable)
Measure plan interest and drop-off
Track engagement on the pricing section and the click-through rate per plan. Also track where people abandon:
- Pricing view → plan click → “Start trial” click → waitlist submit
If Pro gets most clicks but few waitlist submissions, your price or positioning may be too high—or the value isn’t clear yet.
Build Trust Without Making Unverifiable Claims
When you don’t have a product yet, trust is the currency you’re asking visitors to spend. The fastest way to lose it is to promise outcomes you can’t prove (“cut churn by 40%”) or imply customers you don’t have. Your validation site should feel honest, specific, and low-risk.
Use “proof substitutes” that are actually verifiable
You can build credibility without logos or case studies by showing why you’re a believable person (or team) to solve this problem.
Briefly share:
- Your founder story: the moment you hit the problem and why it matters to you.
- Relevant experience: past roles, domain expertise, or work that clearly connects.
- Your process: how you’ll build with customers (e.g., “We’re interviewing 20 ops leads before writing code”).
Keep it concrete. “10 years in finance ops” is stronger than “passionate about productivity.”
Be careful with social proof
Only include testimonials if they’re real and attributable. If you don’t have them yet, replace “testimonials” with previews of what people will get.
For instance:
- A sample weekly report description (without pretending it exists in-app)
- A mock “before/after workflow” showing how the process would change
- A short “What your first 14 days will look like” timeline
Label these clearly as examples or previews.
Add risk reducers that match your stage
Visitors hesitate because they fear spam, wasted time, or being trapped.
Add simple, truthful assurances:
- A clear privacy note near the form: what you collect, why, and that you won’t sell data.
- “Cancel anytime” or “No credit card required” language only if it’s true.
- If you’re taking deposits, state refund terms in plain English.
Use FAQs to handle objections upfront
A short FAQ section can do more for trust than another paragraph of hype. Address common concerns like:
- Integrations (what you plan to support first)
- Time to value (what the first win looks like and roughly when)
- Support (who responds, and expected response time during beta)
The goal isn’t to look big—it’s to look dependable.
Instrument Analytics to Capture Real Signals
If your validation site can’t tell you who is interested and what they did, you’re guessing. Analytics for pre-SaaS validation should focus on behaviors that map to intent—not vanity numbers like total visits.
Track the events that show intent
Start simple and make sure every important step is measurable. At a minimum, track:
- Page view (baseline traffic volume and bounce patterns)
- CTA click (interest in the next step)
- Form submit (commitment)
- Pricing view (price curiosity and buying mindset)
If you have multiple CTAs (e.g., “Join waitlist” vs “Request demo”), track them separately so you can see which promise is pulling.
Define conversion metrics you’ll actually use
Raw counts don’t help you decide. Use a small set of ratios that describe where interest drops:
- Visitor → CTA click (message clarity and relevance)
- Click → signup (friction and trust)
- Signup quality (are these the right people?)
For signup quality, capture one lightweight qualifier in the form (e.g., role, company size, or “What are you trying to solve?”). Then review responses weekly.
Use UTM tags to compare channels and messages
Add UTM parameters to every campaign link so you can compare outcomes across sources and angles (e.g., different ad copy or communities). A simple naming convention (utm_source, utm_campaign, utm_content) is enough—as long as you’re consistent.
Review results in a simple weekly dashboard
You don’t need a complex BI tool. A spreadsheet or basic dashboard should show weekly traffic by UTM, event counts, and the key conversion rates above. The goal is to spot meaningful shifts and decide what to test next—without drowning in data.
Drive Targeted Traffic for Controlled Experiments
Traffic is only useful for validation if it resembles your future customers. A thousand random visitors can create misleading conversion rates; fifty right-fit visitors can tell you what to build.
Choose 1–3 channels that match your persona
Pick channels where your target user already hangs out and where intent is visible:
- Communities (Slack/Discord groups, subreddits, niche forums) for conversational feedback and fast iteration.
- Search (SEO posts or small search ads) when people actively describe the problem.
- Paid social ads when you can target job titles, industries, or interests tightly.
Limit yourself to a few channels so you can isolate variables and compare results cleanly.
Create multiple messages (and keep the test controlled)
Write 2–4 variants of your ad or post, each anchored to a different value proposition. Keep everything else constant: same landing page, same CTA, same audience targeting (when possible). This makes the “why” behind performance easier to interpret.
Examples of message angles you can test:
- Time saved vs. money saved
- Compliance/risk reduction vs. speed
- “For X role” positioning vs. “For Y use case” positioning
Use small budgets to learn, not scale
Start with a budget you’re comfortable spending on insight. Your goal is directionally correct signals (which problem framing attracts qualified clicks), not a perfect CAC model.
Track quality, not just clicks: scroll depth, CTA completion, and follow-up actions like replying to a confirmation email.
Document winners by source + message
Create a simple table or doc that records:
- Traffic source and targeting
- Message variant
- Visitors → CTA conversion rate
- Notes on lead quality (e.g., job titles, company size, interview show-up rate)
The best combo is the one that produces the strongest intent, not the cheapest click.
Turn Signups Into Customer Discovery
A signup isn’t the end of validation—it’s permission to learn. Your goal is to turn “interested” into “specific”: who they are, what they’re trying to do, what they’ve already tried, and what would make them switch.
Add a tiny amount of friction (the helpful kind)
On your signup form, include one short question that turns anonymous demand into actionable context. Keep it multiple-choice or a short text field so completion doesn’t drop.
Examples that work well:
- Role: founder, ops, sales, finance, agency, etc.
- Main challenge: pick one (or “other”)
- Current workaround: spreadsheet, competitor, internal tool, “nothing yet”
This single question makes your follow-up dramatically better—because you can ask about their reality instead of pitching your idea.
Invite interviews without pressuring everyone
Add an optional checkbox like: “I’m open to a 15-minute call to share how I do this today.” The checkbox is a strong signal of motivation, and it keeps your outreach focused on qualified leads.
If you’re early, prioritize interviews with people who:
- Match your intended persona
- Report an expensive workaround
- Are willing to talk (checkbox checked)
Automate the first reply, then personalize
Send an automated email immediately after signup that asks one or two clarifying questions. Keep it reply-friendly (no long survey).
For example:
- “What tool do you use today to handle this?”
- “What’s the moment when this becomes a problem (weekly close, onboarding, reporting, etc.)?”
Then follow up manually with a short, specific invite: “If you have 15 minutes, I’d love to understand how you currently do X.”
Segment so insights don’t average out
Don’t lump every signup into one bucket. Segment by persona (role), problem, and workaround, and review conversion and replies per segment. Often, your best segment is smaller—but far more consistent.
If you want a simple next step, create 3–5 persona tags in your spreadsheet/CRM and keep interview notes grouped by tag. This makes patterns obvious and helps you avoid building for “everyone.”
Iterate Methodically: Tests, Timelines, and Decision Rules
Validation pages can feel “alive” forever—new ideas, new copy, new tweaks. The fastest way to learn is to treat iteration like a lab: controlled changes, clear timelines, and pre-set rules for what counts as a win.
Run A/B tests that isolate one variable
Change one thing at a time so you know what caused the result. If you change the headline and the CTA, you’ll get noise instead of insight.
Good single-variable tests include:
- Headline: problem-led (“Stop losing hours to…”) vs. outcome-led (“Get reports in 5 minutes”)
- CTA: “Join waitlist” vs. “Get early access”
- Pricing display: showing a starting price vs. “Request pricing”
Keep the rest of the page identical, and don’t “peek and tweak” mid-test.
Time-box tests and set a minimum sample size
Decide in advance how long the test runs and how many visitors you need before calling it.
A practical rule for early validation:
- Run each variant until you have at least 200–500 visitors per version (more if traffic is cheap and consistent)
- Time-box to 7–14 days so you capture weekday/weekend behavior
If you can’t reach minimum traffic, that’s a signal too: your channel may not be viable yet, or targeting is off.
Keep a simple change log
Track: what changed, why you changed it, dates, traffic source, and results (conversion rate, email quality, interview acceptance). This prevents circular testing and helps you explain decisions to teammates or investors.
Know when to stop testing
Stop iterating the page and move to a pilot build when you see consistent signals, such as:
- Stable conversion on your best version across multiple traffic bursts
- Repeated interviewees describing the same painful problem
- People asking “When can I use it?” and accepting a concrete next step (demo, paid pilot, deposit)
At that point, more button-color tests won’t beat building the smallest real workflow.
From Validation Website to First SaaS Build
Your validation website did its job if it reduced uncertainty: you now know who wants this, what they expect, and how strongly they want it (measured by signups, replies, and willingness to pay). The build phase should be a direct continuation of those signals—not a fresh brainstorming session.
Choose the right “next step” build
Pick the lightest path that can deliver the promised outcome:
- Concierge MVP: If people want the result more than the tool, deliver it manually (with spreadsheets, email, or no-code). This is ideal when you need to learn workflows and edge cases quickly.
- Prototype: If prospects struggle to understand the concept, create a clickable demo or scripted walkthrough to validate usability and expectations before engineering.
- Narrow feature MVP: If demand is clear and repeated, build only the smallest product that fulfills the core promise on your landing page.
Decide what to build first (based on demand signals)
Use your strongest demand segment as your scope filter. Build the first version around:
- The single job-to-be-done most often mentioned in replies/interviews
- The top 1–2 objections that blocked signups or payment
- The one workflow that connects your value prop to a clear “done” moment
If pricing tests showed sensitivity, keep the MVP flexible (tiers can come later). If higher-intent users clicked through to pricing, make your initial offering match what they expected to see on /pricing.
A simple onboarding flow for early adopters
Early onboarding should confirm value fast and create a feedback loop:
- Welcome + expectation setting (what happens next, timeframe)
- One question intake (role, use case, or data source)
- First success step (import, connect, or create the first project)
- Personal follow-up (email or calendar link) to capture learnings while the experience is fresh
Speed up the “build” step without losing control
Once your validation signals are strong, the bottleneck often becomes execution: turning a proven workflow into a real app quickly, while keeping iteration tight.
A vibe-coding platform like Koder.ai can help here because you can go from a spec (or even your landing-page promise + interview notes) to a working web or mobile app through chat—then iterate fast using features like planning mode, snapshots and rollback, and source code export. That’s especially useful when you’re still translating discovery into product scope and want to ship a narrow MVP (commonly React on the front end, a Go backend with PostgreSQL, and Flutter for mobile) without rebuilding your entire process.
Keep validation momentum
Document your decision rule (“We build X because Y users requested it and Z% attempted to pay”) and set a 2–4 week checkpoint. For a practical checklist of what to do next, see /blog/your-next-step.
FAQ
What is a pre-SaaS validation website?
A pre-SaaS validation website is a simple landing page designed to test whether a specific audience will take a meaningful action (e.g., waitlist signup, demo request, pre-order) before you build the product.
It’s less about “looking legit” and more about collecting evidence to make a go/no-go decision.
Which metrics matter most for validating a SaaS idea?
Prioritize behaviors that indicate intent:
- CTA clicks (e.g., “Join waitlist,” “Request demo”)
- Form submissions
- Pricing section views and plan clicks
- Replies to your confirmation/follow-up email
Use page views and time-on-site only as supporting context, not as the decision metric.
Why should I focus on one persona instead of targeting everyone?
Because you can’t interpret results if you don’t know who the page worked for.
Pick one persona and one painful job-to-be-done so your messaging is specific, your traffic targeting is cleaner, and your conversion rate actually means something.
What should my validation hypothesis include?
A useful hypothesis is testable and includes:
- Who: the persona
- What: the outcome they want (and your approach)
- Why now: an urgency trigger (costs, regulation, growth, tool change)
This makes your landing page a controlled experiment rather than a generic pitch.
How do I set pass/fail criteria for a validation landing page?
Pre-define pass/fail criteria before you publish, such as:
- A minimum number of qualified signups in a set timeframe
- A target conversion rate (visitor → CTA click, click → signup)
- A target share of signups willing to do a 15-minute interview
Without decision rules, it’s easy to rationalize weak signals as success.
What’s the ideal structure for a pre-SaaS validation page?
Use one clear page with:
- Promise above the fold (outcome + audience)
- Proof (credible, verifiable context)
- One primary CTA (waitlist, demo, or pre-order)
Add extra sections only to address objections (switching risk, privacy, time-to-value), not to expand into a full feature tour.
How do I choose the right call-to-action (CTA) for my stage?
Choose the CTA that matches what you need to learn:
- Waitlist: validate problem + audience at scale
- Demo request / concierge pilot: validate solution approach and workflows
- Paid pre-order: test willingness to pay
Avoid offering multiple primary CTAs at once, or you’ll dilute the signal and muddle conversion data.
How can I validate pricing without misleading people?
Run an ethical smoke test:
- Show real plan anchors (2–3 tiers with prices)
- Use a high-intent CTA (e.g., “Start trial”)
- On click, be transparent that it’s in development and route to “Request early access” or “Join waitlist”
- Ask what they expected to do in the trial
This tests intent without pretending the product exists.
How do I build trust if I don’t have customers or a product yet?
Use verifiable “proof substitutes,” such as:
- A brief founder story tied to the problem
- Relevant experience (specific, not hype)
- Clear process (“We’re interviewing X users before building”)
- Plain-language privacy note near the form
Avoid fake testimonials, invented logos, or outcome claims you can’t support yet.
How do I turn waitlist signups into actionable customer discovery?
Treat signups as the start of customer discovery:
- Add one qualifier question (role, company size, current workaround)
- Include an optional interview checkbox (“Open to a 15-minute call”)
- Send an immediate reply-friendly email with 1–2 clarifying questions
- Segment responses so insights don’t average out across different personas
The goal is to learn workflows, switching barriers, and what “must be true” for them to buy.