May 03, 2025·8 min
Create a Web App for a Centralized Risk Register: Practical Guide
Learn how to plan, design, and build a web app that centralizes your risk register: data fields, scoring, workflows, permissions, reporting, and rollout steps.
Learn how to plan, design, and build a web app that centralizes your risk register: data fields, scoring, workflows, permissions, reporting, and rollout steps.
A risk register usually starts life as a spreadsheet—and that works right up until multiple teams need to update it.
Spreadsheets struggle with the basics of shared operational ownership:
A centralized app solves these issues by making updates visible, traceable, and consistent—without turning every change into a coordination meeting.
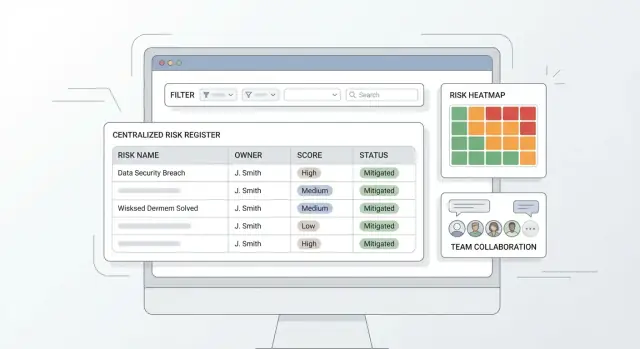
A good risk register web app should deliver:
“Centralized” doesn’t have to mean “controlled by one person.” It means:
This unlocks roll‑up reporting and apples‑to‑apples prioritization.
A centralized risk register focuses on capturing, scoring, tracking, and reporting risks end‑to‑end.
A full GRC suite adds broader capabilities like policy management, compliance mapping, vendor risk programs, evidence collection, and continuous controls monitoring. Defining this boundary early keeps your first release focused on the workflows people will actually use.
Before you design screens or database tables, define who will use the risk register web app and what “good” looks like operationally. Most risk register projects fail not because the software can’t store risks, but because nobody agrees who is allowed to change what—or who is accountable when something is overdue.
Start with a handful of clear roles that match real behavior:
If you add too many roles early, you’ll spend your MVP debating edge cases.
Define permissions at the action level. A practical baseline:
Also decide who can change sensitive fields (e.g., risk score, category, due date). For many teams, those are reviewer-only to prevent “score deflation.”
Write governance as simple, testable rules your UI can support:
Document ownership separately for each object:
This clarity prevents “everyone owns it” situations and makes reporting meaningful later.
A risk register app succeeds or fails on its data model. If the fields are too sparse, reporting is weak. If they’re too complex, people stop using it. Start with a “minimum usable” risk record, then add context and relationships that make the register actionable.
At a minimum, every risk should store:
These fields support triage, accountability, and a clear “what’s happening” view.
Add a small set of context fields that match how your organization talks about work:
Make most of these optional so teams can start logging risks without getting blocked.
Model these as separate objects linked to a risk, rather than stuffing everything into one long form:
This structure enables clean history, better reuse, and clearer reporting.
Include lightweight metadata to support stewardship:
If you want a template to validate these fields with stakeholders, add a short “data dictionary” page in your internal docs (or link it from /blog/risk-register-field-guide).
A risk register becomes useful when people can quickly answer two questions: “What should we deal with first?” and “Is our treatment working?” That’s the job of risk scoring.
For most teams, a straightforward formula is enough:
Risk score = Likelihood × Impact
This is easy to explain, easy to audit, and easy to visualize in a heat map.
Pick a scale that matches your organization’s maturity—commonly 1–3 (simpler) or 1–5 (more nuance). The key is to define what each level means without jargon.
Example (1–5):
Do the same for Impact, using examples people recognize (e.g., “minor customer inconvenience” vs “regulatory breach”). If you operate across teams, allow impact guidance per category (financial, legal, operational) while still producing one overall number.
Support two scores:
In the app, make the connection visible: when a mitigation is marked implemented (or its effectiveness is updated), prompt users to review the residual likelihood/impact. This keeps scoring tied to reality rather than a one-time estimate.
Not every risk fits the formula. Your scoring design should handle:
Prioritization can then combine the score with simple rules like “High residual score” or “Overdue review,” so the most urgent items rise to the top.
A centralized risk register app is only as useful as the workflow it enforces. The goal is to make the “right next step” obvious, while still allowing exceptions when reality is messy.
Start with a small set of statuses that everyone can remember:
Keep status definitions visible in the UI (tooltips or a side panel), so non-technical teams don’t guess.
Add lightweight “gates” so approvals mean something. Examples:
These checks prevent empty records without turning the app into a form-filling contest.
Treat mitigation work as first-class data:
A risk should show “what’s being done about it” at a glance, not buried in comments.
Risks change. Build in periodic reviews (e.g., quarterly) and log every reassessment:
This creates continuity: stakeholders can see how the risk score evolved and why decisions were made.
A risk register web app succeeds or fails on how quickly someone can add a risk, find it later, and understand what to do next. For non-technical teams, aim for “obvious” navigation, minimal clicks, and screens that read like a checklist—not a database.
Start with a small set of predictable destinations that cover the day-to-day workflow:
Keep navigation consistent (left sidebar or top tabs), and make the primary action visible everywhere (e.g., “New risk”).
Data entry should feel like filling out a short form, not writing a report.
Use sensible defaults (e.g., status = Draft for new items; likelihood/impact prefilled to a midpoint) and templates for common categories (vendor risk, project risk, compliance risk). Templates can prefill fields like category, typical controls, and suggested action types.
Also help users avoid repetitive typing:
Teams will trust the tool when they can reliably answer “show me everything that matters to me.” Build one filter pattern and reuse it on the risk list, action tracker, and dashboard drill-downs.
Prioritize filters people actually ask for: category, owner, score, status, and due dates. Add a simple keyword search that checks title, description, and tags. Make it easy to clear filters and save common views (e.g., “My risks,” “Overdue actions”).
The risk detail page should read top-to-bottom without hunting:
Use clear section headers, concise field labels, and highlight what’s urgent (e.g., overdue actions). This keeps centralized risk management understandable even for first-time users.
A risk register often contains sensitive details (financial exposure, vendor issues, employee concerns). Clear permissions and a reliable audit trail protect people, improve trust, and make reviews easier.
Start with a simple model, then expand only if needed. Common access scopes:
Combine scope with roles (Viewer, Contributor, Approver, Admin). Keep “who can approve/close a risk” separate from “who can edit fields” so accountability is consistent.
Every meaningful change should be recorded automatically:
This supports internal reviews and reduces back-and-forth during audits. Make the audit history readable in the UI and exportable for governance teams.
Treat security as product features, not infrastructure details:
Define how long closed risks and evidence are kept, who can delete records, and what “delete” means. Many teams prefer soft delete (archived + recoverable) and time-based retention, with exceptions for legal holds.
If you later add exports or integrations, ensure confidential risks stay protected by the same rules.
A risk register only stays current when the right people can discuss changes quickly—and when the app nudges them at the right moments. Collaboration features should be lightweight, structured, and tied to the risk record so decisions don’t disappear into email threads.
Start with a comment thread on each risk. Keep it simple, but make it useful:
If you already plan an audit trail elsewhere, don’t duplicate it here—comments are for collaboration, not compliance logging.
Notifications should trigger on events that affect priorities and accountability:
Deliver notifications where people actually work: in-app inbox plus email and, optionally, Slack/Teams via integrations later.
Many risks need periodic review even when nothing is “on fire.” Support recurring reminders (monthly/quarterly) at the risk category level (e.g., Vendor, InfoSec, Operational) so teams can align with governance cadences.
Over-notification kills adoption. Let users choose:
Good defaults matter: notify the risk owner and action owner by default; everyone else opts in.
Dashboards are where a risk register web app proves its value: they turn a long list of risks into a short set of decisions. Aim for a few “always useful” tiles, then let people drill into the underlying records.
Start with four views that answer common questions:
A heat map is a grid of Likelihood × Impact. Each risk lands in a cell based on its current ratings (e.g., 1–5). To calculate what you display:
row = impact, column = likelihood.score = likelihood * impact.If you support residual risk, let users toggle Inherent vs Residual to prevent mixing pre- and post-control exposure.
Executives often need a snapshot, while auditors need evidence. Provide one-click exports to CSV/XLSX/PDF that include filters applied, generated date/time, and key fields (score, owner, controls, actions, last updated).
Add “saved views” with pre-set filters and columns, such as Executive Summary, Risk Owners, and Audit Detail. Make them shareable via relative links (e.g., /risks?view=executive) so teams can return to the same agreed picture.
Most risk registers don’t start empty—they start as “a few spreadsheets,” plus bits of information scattered across business tools. Treat import and integrations as a first-class feature, because it determines whether your app becomes the single source of truth or just another place people forget to update.
You’ll typically import or reference data from:
A good import wizard has three stages:
Keep a preview step that displays how the first 10–20 records will look after import. It prevents surprises and builds confidence.
Aim for three integration modes:
If you’re documenting this for admins, link to a concise setup page like /docs/integrations.
Use multiple layers:
You have three practical ways to build a risk register web app, and the “right” one depends on how quickly you need value and how much change you expect.
This is a good short-term bridge if you mainly need a single place to log risks and produce basic exports. It’s inexpensive and fast, but it tends to break down when you need granular permissions, audit trail, and reliable workflows.
Low-code is ideal when you want an MVP in weeks and your team already has platform licenses. You can model risks, create simple approvals, and build dashboards quickly. The trade-off is long-term flexibility: complex scoring logic, custom heat maps, and deep integrations can become awkward or expensive.
Custom builds take longer up front, but they fit your governance model and can grow into a full GRC application. This is usually the best path when you need strict permissions, a detailed audit trail, or multiple business units with different workflows.
Keep it boring and clear:
A common, maintainable choice is React (frontend) + a well-structured API layer + PostgreSQL (database). It’s popular, easy to hire for, and strong for data-heavy apps like a risk register database design. If your organization is already standardized on Microsoft, .NET + SQL Server can be equally practical.
If you want to get to a working prototype faster—without committing to a heavy low-code platform—teams often use Koder.ai as a “vibe-coding” path to an MVP. You can describe the risk workflow, roles, fields, and scoring in chat, iterate on screens quickly, and still export source code when you’re ready to take full ownership. Under the hood, Koder.ai aligns well with this kind of app: React on the frontend and a Go + PostgreSQL backend, with deployment/hosting, custom domains, and snapshots/rollback for safer iteration.
Plan for dev / staging / prod from day one. Staging should mirror production so you can test permissions and workflow automation safely. Set up automated deployments, daily backups (with restore tests), and lightweight monitoring (uptime + error alerts). If you need a checklist for release readiness, reference /blog/mvp-testing-rollout.
Shipping a centralized risk register app is less about building every feature and more about proving the workflow works for real people. A tight MVP, a realistic test plan, and a staged rollout will get you out of spreadsheet chaos without creating new headaches.
Start with the smallest set of features that lets a team log risks, assess them consistently, move them through a simple lifecycle, and see a basic overview.
MVP essentials:
Keep requests like advanced analytics, custom workflow builders, or deep integrations for later—after you’ve validated that the fundamentals match how teams actually work.
Your tests should focus on correctness and trust: people need to believe the register is accurate and access is controlled.
Cover these areas:
Pilot with one team (ideally motivated but not “power users”). Keep the pilot short (2–4 weeks) and track:
Use the feedback to refine templates (categories, required fields) and adjust scales (e.g., what “Impact = 4” means) before wider rollout.
Plan lightweight enablement that respects busy teams:
If you already have a standard spreadsheet format, publish it as the official import template and link it from an internal page like /help/importing-risks.
A spreadsheet works until multiple teams need to edit simultaneously. A centralized app fixes common failure points:
It means one system of record with shared rules, not “one person controls everything.” In practice:
This enables consistent prioritization and reliable roll-up reporting.
Start with a few roles that match real behavior:
Use action-based permissions and separate “edit” from “approve.” A practical baseline:
Also restrict sensitive fields (score, category, due dates) to reviewers if you want to prevent score deflation.
Keep the “minimum usable” record small:
Then add optional context fields for reporting (business unit, project, system, vendor) so teams can start logging risks without getting blocked.
A simple approach works for most teams:
Handle exceptions with options like “Not scored” (with rationale) or “TBD” (with a reassess-by date) so edge cases don’t break the system.
Model related items as linked objects so a risk turns into trackable work:
This avoids one giant form, supports reuse, and makes reporting on “what’s being done” much clearer.
Use a small set of statuses with lightweight gates at transitions. Example gates:
Also support periodic reassessment and reopening with a required reason so history stays coherent.
Capture field-level changes automatically and make key changes explainable:
Pair that with clear access scopes (org, business unit, project, confidential) and basics like SSO/MFA options, encryption, and sensible retention (often soft delete).
Make import and reporting easy so the app becomes the single source of truth:
For rollout, pilot one team for 2–4 weeks, refine templates/scales, then freeze spreadsheet edits, import baseline data, verify owners, and switch over.
Keep roles minimal in an MVP; add nuance later if a real governance need appears.