Mar 31, 2025·8 min
Create a B2B Lead Qualification Funnel Website That Converts
Learn how to plan, design, and optimize a B2B website that captures, qualifies, and routes leads using clear CTAs, smart forms, scoring, and analytics.
Learn how to plan, design, and optimize a B2B website that captures, qualifies, and routes leads using clear CTAs, smart forms, scoring, and analytics.
Before you change your pages, forms, or messaging, get specific about what the website funnel is supposed to produce. A lead qualification funnel site isn’t just “more leads”—it’s the right leads moving to the next step with minimal back-and-forth.
Choose the action that best matches your sales motion and buying cycle:
If you try to push all four equally on every page, you’ll get muddled data and inconsistent lead quality. It’s fine to offer secondary options, but define one “north star” conversion.
Pick a small set of metrics tied to revenue outcomes:
These become your baseline for future improvements and help marketing and sales agree on what “good” looks like.
Create a shared definition that includes:
Write it down in one place (even a simple internal doc) so your site, forms, and routing logic can support it consistently.
Most B2B deals involve multiple roles. Clarify who you need to satisfy:
Once these are defined, you can tailor CTAs, proof points, and form questions to the people most likely to move the deal forward.
A lead qualification funnel works best when you decide, in plain language, who the website is for—and who it’s not for. This makes your messaging clearer, your forms shorter, and your sales team happier.
Keep your ICP to one paragraph your whole team can repeat. Include:
Example: “Mid-market logistics and manufacturing companies in North America (200–2,000 employees) using Microsoft 365 and a modern CRM.”
Your site should reflect the jobs buyers are trying to get done—not your product modules. List the most common:
When you can name the use case, you can build pages and forms that filter by intent.
Common blockers include unclear pricing expectations, uncertainty about implementation effort, security concerns, “not sure it fits our stack,” or fear of spammy follow-up. Address these early with short answers near the CTA.
Create two lists for qualification:
This prevents disqualifying good leads while still protecting sales time.
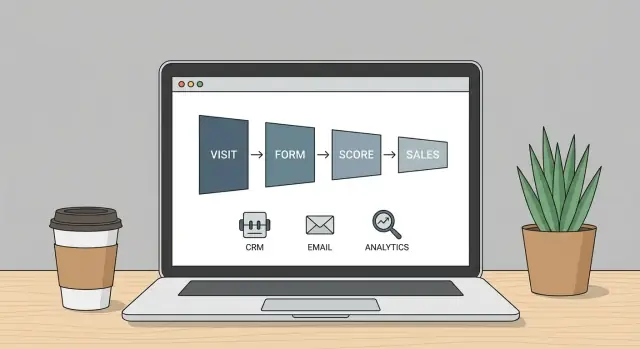
A B2B qualification funnel website isn’t “a set of pages”—it’s a sequence of decisions you’re guiding visitors through. Before you write copy or design layouts, map the path from first visit to a clean sales handoff.
Write your funnel as a simple chain:
Visitor → relevant content → clear CTA → form/booking → qualification → sales pipeline handoff.
For each stage, decide two things: what the visitor needs (clarity, proof, specifics) and what you need (signal of fit, contactability, intent).
Most B2B sites use a few page types to cover the funnel:
The goal is coverage: every high-traffic page should have a logical next step—either a conversion CTA or a softer fallback.
Your funnel continues after the click.
On the thank-you page, don’t stop at “we’ll be in touch.” Provide a clear next action: confirm what happens next, set expectations (response time), and offer optional acceleration (e.g., book a time).
Then align follow-up:
Not everyone is ready to talk to sales. Build intentional “soft conversions” so you don’t lose them:
These should live where indecision happens (pricing, long-form resources, bottom of solutions pages) and keep the relationship moving toward qualification without forcing it.
Your website copy shouldn’t just persuade—it should help the right buyers self-identify and move forward, while gently steering mismatched leads away from booking time with sales.
Draft a single sentence that connects your ICP’s problem to a clear outcome. Keep it concrete and tied to a pain you know they already feel.
Example pattern:
“We help [ICP] reduce [pain] by [mechanism], so they can [outcome] in [timeframe].”
This forces specificity and prevents generic claims that attract everyone (and qualify no one).
Most visitors skim. Give them a predictable structure that answers questions in the order they have them:
When this hierarchy is consistent across key pages, people qualify themselves faster because they don’t have to work to understand what you do.
Top-of-funnel pages should focus on problem clarity and early trust. High-intent pages (pricing, product, integration, comparison) should be direct about fit.
For high-intent pages, include “fit statements” such as:
Replace vague benefits with measurable impact:
Specificity builds trust—and it also filters out prospects who won’t value what you’re selling.
A high-converting qualification funnel site isn’t “more pages.” It’s the right pages, arranged so visitors can quickly self-identify, build confidence, and take the next step without hunting.
Build only what you need to answer three questions: What do you do? Who is it for? What should I do next? A common lean structure looks like:
If a page doesn’t help someone qualify in or out, it’s a candidate for removal or consolidation.
Make the primary action predictable and consistent. Use the same CTA wording across the site (for example, “Book a demo”). Place it:
Also consider a softer secondary CTA (like “See pricing” or “View case studies”) for visitors who aren’t ready.
Visitors should be able to click once and feel “this is for me.” Add obvious entry points by:
Use navigation labels that match how buyers talk—not internal team terms.
Every page should guide to a next step: a relevant CTA, a related page, or a comparison route (“Not sure? See /pricing” or “Explore /case-studies”). If someone hits the bottom and stops, the funnel breaks.
A simple rule: each page should have one primary conversion goal and one logical next click.
Landing pages shouldn’t just “collect leads”—they should help the right people raise their hand, and help the wrong people self-select out. The goal is clarity: who this offer is for, what outcome it delivers, and what happens next.
Start by listing how people will arrive. You’ll usually need separate landing pages for:
These pages can share a template, but the headline and proof should mirror the promise that got the click.
A common conversion killer is giving visitors three different CTAs (demo, download, “talk to sales”) and hoping they pick the “right” one. Make each landing page commit to a single primary offer—like a demo, a fixed-scope assessment, or a downloadable checklist.
Support the offer with a simple structure:
Visitors decide whether to click the CTA before they scroll. Add trust elements close to the first CTA: recognizable customer logos, one short testimonial, and 2–3 proof points (e.g., “Cut onboarding time by 30%,” “SOC 2 Type II,” “Works with Salesforce”). Keep them scannable.
You don’t need a full pricing table, but you do need a fit filter. Add a “Starting at…” range, minimum engagement, or “Best for…” packaging so bargain-hunters don’t flood your calendar—without scaring off qualified buyers who just need a ballpark.
If you already have it, link to /pricing as a secondary path under the CTA (not competing with it).
Your forms and booking flow are where “interest” turns into a qualified conversation—or friction. The goal isn’t to ask everything up front; it’s to collect just enough to route the lead correctly and offer the next step that matches their intent.
Not every visitor is ready to talk to sales. Use two core form types:
A simple rule: if the CTA promises a conversation, earn that conversation with better qualification.
For sales-ready flows, fields that typically pull their weight:
If a field doesn’t change what happens next (routing, prioritization, or the page you show), delete it.
Multi-step forms often outperform long single pages because they feel faster. Start with low-effort fields (email, company) and move to qualification (use case, size). Keep steps short, show progress, and allow “Back” without losing inputs.
Use real-time validation for common issues (typos, missing “@”, unsupported formats). Error messages should tell users exactly how to fix the issue (e.g., “Please use a work email so we can route you to the right team”).
Show calendar booking when:
Otherwise, confirm the request with “We’ll reach out,” set expectations (“within 1 business day”), and route to the right follow-up path (e.g., /thank-you/demo-request).
Lead scoring is the “traffic cop” of your funnel: it helps your website decide who should be routed to sales now, who should be nurtured, and who is a poor fit. The key is to keep the logic simple enough that both marketing and sales can explain it in one minute.
Use two categories of signals so you don’t overvalue either form fills or browsing behavior.
A practical rule: explicit signals determine fit, implicit signals determine intent.
Create a points model with three outcomes and clear thresholds:
Example scoring:
Don’t treat MQLs as “failed SQLs.” Route them into a helpful path:
Document scoring rules in a short one-pager and review them with sales monthly. If someone asks, “Why did this lead go to sales?” you should be able to answer with 2–3 concrete signals, not a black box.
Trust signals are the “silent sales reps” on your site. They reduce the perceived risk of raising a hand, sharing contact details, or booking time with your team—especially when the buyer doesn’t know you yet.
Start with proof that matches your buyer’s decision criteria, not just what looks impressive.
Customer logos work best when they’re recognizable to your target audience (or clearly in the same industry). Pair them with a short line that frames relevance, such as “Used by 200+ teams in logistics and manufacturing.”
Case studies should include context and outcomes. A metric without the baseline is easy to dismiss. Instead of “35% faster,” try “Cut onboarding time from 3 weeks to 2 weeks (35%) for a 50-person sales org.”
Most friction comes from uncertainty: implementation effort, data security, and whether the product will fit.
Create a clear security and privacy hub (e.g., /security) that explains:
If uptime and reliability matter, state your expectations and where you report it (or link to a status page). For implementation, outline the approach in plain language: typical timeline, what your team handles vs. what the customer provides, and what “day one value” looks like.
Include the compliance foundations your market expects (privacy, data processing, and basic governance). Don’t overpromise. A simple statement like “We support DPA requests and provide documentation on request” is more credible than vague claims.
Place proof closest to conversion moments:
When trust signals sit next to the action, they work like reassurance at the exact moment the buyer hesitates.
Your website can qualify leads all day, but if the data doesn’t land in the right place—and fast—you’ll still lose deals. This section is about connecting your forms and booking flows to your CRM so routing and follow-up happen automatically, consistently, and in a way sales actually trusts.
Before touching integrations, list the exact CRM fields required to route and prioritize leads correctly. Typical examples include company name, website, email, role, country/state, employee count, industry, product interest, and “reason for inquiry.”
Keep it practical: if a field won’t change what happens next (routing, messaging, qualification status), don’t collect it on the website.
Routing is where most funnels quietly break. Decide rules that reflect your sales org, such as:
Make these rules explicit in a simple one-pager so marketing, ops, and sales interpret them the same way.
Set up auto-responses that match the offer and the intent:
Use personalization sparingly (name, company, product interest). The goal is clarity and speed, not cleverness.
Not every lead needs a human immediately—high-intent ones do. Create alerts for signals like “Book a demo,” “Pricing page inquiry,” “Enterprise size,” or “High fit + urgent timeline.” Send instant notifications to the right owner (Slack/email/CRM task) with the key context included.
Write down the handoff process: what counts as a qualified lead, where it appears in the CRM, who owns first response, and the expected SLA. Include edge cases (unknown territory, missing size, duplicates). A documented handoff turns your funnel from “best effort” into a predictable system.
Many teams get stuck at this stage because “the funnel” spans too many moving parts—pages, forms, routing logic, and integrations—so it drags into a long web project.
If your goal is to ship a working qualification funnel fast (and iterate with real data), a vibe-coding approach can help. For example, Koder.ai lets teams create web apps through a chat interface, which can be a practical way to prototype or build funnel components (landing pages, multi-step forms, internal qualification dashboards) and then deploy, host, and export source code when you’re ready to formalize the stack.
Conversion optimization works best when it’s treated as a series of small, controlled improvements—not a single redesign. Pick one high-intent path (for example: a core landing page → form/booking → thank-you page) and make it measurably better before touching everything else.
Prioritize tests that can move results without changing your entire site:
Run one primary test at a time so you can tell what caused the change.
Landing pages are often where conversion wins (or losses) happen—especially on mobile.
On pages meant to capture or qualify leads, avoid competing actions. A “Demo,” “Contact,” “Pricing,” and “Download” cluster forces people to decide how to engage instead of whether to engage.
Use one primary CTA, and if needed, a secondary link that’s clearly lower priority (for example, “Not ready? View case studies”).
Personalization can help when it reduces confusion: industry-specific examples, role-based outcomes, or a tailored CTA. Keep it limited to places where it makes the choice easier, not more complex. If segmentation isn’t reliable, stick to plain, specific messaging that fits your ICP.
Launch is the start of the qualification funnel—not the finish. Once real prospects hit the site, you’ll learn which messages attract the right accounts, which pages create noise, and where qualified buyers drop off. The goal is to turn those observations into small, frequent improvements.
Set up analytics to capture the moments that reflect buying momentum, not just page views. At minimum, track:
Make sure each event is tied to a session, a source/medium, and (where possible) a company identifier so you can analyze quality—not only volume.
Traffic is not the KPI; qualified opportunities are. Push lead source data into your CRM and report on outcomes like:
This closes the loop between marketing activity and sales results, and it prevents you from scaling channels that simply create form fills.
Keep the dashboard easy to read and consistent week to week:
Traffic → conversions → qualified leads → pipeline
Include both counts and rates (conversion rate, SQL rate, opportunity rate). A small drop at the top can be less important than a big drop in qualified lead rate.
Schedule recurring reviews (biweekly or monthly) with sales to validate what “qualified” really looks like in practice. Use real call notes and outcomes to refine:
Treat changes as experiments: adjust one thing, measure the impact, and keep a changelog so you know what actually improved the funnel.
If you’re iterating quickly, consider keeping a lightweight “planning mode” for funnel changes (what you’ll test, what you expect to happen, and how you’ll measure it). Whether you implement that in your existing stack or in a build environment like Koder.ai, the key is the same: ship small changes, track outcomes, and continuously tighten the connection between fit, intent, and sales handoff.
Start by choosing one primary conversion that matches your sales motion: Book a demo, Request a quote, Start a trial, or Contact sales. Then align supporting pages, forms, and follow-up around that “north star” so lead quality and reporting stay consistent.
“Qualified” should combine fit and intent.
Document the definition in a shared internal doc so your site copy, forms, scoring, and routing all reflect the same standard.
Pick metrics tied to revenue outcomes, not just volume:
Use these as your baseline before you start changing pages so you can measure real improvement.
Write a one-paragraph ICP your whole team can repeat. Include:
A clear ICP improves messaging clarity and reduces unqualified submissions.
Map the funnel as a simple sequence: Visitor → relevant content → clear CTA → form/booking → qualification → sales handoff.
Then assign page types to stages (homepage, solutions/use cases, resources, pricing) and ensure each high-traffic page has a logical next step—either a conversion CTA or a softer fallback.
Use a consistent scan-friendly structure:
Add clear fit statements like “Best for…” and “Not a fit if…” on high-intent pages to help buyers self-qualify.
A lean structure usually covers qualification without extra clutter:
If a page doesn’t help someone qualify in/out or take a next step, consolidate or remove it.
Match form depth to intent:
Keep only fields that change routing or next steps. If it doesn’t affect what happens next, delete it.
Use calendar booking when the lead meets basic fit and you have coverage (region/time zone) and relevant meeting types.
Otherwise, show “We’ll reach out” with a clear SLA (e.g., “within 1 business day”) and route them into the correct follow-up path using their form answers.
Keep scoring explainable with fit vs. intent:
Set simple thresholds for , , and , and review the rules with sales monthly so routing stays trusted and auditable.