Jun 21, 2025·8 min
How to Build a Mobile App for Digital Receipts & Expenses
A practical guide to creating a mobile app that captures receipts, extracts data with OCR, categorizes expenses, and exports to accounting tools.
A practical guide to creating a mobile app that captures receipts, extracts data with OCR, categorizes expenses, and exports to accounting tools.
Before you choose features or screen designs, get specific about the problem you’re solving. “Track expenses” is too broad; the real pain is usually lost receipts, tedious manual entry, and slow reimbursement cycles.
Write a one-sentence problem statement you can test against every decision:
“Help people capture a receipt in seconds, turn it into a complete expense automatically, and submit it without chasing missing details.”
This keeps scope under control and prevents your app from turning into a generic finance tool.
Most digital receipts apps serve more than one audience:
Pick a primary user first (often employees or freelancers), then design the finance-team experience as a “review layer” rather than the core workflow.
Keep the first version focused on a small set of outcomes:
Agree on a few metrics that reflect real value:
When the goal, users, jobs, and metrics are clear, the rest of the build becomes a series of straightforward trade-offs rather than guesswork.
Before you pick features or screens, write down the end-to-end journey your app needs to support. A clear workflow prevents “receipt scanning” from becoming a pile of disconnected tools.
At a minimum, map the full path:
For each step, note what the user sees, what data is created, and what must happen automatically (for example: totals calculated, currency normalized, taxes detected).
Decide the main entry points, because they shape the UI and your backend assumptions:
Pick one “default start” for your MVP, then support the rest as secondary paths.
Clarify who can do what:
Design the handoff rules early (e.g., when an expense becomes read-only, who can override, and how changes are logged).
Document messy realities: returns/refunds, split bills, multi-currency, tips, missing receipts, and per diem. Even if you don’t fully automate them in v1, your workflow should have a clear path that doesn’t block users.
A good data model makes everything else easier: faster search, fewer manual edits, and cleaner exports for accounting. The key is to separate what the user captured (the original receipt file) from what your app understands (normalized fields you can filter and report on).
Treat a Receipt as evidence (a file plus extraction results) and an Expense as the business record used for reimbursement, policy checks, and reporting.
A single expense may have one receipt, multiple receipts (split payments), or no receipt (manual entry), so model this as a flexible relationship.
Plan a capture_method field so you can grow beyond camera scans:
This field also helps you troubleshoot quality issues and tune OCR/parsing later.
At a minimum, store these on the Expense (even if sourced from OCR): merchant, date, total, tax, currency, payment method. Keep both the raw text and normalized values (e.g., ISO currency codes, parsed dates) so edits are reversible and explainable.
Also store metadata like:
merchant_normalized (for consistent search)transaction_last4 or tokenized card reference (to prevent duplicates)timezone and locale (to parse dates/taxes correctly)Store raw image/PDF separately from the extracted/normalized data. This enables re-processing (better OCR later) without losing the original.
Design search for the real questions users ask:
Index these fields early; it’s the difference between “scroll forever” and instant answers.
Include retention controls in your schema, not as an afterthought:
With these pieces, your app can scale from personal expense capture to company-wide compliance without rewriting the foundation.
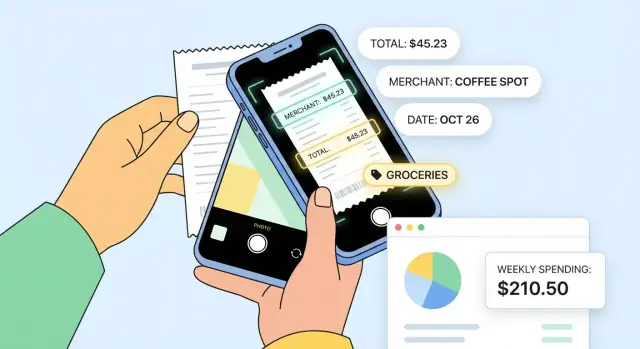
Receipt capture is the moment users decide whether your app feels effortless or annoying. Treat the camera as a “scanner,” not a photo tool: make the default path fast, guided, and forgiving.
Use live edge detection and auto-crop so users don’t need to frame perfectly. Add subtle, actionable hints (“Move closer,” “Avoid shadows,” “Hold steady”) and a glare warning when highlights blow out the paper.
Multi-page capture matters for hotel folios and long itemized receipts. Let users keep snapping pages in one flow, then confirm once.
A little preprocessing often improves accuracy more than switching OCR engines:
Run this pipeline consistently so the OCR sees predictable inputs.
On-device OCR is great for speed, offline use, and privacy. Cloud OCR can be better for low-quality images and complex layouts. A practical approach is hybrid:
Be transparent about what triggers uploads and give users control.
Start with high-value fields: merchant, date, currency, total, tax, and tip. Line items are useful but significantly harder—treat them as an enhancement.
Store a confidence score per field, not just per receipt. That lets you highlight only what needs attention (e.g., “Total unclear”).
After scanning, show a quick review screen with one-tap fixes (edit total, set date, change merchant). Capture corrections as training signals: if users repeatedly fix “TotaI” to “Total,” your extraction can learn common patterns and improve over time.
Good capture is only half the job. To keep expenses clean (and reduce back-and-forth), your app needs fast categorization, flexible metadata, and strong guardrails against duplicates.
Start with deterministic rules that users can understand and admins can manage. Examples: “Uber → Transport,” “Starbucks → Meals,” or “USD + airport merchant codes → Travel.” Rules are predictable, easy to audit, and can work offline.
On top of that, add ML-based suggestions (optional) to speed up entry without taking control away. Keep the UI clear: show the suggested category, why it was suggested (e.g., “based on merchant”), and let users override in one tap.
A third accelerator is user favorites: recently used categories per merchant, pinned categories, and “last used for this project.” These often outperform “AI” for real-world speed.
Most organizations need more than a category. Build custom fields such as project, cost center, client, and policy tags (e.g., “billable,” “personal,” “recurring”). Make them configurable per workspace, with required/optional rules depending on policy.
Splits are common: a hotel bill split across projects, or a group meal split by attendees.
Support splitting one expense into multiple lines with different categories, projects, or attendees. For shared payments, allow users to mark “paid by” and allocate shares—while keeping one underlying receipt.
Run policy checks at save and at submit:
For duplicates, combine multiple signals:
When you detect a likely duplicate, don’t block immediately—offer “Review” with side-by-side details and a safe “Keep both” option.
A receipts-and-expenses app fails or succeeds on reliability: can people capture a receipt in a basement café, trust it won’t disappear, and find it later when finance asks? The architecture decisions you make early determine that day-to-day feel.
For an MVP, decide whether you’re optimizing for speed of delivery or best-in-class native experience.
Receipt capture happens when connectivity is unreliable. Treat the phone as the first place data is saved.
Use a local queue: when a user submits a receipt, store the image + draft expense locally, mark it “pending,” and sync later. Plan for retries (with exponential backoff), and define how you’ll handle sync conflicts (e.g., “server wins,” “latest wins,” or “ask the user” for rare cases like edited amounts).
Most teams need a backend for:
Keeping these services modular helps you swap OCR providers or improve parsing without rebuilding the app.
Indexes matter when people search “Uber” or filter “Meals in March.” Store normalized merchant names, dates, totals, currency, categories, and tags. Add indexes for common queries (date range, merchant, category, status), and consider a lightweight search layer if “receipt storage and search” is a core promise.
Use background sync where supported, but don’t depend on it. Show clear in-app sync status, and consider push notifications for events like “OCR ready,” “receipt rejected,” or “expense approved,” so users don’t keep opening the app just to check.
If you want to validate the workflow quickly (capture → OCR → review → submit) before investing in a full custom build, a vibe-coding platform like Koder.ai can help you prototype and ship faster using a chat-driven interface. It’s particularly useful for building the supporting web dashboard and backend services (for example, a React admin panel plus a Go + PostgreSQL API), iterating in “planning mode,” and rolling back changes with snapshots while you test with real users.
Receipts and expenses contain sensitive personal and company details: names, card fragments, addresses, travel patterns, and sometimes tax IDs. Treat security and privacy as product features, not just compliance checkboxes.
Choose a login method that matches how the app is deployed:
Use TLS for all network calls, and encrypt sensitive data on the server. Receipts are often stored as images or PDFs, so secure media storage separately from database records (private buckets, short-lived signed URLs, and strict access policies).
On-device, cache as little as possible. If offline storage is required, encrypt local files and protect access behind OS-level security (biometrics/passcode).
Define roles early and keep permissions explicit:
Add guardrails such as “view-only” access for auditors and restricted visibility for sensitive categories (e.g., medical).
Collect only what you need. If you don’t need full card numbers or exact locations, don’t store them. Be clear about what’s extracted from receipts, how long you keep it, and how users can delete it.
Maintain an audit log for key actions: who changed what, when, and why (including edits to amounts, categories, and approvals). This supports dispute resolution, compliance reviews, and integration troubleshooting.
A great receipts-and-expenses app feels like a shortcut: users spend seconds capturing, not minutes correcting. The goal is to turn “I paid” into “it’s ready to submit” with as few taps as possible.
Most teams can cover 90% of real usage with six screens:
Design these screens as a single flow: capture → review → auto-save to list → submit when ready.
Prioritize one-handed capture: big shutter button, reachable controls, and a clear “Done” action. Use smart defaults to prevent repetitive data entry—pre-fill currency, payment method, project/client, and commonly used categories.
In the Review screen, use “chips” and quick actions (e.g., Change category, Split, Add attendees) instead of long forms. Inline editing beats pushing users into separate edit pages.
People won’t accept automation unless they understand it. Highlight extracted fields (merchant, date, total) and add a short “why” for suggestions:
Visually mark confidence (e.g., Needs attention for low-confidence fields) so users know where to look.
When capture quality is poor, don’t just fail. Prompt with specific guidance: “Receipt is blurry—move closer” or “Too dark—turn on flash.” If OCR fails, provide retry states and a fast manual fallback for only the missing fields.
Use readable typography, strong contrast, and large tap targets. Support voice input for notes and attendees, and ensure error messages are announced by screen readers. Accessibility isn’t extra—it reduces friction for all users.
A receipt-capture app becomes truly useful when it can move expenses through review, reimbursement, and accounting with minimal back-and-forth. That means building clear approval steps, exporting reports people actually submit, and integrating with the tools finance teams already use.
Keep the workflow simple, predictable, and visible. A typical loop is:
Design details matter: show “what changed since last submission,” allow inline comments on a specific line item, and store every status transition (Submitted → Approved → Exported, etc.). Also decide early whether approvals happen per expense, per report, or both—finance teams often prefer approving a report, while managers may want to spot-check line items.
Support common exports so users don’t need to rebuild reports manually:
If you offer a PDF packet, make the summary page match what finance expects: totals by category, currency, tax, and policy flags (e.g., “missing receipt,” “over limit”).
For popular platforms (QuickBooks, Xero, NetSuite), integrations usually boil down to: creating expenses/bills, attaching receipt files, and mapping fields correctly (vendor/merchant, date, amount, category/account, tax). Even if you don’t ship native integrations immediately, provide a generic webhook/API so teams can connect your app to their workflow tools.
To reduce support headaches, make mappings configurable: let an admin map your categories to their accounts and set defaults by team, project, or merchant.
Users care most about “when do I get paid?” Even if payouts happen in payroll, your app can track reimbursement status:
If you can’t confirm “Paid” automatically, allow a manual handoff step or a payroll import to reconcile statuses.
For plan and integration considerations, it can help to outline what’s included at each tier—linking to /pricing keeps expectations clear without burying readers in details.
An expense app succeeds when it removes busywork, not when it has the longest feature list. Start with the smallest useful loop and prove it works for real people doing real expense reports.
Build only what’s required to complete: capture → extract → categorize → export.
That means a user can snap a receipt, see key fields (merchant, date, total) filled in, choose or confirm a category, and export/share an expense report (CSV, PDF, or a simple email summary). If users can’t finish this loop quickly, extra features won’t save you.
Write down what you’re deliberately not building yet:
Keeping a clear roadmap prevents scope creep and makes user feedback easier to prioritize.
Track the funnel from capture to submission:
Pair this with lightweight in-app prompts like “What was frustrating about this receipt?” at the moment of failure.
Build a small, diverse set of real receipts (different merchants, fonts, languages, crumpled photos). Use it for evaluation and regression tests so OCR quality doesn’t silently degrade.
Pilot with a small team for 1–2 cycles of expense submissions. Ask users to correct extracted fields and categorize receipts; treat those corrections as labeled training/quality data. The goal isn’t perfection—it’s proving the workflow saves time consistently.
If your goal is to get to a working beta quickly, consider using Koder.ai to build the supporting pieces (admin console, exports, OCR job dashboard, and core API) from a chat-driven specification. Because it supports source-code export, deployments/hosting, and snapshots with rollback, you can iterate rapidly with pilot users and still keep ownership of the code as the product matures.
Even well-designed expense apps can stumble in predictable places. Planning for these issues early saves weeks of rework and a lot of support tickets.
Real receipts aren’t studio photos. Crumpled paper, faded ink, and especially thermal paper can produce partial or distorted text.
To reduce failures, guide users at capture time (auto-crop, glare detection, “move closer” prompts) and keep the original image so they can rescan without re-entering everything. Treat OCR as “best effort”: show the extracted fields with confidence indicators and make edits fast. Also consider a fallback path for low-confidence scans (manual entry or human review for high-value receipts).
Dates, currencies, and taxes vary widely. A receipt with “03/04/25” can mean different things, and VAT/GST rules affect what totals should be stored.
Avoid hardcoding formats. Store amounts as numbers plus currency code, store dates as ISO timestamps, and keep the raw receipt text for auditing. Build tax fields that can handle inclusive/exclusive taxes and multiple tax lines. If you expand to multiple languages, keep merchant names in original form but localize UI labels and category names.
High-resolution images are heavy, and uploads over mobile data can be slow—draining battery and frustrating users.
Compress and resize on-device, upload in the background with retry, and use a queue so receipts don’t “disappear” when the network drops. Cache recent receipts and thumbnails for quick browsing. Put strict limits on memory usage to avoid crashes on older phones.
Altered totals, duplicate submissions, and fake receipts show up quickly in real deployments.
Add duplicate detection (same merchant/amount/date, similar OCR text, image fingerprints) and flag suspicious edits (e.g., total changed after OCR). Keep immutable audit logs of what was captured vs. what was edited, and require justification for manual overrides on policy-sensitive fields.
Users will ask for exports, deletions, and help recovering missing receipts.
Prepare basic support tooling: search by user/receipt ID, view processing status, re-run OCR, and export data on request. Define incident response: what happens if OCR is down, or uploads fail? Having clear runbooks and a simple status page (/status) turns chaos into a manageable workflow.
A successful launch isn’t just “shipping to the app store.” It’s setting expectations, watching real-world behavior, and tightening the loop between what users experience and what your team fixes.
Define clear SLAs for the two moments users care about most: receipt processing (OCR) and syncing across devices.
For example, if OCR usually completes in 10–30 seconds but can take longer on poor networks, say so directly: “Processing receipt… usually under 30 seconds.” If sync can be delayed, show a lightweight status like “Saved locally • Syncing” and a retry option. These small cues prevent support tickets and reduce repeated uploads.
Track a small set of indicators that reveal reliability issues early:
Alert on spikes, and review trends weekly. OCR confidence drifting down often signals a vendor change, camera update, or a new receipt format in the wild.
Add an in-app feedback button near the receipt details screen, where frustration happens. Make corrections easy, then review aggregated “correction logs” to identify common parsing mistakes (dates, totals, taxes, tips). Use that list to prioritize model/rule updates.
Once capture and search are stable, consider:
Offer a 60-second walkthrough, a sample receipt users can edit, and a short “best results” tip page (good lighting, flat surface). Link to /help/receipts for quick reference.
Start with a narrow, testable problem statement (e.g., “capture a receipt in seconds, auto-create an expense, submit without missing details”). Then choose a primary user (employees or freelancers) and define 2–4 measurable success metrics like:
These constraints prevent scope creep into a generic finance app.
A practical MVP loop is: capture → extract → categorize → export/submit.
In v1, prioritize:
Defer line items, card feeds, advanced policies, and deep integrations until the loop reliably saves time.
Map the full path from “proof” to “payable”:
For each step, specify what’s automatic, what the user sees, and what data is created. This prevents building disconnected tools that don’t complete the reimbursement journey.
Pick one default start for your MVP (usually camera capture) and add others as secondary paths:
Your choice affects UI and backend assumptions (e.g., image preprocessing vs. parsing PDFs/email HTML). Track this with a capture_method field so you can debug accuracy and conversion by source.
Model Receipt and Expense as separate but linked records:
Keep relationships flexible: one expense can have multiple receipts (split payments) or none (manual entry). Store both raw OCR text and normalized fields so edits are explainable and reversible.
Use a camera experience that behaves like a scanner:
Before OCR, run consistent preprocessing (deskew, perspective correction, denoise, contrast/lighting normalization). Often this improves accuracy more than switching OCR vendors.
A hybrid approach is often most practical:
Whichever you choose, store confidence per field (not just per receipt) and build a fast review screen that highlights only what needs attention (e.g., “Total unclear”). Be transparent about what triggers uploads and give users control.
Start with rules users can understand, then layer suggestions:
Also support custom fields like project, cost center, and client so categorization matches real workflows.
Combine multiple signals and avoid hard-blocking:
When you detect a likely duplicate, show a side-by-side review and allow “Keep both.” Also log suspicious changes (e.g., total edited after OCR) in an audit trail for finance review.
Build offline-first reliability into the core flow:
Show clear states like “Saved locally • Syncing” and use notifications for key events (OCR ready, rejected, approved). This is what makes the app trustworthy in poor connectivity.