Aug 02, 2025·8 min
Create a Mobile App for Repair Requests & Status Updates
Learn how to plan, design, and build a repair request app with status updates, photos, notifications, and admin tools—plus tips for launch and growth.
What a Repair Request App Should Do
A repair request app is a simple promise: anyone who spots a problem can report it in minutes, and everyone involved can see what happens next—without phone tag, repeated emails, or “did you get my message?” follow-ups.
Who the app is for
The same workflow shows up in many settings, just with different labels:
- Tenants and homeowners reporting maintenance issues (leaks, heating, appliances).
- Employees flagging workplace problems (lighting, HVAC, safety hazards).
- Customers requesting device or product repairs (warranty claims, returns, fixes).
- Service providers and contractors handling jobs in the field.
What “repair requests + status updates” should achieve
At its core, the app should reduce back-and-forth by capturing the right details upfront and making status changes visible.
A good system:
- Collects a clear description, location, and urgency.
- Supports photo-based repair requests so technicians can diagnose faster.
- Creates a trackable ticket (work order) with an owner and a timeline.
- Shows work order status updates in plain language (e.g., “Received,” “Scheduled,” “In progress,” “Completed”).
Typical use cases
You’ll see this pattern in property maintenance, facility maintenance workflow for offices and campuses, device repairs in retail/service centers, and home services like plumbing or electrical.
What success looks like
Success isn’t “more features.” It’s measurable outcomes:
- Faster resolution times because requests arrive complete.
- Fewer calls and emails asking for updates.
- Higher satisfaction from predictable scheduling and transparent progress.
- Better accountability: every issue has a clear owner and next step.
Define Users, Roles, and the Repair Workflow
A repair request app works when it matches how people actually report, triage, and fix issues. Before designing screens, define who touches a ticket, what decisions they make, and what the “happy path” looks like.
Core user roles (and what each needs)
Requester (tenant/employee/resident): reports the issue, adds photos, chooses a location, and checks status without having to call.
Technician (maintenance/contractor): receives assignments, sees location details, communicates availability, logs work, and closes the job with evidence.
Dispatcher/Admin: triages new requests, validates information, sets priority, assigns the right technician, and coordinates access (keys, appointments, safety).
Manager (property/facility lead): monitors backlog, SLAs, recurring issues, and performance trends; approves costs when needed.
Map the workflow from “report issue” to “completed”
Keep the workflow simple, with clear handoffs:
- Report issue (requester submits).
- Triage (admin confirms location, category, and urgency).
- Schedule/Assign (dispatcher picks technician and time window).
- In progress (technician en route/working, may request more info).
- Completed (work done, notes + photos, requester notified).
- Reopen/Follow-up (if not fixed, route back with history intact).
Communication channels to plan for
Decide which events trigger in-app updates, email, SMS, and push notifications. Common triggers: ticket received, appointment set, technician en route, work completed, and message replies.
What must be tracked on every ticket
At minimum: exact location (building/floor/room/unit), category, priority, SLA targets (response and resolution), assignee, timestamps, status history, photos/attachments, and a message log. This data powers reliable work order status updates and meaningful reporting.
Must-Have Features for Requesters
Requesters judge a repair request app by two things: how quickly they can submit a problem, and how clearly they can see what happens next. The goal is to reduce back-and-forth without turning the form into paperwork.
Fast, structured request submission
A good request flow blends structured fields (for reporting and routing) with a free-text description (for real context). Include:
- Category (e.g., Plumbing, Electrical, HVAC, Appliances) to speed up triage and assignment.
- Description with simple prompts like “What happened?” and “When did you first notice it?”
- Location: address + unit/room selector so requests don’t get lost in “Building A” ambiguity.
- Preferred times: selectable time windows, plus an “access instructions” field (gate codes, pets, lockbox).
Keep the form short with defaults and smart suggestions (remember last-used unit, offer recent categories).
Photo/video that helps (without causing privacy issues)
Media dramatically improves first-time fixes—especially for leaks, damage, and error codes. Make it easy to add photos and short video, but set clear boundaries:
- Enforce file size limits and auto-compress uploads so submissions work on mobile data.
- Allow multiple photos and a simple “annotate” option (circle the issue).
- Provide a brief privacy note and guidance like “Avoid capturing people, ID documents, or screens.”
If your audience includes tenants, state who can view the media and how long it’s retained.
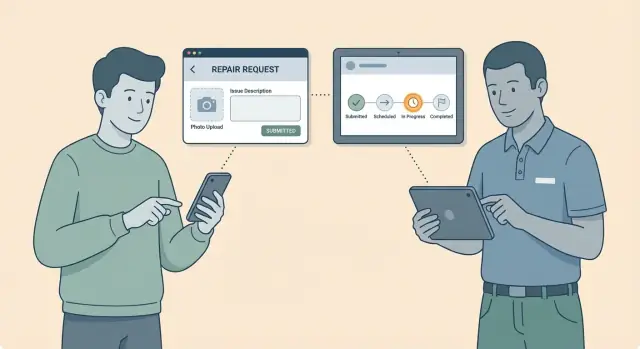
A status timeline people can trust
Requesters shouldn’t have to call to learn what “open” means. Show a simple timeline with timestamps:
Submitted → Accepted → Scheduled → In Progress → Completed
Each step should explain what to expect (“Scheduled: technician planned for Tue 1–3pm”) and who is responsible. If something is blocked (waiting on parts), surface that in plain language.
Comments or chat with an audit trail
Two-way communication reduces missed appointments and repeat visits. Support comments or chat on each ticket, but keep it accountable:
- Messages are tied to the ticket and never disappear (audit trail).
- Users can add extra details after submitting (e.g., “leak got worse”) without creating a new ticket.
- Include read receipts or “last updated by” so the thread doesn’t feel like a black hole.
Searchable ticket history
Requesters often report recurring issues. Give them a searchable history with filters (status, category, location) and a quick “submit similar request” action. This builds confidence: users can see outcomes, completion notes, and what was actually fixed.
Must-Have Features for Technicians
Technicians need the app to remove friction, not add it. Prioritize fast access to the next job, clear context (what, where, urgency), and the ability to close a ticket without returning to a desktop system. Optimize for one-hand use, spotty connectivity, and real-world conditions.
A job list that makes the day manageable
Your default screen should be a job list with filters that match how technicians plan their work: priority, due date, location/building, and “assigned to me.”
Add lightweight sorting (e.g., nearest location or oldest open), and make key details visible at a glance: ticket number, status, SLA/due date, and whether the request includes photos.
One-tap status updates (with the right context)
Status updates should be doable in one tap—think Start, On hold, Needs parts, Completed—with optional add-ons instead of mandatory forms.
After a status change, prompt for what matters:
- Quick notes (“Replaced faucet cartridge; tested ok”).
- Parts used (select from a short list or scan a barcode if you support it).
- Next action (schedule follow-up, request approval, escalate).
This is where work order status updates become reliable: the app should make “doing the right thing” the easiest thing.
Offline mode basics (cache and sync)
A practical offline mode is essential for a field service app. At minimum, cache the technician’s assigned jobs (including photos and location info), let them draft updates offline, then sync automatically when a connection returns.
Be explicit about sync state. If an update is pending, show it clearly and prevent duplicate submissions.
Proof of work: photos and (optional) signature
Support before/after photos with simple guidance (labels like “Before” and “After”). Photos are especially valuable for photo-based repair requests where the original issue may look different by the time a tech arrives.
For certain environments (e.g., commercial facilities or tenant maintenance app scenarios), an optional customer signature can confirm completion. Don’t force signatures for every ticket—make it a workflow rule admins can enable per property or job type.
Time tracking that doesn’t feel like time tracking
Capture timestamps that matter without turning the app into a stopwatch:
- Arrival time (tap when on site).
- Labor minutes (quick edit if needed).
- Completion time (auto on “Complete,” but editable with permission).
These fields unlock better reporting (e.g., average time-to-complete by location) and help a maintenance management app stay accountable without burdening technicians.
If you want technicians to adopt your mobile work order app, every feature should answer one question: “Will this help me finish the job faster and with fewer callbacks?”
Admin Tools, Assignment, and Reporting
Requesters and technicians may only see a few screens, but admins need a control center that keeps work moving, prevents tickets from getting lost, and produces data you can act on.
Admin dashboard essentials
At minimum, the admin dashboard should let you create, edit, and assign tickets quickly—without opening five tabs. Include fast filters (site/building, category, priority, status, technician) and bulk actions (assign, change priority, merge duplicates).
Admins also need tools to manage the “dictionary” of work: categories (plumbing, HVAC, electrical), locations (sites, buildings, floors, units/rooms), and common issue templates. This structure reduces messy free-text tickets and makes reporting reliable.
Service routing: manual vs. rules
Manual assignment is necessary for exceptions, but rules-based routing saves time every day. Typical routing rules include:
- Skills/certifications (only licensed techs can take certain work).
- Zones (assign by site/building to reduce travel).
- Workload balancing (avoid overloading one technician).
A practical approach is “rules first, admin override always.” Show admins why a ticket was routed a certain way so they can trust (and adjust) the system.
SLA tracking and escalations
If you promise response times, your app should enforce them. Add SLA timers per priority/category, and trigger escalations when tickets are nearing overdue—not only after they’re late. Escalations can re-notify the assigned tech, alert a supervisor, or bump priority with an audit trail.
Reporting that actually helps
Keep reporting focused on decisions:
- Ticket volume by location/category.
- Time to first response and time to resolution.
- Repeat issues (same asset/location within X days).
- Technician load and backlog trends.
Permissions and visibility
Define who can view tickets by site, building, department, or client account. For example, a school principal might see only their campus, while a district admin sees all. Tight visibility rules protect privacy and prevent confusion when multiple teams share the same system.
UX Patterns for Clear Status Updates
Build Your MVP in Chat
Describe your repair request workflow in chat and get a working app you can iterate on fast.
People don’t file repair requests because they love forms—they want reassurance that something is happening. Your status UI should answer three questions at a glance: Where is my request now? What happens next? Who owns it?
Use a “status timeline” that reads like a story
A simple vertical timeline works well on mobile: each step has a clear label, a timestamp, and an owner.
Example:
- Submitted — Mon 9:12 AM (You)
- Reviewed — Mon 10:05 AM (Front Desk)
- Scheduled — Tue 1:30 PM (Maintenance)
- In Progress — Wed 9:00 AM (Tech: J. Rivera)
- Completed — Wed 10:22 AM (Maintenance)
If something is waiting, show it explicitly (e.g., On Hold — waiting for parts) so users don’t assume you forgot.
Set next-step expectations, not just labels
Under the current status, add a short “what happens next” message:
- “We’ll review within 4 business hours.”
- “We’ll propose a time window within 24 hours.”
- “If you’re not home, leave access instructions in Comments.”
These micro-promises reduce “any updates?” messages without adding more notifications.
Keep labels consistent and user-friendly
Avoid internal terms like “WO Created” or “Dispatched.” Use the same verbs everywhere: Submitted, Scheduled, In Progress, Completed. If you must support internal states, map them to user-facing labels.
Make adding context effortless
Place Add comment, Add photo, and Add location details directly on the request screen, not hidden in menus. When users add details, reflect it in the timeline (“Requester added photos — 2:14 PM”).
Accessibility that prevents misreads
Use readable font sizes, strong contrast, and clear status chips (text + icon, not color alone). Keep forms short, with plain-language field labels and error messages that explain exactly what to fix.
Notification Strategy That Users Won’t Ignore
Notifications help only when they’re predictable, relevant, and easy to act on. A good repair request app treats notifications as part of the workflow—not as noise.
1) Define the events that actually matter
Start with triggers tied to real user questions (“What’s happening with my ticket?”):
- Request created (confirmation + ticket number).
- Assigned (who owns it now).
- Scheduled (date/time window).
- Delayed (new ETA and reason when possible).
- Completed (what was done + any follow-up steps).
Avoid notifying on every small internal change (like technician notes) unless the user explicitly opts in.
2) Let people choose the channel
Different users want different channels. In settings, offer preferences per role:
- Push for instant updates (best default for a service ticket mobile app).
- Email for a written record and attachments.
- SMS only if you truly need it (cost, consent, and regulations apply).
Also allow “critical-only” vs. “all updates,” especially for a tenant maintenance app where users may submit multiple requests.
3) Write templates that are short and specific
Each message should answer two things: what changed and what’s next.
Examples:
- “Ticket #1842 assigned to Alex. Next: scheduling.”
- “Visit scheduled for Tue 10–12. Tap to view details.”
- “Delayed: part on order. New ETA: Thu. Tap for updates.”
4) Respect quiet hours and rate limits
Add quiet hours (e.g., 9pm–7am) and frequency limits (e.g., bundle non-urgent updates into one). This reduces notification fatigue and improves trust.
5) Use deep links to the exact screen
Every notification should open directly to the relevant ticket view (not the app home). Deep links should land on the correct tab or status timeline, e.g., /tickets/1842?view=status, so users can act immediately.
Plan the Data Model and Status Rules
Add an Admin Control Center
Spin up an admin console for triage, assignment, and reporting without building from scratch.
A repair request app feels “simple” to users, but it only stays simple if the underlying data and status rules are consistent. Spend time here and you’ll prevent confusing updates, stuck tickets, and messy reporting.
Core data model (keep it lean)
Start with entities that map to real work:
- Users: requester, technician, admin (roles can be a field on the user or a separate table).
- Locations: building, unit/room, floor—whatever your organization actually uses.
- Assets (optional): HVAC unit, elevator, printer (add only if you need asset history and preventative maintenance).
- Tickets (work orders): title, description, location, priority, category, requested-by, assigned-to, timestamps.
- Messages/Comments: conversation thread tied to a ticket.
- Attachments: photos, videos, PDFs tied to tickets or messages.
- Statuses: current status on the ticket plus status history for traceability.
Status transitions (rules people can understand)
Define a small status set and strict transitions (e.g., New → Triaged → Assigned → In Progress → Waiting on Parts → Completed → Closed).
Document:
- Who can change what (requester can cancel; technician can move to In Progress; admin can override).
- Required fields on completion (resolution note, time spent, parts used, “after” photo, cost code).
- Reopen rules (who can reopen, how many days after completion).
Audit log (for accountability)
Store an immutable audit log for key events: status updates, assignment changes, edits to priority/location, and attachment deletes. Include actor, timestamp, old value, new value, and source (mobile/web/API).
Attachments: storage and retention
Use object storage (S3-compatible) with expiring upload URLs. Decide retention expectations upfront: keep attachments as long as tickets exist, or auto-delete after X months for privacy. Support redaction/removal workflows.
Analytics events to measure real performance
Track a simple funnel: ticket created, first response, assigned, work started, completed, closed. Capture resolution time, reassignment count, and “waiting” time to see where delays happen without reading every ticket.
Choose the Tech Approach and Architecture
Picking the right tech stack is mostly about trade-offs: budget, timeline, internal skills, and how “real-time” the app truly needs to feel.
Cross-platform vs. native
A cross-platform app (like Flutter or React Native) is often the best fit for a repair request app because you can ship iOS and Android from one codebase. That usually means faster delivery and lower cost—especially important for an MVP and pilot.
Go native (Swift for iOS, Kotlin for Android) if you need heavy device-specific features, unusually smooth performance, or your organization already has strong native teams. For most service ticket and mobile work order apps, cross-platform is more than enough.
Backend basics (keep it boring)
Even a simple maintenance management app needs a backend to be trustworthy. Plan for:
- Authentication (email/password, SSO if needed later).
- An API the mobile app talks to.
- A database for tickets, users, locations, and status history.
- File storage for photo-based repair requests (before/after images).
- A notification service for push notifications and email.
“Boring” architecture wins: a single API + database is easier to maintain than many moving parts.
Real-time updates: simple options
Users want work order status updates quickly, but you don’t always need true real-time streaming.
- Polling: the app checks for updates every X seconds/minutes. It’s straightforward and stable.
- WebSockets: updates arrive instantly, but add complexity.
A practical approach: use push notifications to alert users, then refresh data when they open the app or tap the notification.
A faster build path (when you need to ship quickly)
If your goal is to validate the workflow fast, consider a vibe-coding approach with Koder.ai. You can describe the requester flow, technician job list, and admin dashboard in chat, iterate in a planning mode before code changes, and generate a working web app (React) plus backend (Go + PostgreSQL). For mobile, Koder.ai can help scaffold a Flutter client and keep API contracts consistent as your status rules evolve.
It’s also useful during pilots: snapshots and rollback reduce risk when you’re tuning status transitions, notifications, and permissions based on real usage. And when you’re ready, you can export the source code and deploy/host with custom domains.
Integrations to plan for (optional)
Even if you don’t build them in the MVP, design with future integrations in mind:
- Email (ticket receipts, summaries).
- Calendars (appointment windows for tenants/technicians).
- Maps (navigate to a site, confirm location).
- CRM/helpdesk (if tickets must sync with existing systems).
Testing that matches real usage
Repair apps fail in the field when testing is too lab-like. Test across:
- A few older devices (not just the newest phones).
- Slow networks and spotty Wi‑Fi.
- Offline capture (draft a request, upload later).
- Photo uploads (large images, retries, permissions).
This is where a field service app becomes dependable instead of frustrating.
Security, Privacy, and Permissions
A repair request app often contains sensitive details: where someone lives or works, what’s broken, and photos that may accidentally include faces, documents, or security devices. Treat security and privacy as core product features—not add-ons.
Authentication that fits the audience
Start friction-light, then scale up:
- Email magic links for tenants and casual users (no passwords to forget).
- Phone sign-in (SMS/OTP) when email deliverability is a concern.
- SSO for businesses (e.g., Google/Microsoft) if you sell to organizations that require centralized control.
Make account recovery simple, and rate-limit login attempts to reduce abuse.
Permissions: least privilege by default
Design access control around roles and locations. A tenant should only see tickets for their unit, while a technician may see tickets assigned to them across multiple sites.
A good rule: users get the minimum access needed to do their job, and admins explicitly grant broader visibility. If you support multiple buildings or clients, treat each as a separate “space” so data can’t leak across locations.
Protect what’s inside photos and notes
Photos are incredibly useful, but they can expose personal information. Add lightweight guidance near the camera button like: “Avoid capturing faces, IDs, or passwords.” If users frequently photograph documents or screens, consider offering redaction guidance (and optionally a simple blur tool later).
Secure uploads and storage
Use encrypted transport (HTTPS) and store files in a private bucket. Avoid exposing direct file URLs that can be shared or guessed. Serve images through time-limited, permission-checked links.
Compliance: keep it practical
Compliance needs vary by industry and region. Keep claims general (e.g., “we encrypt data in transit”), document your data handling, and consult legal when you introduce regulated data types or enterprise contracts.
MVP Scope, Prototyping, and Pilot Launch
Create the End-to-End App
Build the core loop: request, schedule, update, complete, and notify - all from one platform.
The fastest way to prove your repair request app works is to narrow the first release to what people need most: submitting a request, understanding what’s happening, and closing the loop.
Start with a practical MVP feature list
Keep the MVP small enough to ship, but complete enough to create trust:
- Create a repair request with category, location, description, and photos.
- Auto-generated ticket ID and a clear status timeline (e.g., Submitted → Scheduled → In Progress → Completed).
- Two-way comments (requester ↔ technician/admin) tied to the ticket.
- Basic assignment (manual is fine) and a simple “My jobs” list for technicians.
- Completion notes plus “done” photos and a quick requester confirmation.
If a feature doesn’t help submit, update, or finish a work order, push it later.
Prototype first, test quickly
Before building, create a clickable prototype (Figma/ProtoPie/etc.) covering:
- Submitting a request with a photo.
- Checking status and reading updates.
- Messaging and closing the ticket.
Run short tests (15–20 minutes) with 5–8 real users (tenants, office staff, technicians). Watch for confusion around statuses, wording, and where users expect notifications.
If you’re using Koder.ai, you can also prototype the same flows as a working app early (not just screens), then refine copy, status labels, and permissions with real click-through behavior—while keeping scope under control.
Pilot with one site or one team
Launch the MVP to a single building, floor, or maintenance crew for 2–4 weeks. Track: time to first response, time to completion, number of “where is my ticket?” follow-ups, and notification opt-outs.
Align internal processes before you launch
Decide who triages requests, who assigns work, what “urgent” means, and response-time expectations. The app can’t compensate for unclear ownership.
Create a simple roadmap
After validation, prioritize the next additions: SLA rules, recurring maintenance, inventory/parts, offline mode, and deeper reporting—only after your core status updates and notifications feel reliable.
Launch Checklist and Ongoing Improvement
Shipping the first version is only half the job. The other half is making it easy to roll out, easy to learn, and continuously improved based on real usage.
Decide how you’ll distribute the app
Choose a deployment model that matches your environment:
- Public app store distribution (Apple App Store / Google Play): best when you support multiple organizations, residents, or customers who install the app themselves.
- Private distribution: best for internal teams (technicians, facilities staff). Options include MDM distribution, Apple Business Manager, managed Google Play, or an “unlisted” app.
If you’re supporting both requesters and technicians, you may ship one app with role-based access or two apps (a tenant maintenance app and a technician field service app). Either way, confirm sign-in flows and permissions before launch.
Onboarding that prevents bad tickets
Most low-quality service tickets come from unclear expectations. Your onboarding should set rules without feeling like a lecture.
Use a short tutorial (3–5 screens), then guide users through a sample request that demonstrates:
- What counts as a good photo (well-lit, shows context, avoid faces/IDs).
- What details matter (location, urgency, access notes).
- How status updates work (e.g., Submitted → Assigned → In Progress → Completed).
Consider adding a lightweight tips panel on the request form to reduce back-and-forth without increasing friction.
Support and feedback loops
Make it easy for users to get help at the moment they’re stuck:
- In-app feedback for bugs and feature requests.
- A small FAQ focused on real issues: “Why is my request pending?”, “How do I add more photos?”, “How do I re-open?”
- A clear contact channel (email, phone, or chat) with expected response times.
Link to these from the request confirmation screen and from the status page, not just from settings.
Metrics to track from day one
Instrument your maintenance management app to capture a few key numbers that reflect the actual workflow:
- Submit-to-assign time (how quickly requests get ownership).
- Completion time (by category, property, technician).
- Re-open rate (quality of fixes and communication).
- NPS/CSAT (after completion, short and optional).
These metrics help you decide whether the problem is staffing, triage rules, unclear forms, or missing technician tools.
Iterate with focused improvements
Set a cadence (e.g., every 2–4 weeks) to review feedback and metrics, then ship small changes:
- Reduce form friction: fewer required fields, smarter defaults, auto-filled location.
- Improve assignment rules: better routing by category, location, availability.
- Refine notifications: fewer messages, more meaning.
If you’re building on Koder.ai, this iteration loop can be especially fast: update the workflow in chat, validate in planning mode, and ship changes with the safety net of snapshots/rollback—then export the code whenever you want full in-house control.
Treat every update as an opportunity to make the app faster to use, not just richer in features.
FAQ
What is the core purpose of a repair request app?
A repair request app should do three things reliably:
- Capture the right details fast (what, where, urgency, photos).
- Turn every request into a trackable ticket with an owner.
- Provide plain-language status updates (e.g., Submitted → Scheduled → In Progress → Completed) so users don’t need to call for updates.
What information should be required on every repair request?
Keep the form short but structured so tickets are actionable:
- Category (Plumbing/Electrical/HVAC/etc.)
- Description + simple prompts (what happened, when it started)
- Exact location (building/floor/room/unit)
- Urgency/priority
- Photos/video (optional but strongly encouraged)
- Preferred time windows + access instructions (gate codes, pets, lockbox)
Which work order statuses work best for clear updates?
Use a small set of user-facing statuses with timestamps and an owner for each step. A practical timeline is:
- Submitted
- Reviewed/Accepted
- Scheduled (with a time window)
- In Progress (tech en route/working)
- Completed (with notes and proof)
If work is blocked, show it explicitly (e.g., ) instead of leaving the ticket “open.”
How do photo-based repair requests improve resolution time?
They reduce repeat visits and speed up triage because technicians can often diagnose issues before arriving. Make photo uploads practical by:
- Auto-compressing and enforcing size limits
- Allowing multiple photos and quick annotation (e.g., circle the issue)
- Adding a short privacy note (“Avoid faces, IDs, or screens”)
What should technicians be able to do from the mobile app?
Make updates easy and consistent:
- One-tap status changes (Start, On hold, Needs parts, Complete)
- Optional prompts after changes (quick notes, parts used, next action)
- Clear “pending sync” indicators if offline
The goal is to make the correct workflow faster than skipping it.
How important is offline mode for a field service or maintenance app?
A basic offline mode should:
- Cache assigned jobs (details, location info, and key photos)
- Allow drafting notes and status changes offline
- Sync automatically when connectivity returns
Be transparent about sync state and prevent duplicate submissions if the same update is queued twice.
What notifications should a repair request app send (and what should it avoid)?
Start with events that match real user questions:
- Request created (ticket number)
- Assigned (who owns it)
- Scheduled (time window)
- Delayed (reason + new ETA)
- Completed (what was done)
Let users choose channels (push/email/SMS where appropriate), support quiet hours, and deep-link notifications directly to the ticket (e.g., /tickets/1842?view=status).
What data model do you need for reliable status updates and reporting?
At minimum, model these entities:
- Users (with roles)
- Locations (site/building/unit/room)
- Tickets/work orders (with status + timestamps)
- Status history (immutable timeline)
- Comments/messages (per ticket)
- Attachments (photos/video)
Add strict status transition rules and an audit log for key changes (assignment, priority, location, deletes) to keep reporting and accountability trustworthy.
How should permissions and privacy work in a tenant or facility maintenance app?
Use least-privilege access based on role and location:
- Requesters see only their own unit/department tickets.
- Technicians see tickets assigned to them (or their zone).
- Admins/managers see broader scopes based on site/building/client.
Store attachments securely (private storage, time-limited links) and clearly communicate who can view uploaded media and how long it’s retained.
What should be included in an MVP for a repair request and status update app?
A practical MVP should fully support the end-to-end loop:
- Submit request (category, location, description, photos)
- Ticket ID + status timeline
- Two-way comments tied to the ticket
- Basic assignment + “My jobs” list
- Completion notes + after-photos (and optional confirmation)
Pilot in one building or team for 2–4 weeks and track time to first response, time to completion, and “where is my ticket?” follow-ups.