

Create a Service Booking Funnel Website Without a Backend
Learn how to build a service booking funnel website using no-code tools: landing page, forms, scheduling, payments, and automated follow-ups—no backend needed.
Clarify Your Offer and Funnel Goal
Before you pick tools or design pages, get clear on what you’re actually selling. A booking funnel works best when the offer is specific enough that a visitor can decide quickly.
Define the service in plain terms
Write a one-sentence description that a new visitor would understand. Then confirm these basics:
- What’s included: deliverables (e.g., “60-minute Zoom session + action plan PDF”).
- Duration: length of the session and any prep time needed.
- Price: a single number whenever possible (or clear tiers).
- Boundaries: who it’s for, and who it’s not for (this reduces mismatched bookings).
If you can’t explain the service without “custom,” “varies,” or “depends,” your funnel will feel slippery. Tighten the offer first.
Choose one primary goal
A funnel should push toward one outcome:
- Booked call (good for high-ticket or complex services)
- Paid session (best for straightforward services with a fixed price)
- Request form (useful when you must review details before accepting)
Pick one as the primary conversion. Anything else is secondary.
Identify your ideal customer’s top questions
List the 5–7 questions people ask before they commit (results, process, timing, pricing, fit). These become your landing page sections and FAQ—not extra pages.
Decide: one-step booking vs. short qualification
- One-step booking works when your service is simple and you’ll accept most clients.
- Qualification step (a few questions before the calendar) is better when you need to screen for fit, collect context, or protect your time.
Once you’ve made these decisions, the rest of the funnel becomes much easier to build and keep “backend-free.”
Pick a Website Builder That Works Without a Backend
A service booking funnel doesn’t need a custom server—your “builder” just needs to publish fast pages and let you embed the tools that handle scheduling, forms, and payments.
Option 1: Static site builders (simple, fast)
Static builders publish lightweight pages that load quickly and are easy to maintain. They’re ideal if your funnel is a handful of pages and you’re comfortable working with a template.
Examples: Carrd, Framer, Webflow (static-style publishing), or template-based hosts.
Option 2: Landing page tools (fast to launch, focused)
Landing page tools are built for conversion pages, A/B testing, and quick edits. If your funnel is primarily “one landing page → booking,” this can be the most straightforward path.
Examples: Unbounce, Leadpages, Instapage.
Option 3: Template website platforms (best for small service sites)
If you also want a simple “about/services/contact” site alongside your funnel, a template platform gives you navigation, blog support, and built-in site management.
Examples: Squarespace, Wix, WordPress.com (hosted).
Option 4: Vibe-coding platforms (fast builds with code ownership)
If you want more flexibility than templates—without standing up your own backend—vibe-coding platforms can be a good middle ground. For example, Koder.ai lets you create web apps and funnel-style sites from a simple chat, then handle hosting, custom domains, and quick iteration. It’s especially useful when your “simple funnel” grows into something slightly more custom (like dynamic service options, gated confirmation pages, or internal admin views) while still keeping a lightweight ops footprint.
What to check before you commit
Make sure the builder supports these basics (you’ll feel the difference later):
- Built-in SEO controls: editable page title, meta description, open-graph image, clean URLs, and 301 redirects.
- Mobile editing and previews: your booking funnel will be mostly mobile traffic.
- Fast hosting and CDN: pages should load quickly without extra plugins.
- Embeds and widgets: confirm you can paste embed code for forms, calendars, and payment widgets/links (and that it works on mobile).
Domain plan (keep it simple)
Decide early whether you’ll use:
- a custom domain (recommended for trust and brand consistency), or
- a platform subdomain (fine for validation or a short-term test).
If you’re starting lean, launch on a subdomain for a week, confirm people book, then connect a custom domain when you’re confident. This keeps momentum without locking you into the wrong tool.
Map the Funnel Pages and User Flow
Before you touch a website builder, decide what pages exist and what happens after each click. A simple funnel works because it removes choices. Your job here is to design a path that feels obvious to a first-time visitor.
The minimum set of pages
At a minimum, you can ship a booking funnel with four pages:
- Landing page: explains the service, outcomes, price range (if possible), and a clear call-to-action (CTA) to book.
- Booking page: where people pick a time (and possibly a service).
- Confirmation page: the “you’re booked” message, next steps, and what to prepare.
- Privacy page: a simple privacy notice explaining what data you collect and why.
If you want to keep everything extremely tight, the Privacy page can live in the footer and still count as a “page” from a legal perspective.
Do you need a “Choose a service” step?
Add a separate Choose a service page only if it reduces confusion. Good reasons:
- You offer 3+ distinct services with different durations or prices.
- You need a qualifier (e.g., “New client” vs “Returning client”).
If you only have one core offer, skip the extra step. The best funnel page is often the one you don’t create.
Sketch the flow (visitor → booked)
Write the flow as a simple chain:
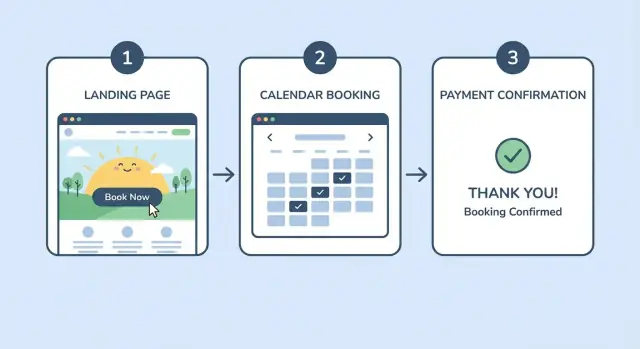
Ad/Social/Search → Landing → (Choose service) → Booking → Confirmation
On each page, include exactly one primary next action. Keep navigation minimal—often just a logo link and a “Book now” button—so visitors don’t wander off to unrelated pages.
What should happen after confirmation?
Decide the “next step” message now: where they’ll receive details (email/SMS), how to reschedule, and what to bring. This prevents last-minute patchwork later when you connect scheduling and forms.
Build a High-Converting Landing Page
Your landing page is the “decision page” of your service booking funnel. It should help the right person quickly understand what you do, trust you, and take one clear action.
Start with a clear headline
Write one sentence that says who it’s for and what outcome they get. Keep it specific and measurable when you can.
Examples:
- “Portrait photos for busy professionals—book a 30‑minute session and get 10 edited images in 48 hours.”
- “Strength coaching for new runners—reduce injuries and build a plan you can stick to.”
Follow the headline with a short supporting line that answers, “Why you?” (speed, specialization, approach, location, guarantee, etc.).
Add proof early (and make it skimmable)
People hesitate to book when they can’t predict the experience. Add proof near the top of the page so visitors don’t have to scroll to find reassurance.
Good options include:
- 2–3 short testimonials with a specific result
- before/after examples (photos, screenshots, or a short metric)
- mini case notes (3–4 lines: problem → what you did → outcome)
If you have recognizable client types (e.g., “dentists,” “new parents,” “startups”), include that context in the testimonial to make it feel relevant.
Explain how it works in three steps
A simple “How it works” section reduces uncertainty and sets expectations. Use exactly three steps and match your funnel flow:
- Book a time that works for you
- Pay securely to confirm your spot
- Get the service (what happens next, how long it takes, where it happens)
Add one sentence under each step with practical details (duration, what they should prepare, delivery timeline). This prevents back-and-forth messages later.
Use one primary CTA above the fold
Your page should have one main call-to-action (CTA) and repeat it consistently. Put a single prominent button near the top, before scrolling.
- Button text: “Book now”, “Book a session”, or “Reserve your time”
- Avoid multiple competing buttons like “Contact,” “Learn more,” and “Pricing” all at once
If you need a secondary action, keep it subtle (a text link) and only for people who truly aren’t ready.
Add FAQs that remove hesitation
FAQs are not filler—they’re your silent sales assistant. Include 5–8 questions that address common objections:
- What’s included?
- How do rescheduling and cancellations work?
- Do you offer refunds?
- Where does the service happen (online/in person)?
- What happens after payment?
Write answers in plain language, and be clear about policies so there are no surprises after someone books.
Add Appointment Scheduling (Calendar) Without Coding
A service booking funnel lives or dies on how easy it is to pick a time. The simplest approach is to use a dedicated scheduling tool (Calendly, Cal.com, SavvyCal, Square Appointments, Acuity, etc.) and connect it to your existing calendar—no server, no database, no custom code.
Choose the right scheduling setup
Start by confirming the tool supports your time zone and can handle clients booking from different locations. Then decide what you’re actually selling:
- Free consult call: great for higher-priced services where you qualify leads first.
- Direct paid appointment: ideal for clear, fixed-scope sessions (coaching call, audit, haircut, lesson).
If you offer both, create separate event types so your funnel can send people to the right option.
Configure availability so it protects your time
A calendar is not just a “pick a slot” widget—it’s your boundary-setting tool. Before embedding anything, set:
- Buffers between meetings (e.g., 10–30 minutes)
- Minimum notice (e.g., no same-day bookings)
- Max bookings per day to prevent overload
Also consider limiting start times (e.g., on the hour only) to keep your schedule tidy.
Embed vs. link: pick the smoothest experience
Most tools let you embed the scheduler directly on your booking page, keeping people in your funnel. That’s usually best for conversions.
If your page is lightweight (or you want fewer distractions), you can link out to the scheduling page in a new tab—just keep the button copy clear (e.g., “Choose your time”).
Add intake questions early (when possible)
Many schedulers support intake questions in the booking flow. Use them to collect essentials (goal, preferred format, short context) so you can show up prepared—without adding a separate step.
Collect Client Details with Forms and Intake Questions
A booking funnel works best when you ask just enough to deliver the service—no more. Long forms feel like homework, and they increase drop-offs right before the finish line.
Start with the minimum
Begin with the essentials:
- Name
- Email (and phone only if you truly need it)
- What they’re booking / service type
- Preferred date/time window (if your scheduler doesn’t capture this)
If you’re unsure whether a field is necessary, remove it and add it later only if it becomes a real problem.
Use conditional questions for light qualification (optional)
Conditional logic keeps forms short while still collecting the right details. Example: if someone selects “Group session,” show “Number of attendees.” If they select “Website audit,” show “Website URL.” This helps you qualify and prepare without forcing every visitor through every question.
Send submissions somewhere you’ll actually use
Make sure every submission lands in at least two places:
- Email notification so you can act fast
- A spreadsheet or CRM (Google Sheets, Airtable, HubSpot, etc.) so nothing gets lost and you can track lead quality
Many form tools support simple integrations or automation steps to push responses into your chosen system.
Set clear expectations right on the form
Add one or two lines near the submit button:
- When they’ll hear back (e.g., “We reply within 1 business day”)
- What happens next (e.g., “You’ll receive a confirmation email and any prep steps”)
Don’t skip consent and privacy basics
If you collect personal data, include a consent checkbox (especially for marketing emails) and link to your privacy policy (e.g., /privacy). Keep the wording plain and specific about how you’ll use their information.
Accept Payments Without a Custom Checkout
You don’t need to build a shopping cart to get paid. For most service booking funnels, a hosted payment option is faster, safer, and easier to maintain.
Choose your payment method
Pick one of these depending on how “structured” your offer is:
- Payment link (fastest): send people to a secure, hosted payment page.
- Hosted checkout page: a branded checkout with products, tax, coupons, and receipts.
- Invoice: best when pricing varies (custom packages, add-ons, corporate clients).
Decide how people pay
Match payment timing to your service and risk:
- Pay in full: simplest; great for fixed-price sessions.
- Deposit: reduces no-shows while keeping the decision easy.
- Free booking + pay later: works when you must confirm eligibility first, but it increases drop-offs—use only when needed.
Whatever you choose, say it clearly near the primary call-to-action and again near the payment button.
Make pricing transparent
Show what’s included (duration, deliverables, revisions, location/remote, what to prepare). If there are add-ons, present them before the payment step so there are no surprises.
Refund and cancellation terms
Add a short “Payment & cancellation” note close to checkout: refund window, reschedule rules, and what happens for no-shows. Link to the full policy on a separate page (e.g., /terms) so it’s always accessible.
Test the payment flow everywhere
Before launch, complete a real end-to-end test on mobile and desktop:
- Click from landing page → booking → payment
- Confirm the receipt email arrives
- Verify the confirmation page tells the client what happens next
If anything feels slow or confusing, simplify the steps—payments should feel effortless.
Automate Confirmations, Reminders, and Follow-Ups
Automation is what makes a no-backend booking funnel feel “real” to clients: they get instant proof their spot is reserved, you get clean details in the right place, and fewer people forget to show up.
Send instant confirmation (and a calendar invite)
Set up an immediate confirmation the moment someone books (or pays—depending on your process). The confirmation should include:
- The date/time (with time zone)
- A reschedule/cancel link
- The meeting location (video link or address)
- What to prepare (documents, questionnaire, etc.)
Most schedulers can send an email confirmation automatically. If you also want a calendar invite, use your scheduling tool’s built-in invitation feature or connect it to Google Calendar/Outlook so the event is created instantly and the invite goes out.
Use a simple workflow you can explain in one sentence
Keep the flow easy to reason about:
payment/booking → confirmation → reminders
If you take payment first (common for consults), your “success” page can push them into scheduling. If you schedule first, the confirmation can include a payment link with a clear deadline.
Add reminders to cut no-shows
A small reminder sequence reduces missed appointments without sounding pushy. A practical default:
- 24 hours before: quick reminder + reschedule link
- 1 hour before: short “see you soon” message + location/video link
Make sure reminder emails are short and readable on mobile.
Route every lead to the right place
Even without a backend, you can still capture everything reliably. Use your form/scheduler integrations or an automation tool to send booking details to the destination you actually check:
- Email (simple and fast)
- A spreadsheet (good for tracking)
- A CRM (if you have one)
- An inbox/queue (for a team)
Prepare a manual fallback
Automations can fail (token expirations, quota limits, typoed filters). Build a backup plan:
- A “Booking received” page that tells clients what happens next
- A dedicated notification email to you for every new booking/payment
- A simple manual script: “If you don’t receive a confirmation within 5 minutes, email us at ___”
That safety net protects the client experience—even when the tools misbehave.
Track Conversions and Funnel Performance
If you don’t measure the funnel, you’ll end up guessing which changes actually increase bookings. The goal is simple: know where people drop off, and which traffic sources create real appointments (not just clicks).
Choose analytics that fit your privacy needs
A standard option is Google Analytics, but if you prefer a lighter, privacy-friendly approach, tools like Plausible or Fathom work well for static sites and are easier to manage.
Whichever you choose, install it on every funnel page (landing page, booking page, thank-you page). Consistent tracking is more important than fancy reports.
Track the events that signal intent
Page views alone won’t tell you if the funnel works. Set up a few key events so you can see progression:
- Primary CTA clicks (e.g., “Book now” button)
- Booking starts (click-through to your calendar tool)
- Completed bookings (ideally measured by a dedicated thank-you page after booking)
- Payment completed (if you use a payment link that can redirect to a confirmation page)
If your scheduler can’t redirect to a custom thank-you page, use its built-in confirmation page views and pair that with click tracking from your site.
Use UTMs to make ads and social measurable
Add UTM parameters to links you post in ads, email signatures, Instagram bio, or partner directories. For example:
?utm_source=instagram&utm_medium=bio&utm_campaign=winter_offer
This lets you compare booking rates by source, not just traffic volume.
Build a simple spreadsheet dashboard
A lightweight dashboard can be a shared spreadsheet with weekly numbers:
- Sessions (by channel)
- CTA clicks
- Bookings completed
- Cost per booking (if running ads)
Seeing the “sessions → clicks → bookings” chain in one place makes bottlenecks obvious.
Don’t ignore speed and mobile usability
Check performance in PageSpeed Insights and test the funnel on your phone. Slow load time, oversized popups, or hard-to-tap buttons can quietly cut conversions—especially on the landing page and the “Book now” step.
Optimize the Funnel to Increase Bookings
Optimization is where a “nice-looking” funnel becomes a reliable booking machine. The goal is simple: reduce hesitation and remove friction between the landing page, the booking step, and payment.
Run small A/B tests (one change at a time)
Keep tests focused so you can tell what actually helped. Start with changes that affect motivation and clarity:
- Headline: test a benefits-first headline vs. a niche-specific promise.
- CTA button text: “Book a call” vs. “Check availability” vs. “Schedule your session.”
- Page length: a short page for people who already know you vs. a longer page that answers objections.
- Social proof: swap in different testimonials (short, punchy vs. detailed) or change their placement.
Let a test run until you have enough traffic to see a pattern (not just a couple of bookings).
Find the biggest drop-off point
Look at where people quit:
- Landing page drop-off: usually a message mismatch, weak offer, or too much scrolling before the next step.
- Booking drop-off: too many time options, confusing time zones, or extra fields.
- Payment drop-off: surprise price, unclear refund policy, or a payment step that feels disconnected.
Fix the worst leak first. A small improvement at the biggest drop-off often beats polishing everything.
Improve clarity by removing distractions
Read your page as if you’re new. If a visitor can’t answer “What do I get?” and “What do I do next?” within 10 seconds, rewrite.
Common wins:
- Replace vague phrases (“transform your life”) with concrete outcomes.
- Move details that don’t help the decision (long bios, extra services) below the main CTA.
- Add a simple 3-step summary: Choose a time → Share details → Get confirmation.
Add trust signals (only what’s true)
Trust increases bookings when it’s specific:
- A real photo, real name, and a clear way to reach you
- Relevant credentials or years of experience
- Clear guarantees or policies (only if you can honor them)
Collect feedback and iterate
Ask 5–10 ideal clients to go through the funnel and say what they expected at each step. Note the exact words they use—those phrases often become your best headline and CTA copy.
Trust, Legal, and Accessibility Basics
A booking funnel works best when visitors feel safe saying “yes” quickly. A few simple pages and design choices can remove hesitation and reduce support requests—without adding a backend.
Add the legal pages (and make them easy to find)
Create a /privacy and /terms page, then link both in your footer on every page. Keep them plain-language and specific to your process: what you collect, why you collect it, and how long you keep it.
If you operate locally or serve regulated industries, add a short note about jurisdiction, cancellation windows, and any required disclosures.
Explain what happens after they book
Near the booking button, add a short “How it works” block:
- Scheduling: “You’ll choose a time on our calendar and receive an email confirmation.”
- Payments: “Payment is processed by our payment provider; we don’t store card details.”
- Data handling: “Your form answers are used only to prepare for your appointment.”
This sets expectations and reduces drop-offs caused by uncertainty.
Accessibility basics that help everyone
Use readable body text (avoid tiny fonts), strong contrast, and buttons that look like buttons. Keep labels clear (“Book a call,” “Pay deposit,” “Reschedule”). If you use icons, pair them with text.
Also ensure forms have visible labels (not just placeholder text) so they’re easier to understand and use with assistive tools.
Protect your forms from spam
Turn on your form tool’s built-in spam filtering or add a CAPTCHA when needed. If possible, block obvious bot submissions (e.g., multiple links in a message) and avoid publishing direct email addresses in plain text.
Provide a human fallback
Add a Contact option for edge cases: rescheduling issues, payment errors, or accessibility needs. A simple link to /contact plus a support email (or a form) is often enough to prevent lost bookings.
Launch Checklist and Ongoing Maintenance
Launching a service booking funnel is mostly about removing surprises. Before you share the link widely, run a clean end-to-end test and set a light maintenance habit so the funnel stays accurate (and profitable).
Pre-launch checklist (15–30 minutes)
Test the full flow on phone, tablet, and desktop. Don’t just look at pages—actually complete a booking.
- Click your main CTA and confirm it always leads to the next step (no dead ends)
- Submit the form with test details and confirm the info lands where you expect
- Book an appointment in your calendar tool and verify the time zone is correct
- Complete a test payment (or use a sandbox/test mode if available)
Confirmation and email sanity checks
Your confirmation page and emails are where most confusion happens. Make the messaging explicit.
Check:
- Deliverability: send to Gmail and Outlook; look in Promotions/Spam
- Subject lines: clear and searchable (e.g., “Booking confirmed: [Service] on [Date]”)
- Content: date, time zone, location/link, reschedule/cancel instructions, and what to prepare
- Fallbacks: if someone pays but doesn’t book (or vice versa), tell them exactly what to do next
Publish one link that starts the funnel
Create a single “start here” URL (your landing page) and use it everywhere—social bio, emails, ads, and QR codes. This prevents people from entering the funnel halfway through and dropping.
Ongoing maintenance (simple routine)
Once a week (or at least monthly): update availability, pricing, and FAQs; spot-check one test booking; and scan for broken links.
Back up the essentials in one doc: page copy, offer details, form questions, automation rules, payment link, and calendar settings. If a tool resets or you switch providers, you’ll rebuild in minutes, not hours.
FAQ
What does “a service booking funnel website without a backend” actually mean?
A “no-backend” booking funnel uses hosted tools for scheduling, forms, payments, and email notifications—so you don’t need to build or maintain a custom server or database. Your website’s job is mainly to publish fast pages and guide people through one clear path: landing → booking → confirmation.
How do I clarify my service offer before building the funnel?
Make the offer specific enough that someone can decide quickly:
- Deliverables: what they get (e.g., “60‑minute session + action plan PDF”)
- Duration: session length + any prep
- Price: one clear number (or simple tiers)
- Boundaries: who it’s for / not for
If your description relies on “custom,” “varies,” or “depends,” tighten the scope before you build pages.
What should my funnel’s primary goal be—booked call, paid session, or request form?
Pick one primary conversion:
- Booked call: best for high-ticket or complex services
- Paid session: best for fixed-scope services
- Request form: best when you must review details before accepting
Everything else (newsletter, social follows, blog browsing) should be secondary so visitors don’t get pulled in multiple directions.
When should I use a qualification form instead of letting people book immediately?
Use one-step booking when your service is simple and you’ll accept most clients.
Add a short qualification step when you need to:
- Screen for fit (protect your time)
- Collect key context before the call
- Route people into different services or durations
Keep qualification light: a few high-signal questions, not a long questionnaire.
Which website builder is best for a no-backend booking funnel?
Choose based on how you want to work:
- Static/fast builders: great for a small funnel and speed (easy embeds)
- Landing page tools: great for quick iterations and conversion focus
- Template website platforms: best if you also need a full small site (about/services/blog)
Before committing, confirm you have: SEO controls, mobile previews, fast hosting/CDN, and reliable embeds for calendars/forms/payments.
What pages do I need for a simple booking funnel?
A minimal funnel can be just:
- Landing page: decision + CTA
- Booking page: embedded calendar (and optional intake questions)
- Confirmation page: next steps + prep info
- Privacy page: what data you collect and why (linked in the footer)
Add a separate “choose a service” step only if it reduces confusion (e.g., 3+ distinct offers).
What should a high-converting booking landing page include?
Aim for clarity and skimmability:
- Headline: who it’s for + outcome
- Proof near the top: 2–3 short testimonials or mini case notes
- “How it works” in exactly 3 steps (book → pay → receive service)
- One primary CTA repeated consistently (e.g., “Book now”)
Avoid competing buttons that split attention right when someone is deciding.
How should I set up appointment scheduling for the best booking experience?
Configure your scheduler to reduce friction and protect your time:
- Correct time zone handling for visitors
- Buffers between meetings and minimum notice
- Max bookings per day (and tidy start times)
- Separate event types for different offers (free consult vs paid session)
Embed the calendar when possible for a smoother flow; link out only if the embed hurts performance or usability.
How long should my intake form be, and where should the data go?
Collect only what you need to deliver the service:
- Name + email (phone only if necessary)
- Service type (if you have multiple)
- One or two context questions
Use conditional logic to keep forms short, and send submissions to:
- Email notifications (so you act fast)
- A spreadsheet/CRM (so nothing gets lost)
Always link your privacy policy (e.g., /privacy) and add consent where required.
How do I accept payments and communicate refunds/cancellations without custom checkout code?
Keep payments simple with hosted options:
- Payment link: fastest to launch
- Hosted checkout: better for receipts/tax/coupons
- Invoice: best for variable pricing
State pricing and key terms near checkout, and include a short note with a link to full policies (e.g., /terms): refund window, rescheduling rules, and no-show handling. Then test the entire flow on mobile and desktop.