May 05, 2025·8 min
Create a Web App to Manage Customer Escalation Timelines
Step-by-step plan to build a web app that tracks customer escalations, deadlines, SLAs, ownership, and alerts—plus reporting and integrations.
Step-by-step plan to build a web app that tracks customer escalations, deadlines, SLAs, ownership, and alerts—plus reporting and integrations.
Before you design screens or pick a tech stack, get specific about what “escalation” means in your organization. Is it a support case that’s aging, an incident that threatens uptime, a complaint from a key account, or any request that crosses a severity threshold? If different teams use the word differently, your app will encode confusion.
Write a one-sentence definition that your whole team can agree on, then add a few examples. For instance: “An escalation is any customer issue that requires a higher support tier or management involvement, and has a time-bound commitment.”
Also define what doesn’t count (e.g., routine tickets, internal tasks) so v1 doesn’t bloat.
Success criteria should reflect what you want to improve—not just what you want to build. Common core outcomes include:
Pick 2–4 metrics you can track from day one (e.g., breach rate, time in each escalation stage, reassignment count).
List primary users (agents, team leads, managers) and secondary stakeholders (account managers, engineering on-call). For each, note what they need to do quickly: take ownership, extend a deadline with a reason, see what’s next, or summarize status for a customer.
Capture current failure modes with concrete stories: missed handoffs between tiers, unclear due times after reassignment, “who approved the extension?” debates.
Use these stories to separate must-haves (timeline + ownership + auditability) from later additions (advanced dashboards, complex automation).
With goals clear, write down how an escalation moves through your team. A shared workflow prevents “special cases” from turning into inconsistent handling and missed SLAs.
Start with a simple set of stages and allowed transitions:
Document what each stage means (entry criteria) and what must be true to exit it (exit criteria). This is where you avoid “Resolved but still waiting on customer” ambiguity.
Escalations should be created by rules you can explain in one sentence. Common triggers include:
Decide whether triggers create an escalation automatically, suggest one to an agent, or require approval.
Your timeline is only as good as its events. At minimum, capture:
Write rules for ownership changes: who can reassign, when approvals are needed (e.g., cross-team or vendor handoff), and what happens if an owner goes off shift.
Finally, map dependencies that affect timing: on-call schedules, tier levels (T1/T2/T3), and external vendors (including their response windows). This will drive your timeline calculations and escalation matrix later.
A reliable escalation app is mostly a data problem. If timelines, SLAs, and history aren’t modeled clearly, the UI and notifications will always feel “off.” Start by naming the core entities and relationships.
At minimum, plan for:
Treat each milestone as a timer with:
start_at (when the clock begins)due_at (computed deadline)paused_at / pause_reason (optional)completed_at (when met)Store why a due date exists (the rule), not just the computed timestamp. That makes later disputes easier to resolve.
SLAs rarely mean “always.” Model a calendar per SLA policy: business hours vs 24/7, holidays, and region-specific schedules.
Compute deadlines in a consistent server time (UTC), but always store the case time zone (or customer time zone) so your UI can display deadlines correctly and users can reason about them.
Decide early between:
CASE_CREATED, STATUS_CHANGED, MILESTONE_PAUSED), orFor compliance and accountability, prefer an event log (even if you also keep “current state” columns for performance). Every change should record who, what changed, when, and source (UI, API, automation), plus a correlation ID for tracing related actions.
Permissions are where escalation tools either earn trust—or get bypassed with side spreadsheets. Define who can do what early, then enforce it consistently across the UI, API, and exports.
Keep v1 simple with roles that match how support teams actually work:
Make role checks explicit in the product: disable controls rather than letting users click into errors.
Escalations often span multiple groups (Tier 1, Tier 2, CSM, incident response). Plan for multi-team support by scoping visibility using one or more of these dimensions:
A good default is: users can access cases where they are the assignee, watcher, or belong to the owning team—plus any accounts explicitly shared with their role.
Not all data should be visible to everyone. Common sensitive fields include customer PII, contract details, and internal notes. Implement field-level permissions such as:
For v1, email/password with MFA support is usually sufficient. Design the user model so you can add SSO later (SAML/OIDC) without rewriting permissions (e.g., store roles/teams internally, map SSO groups on login).
Treat permission changes as auditable actions. Record events like role updates, team reassignment, export downloads, and configuration edits—who did it, when, and what changed. This protects you during incidents and makes access reviews much easier.
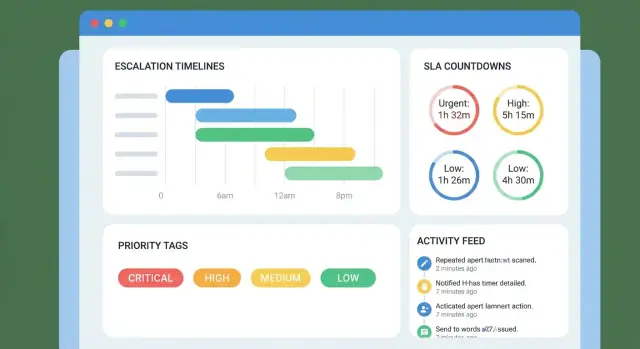
Your escalation app succeeds or fails on the everyday screens: what a support lead sees first, how quickly they can understand a case, and whether the next deadline is impossible to miss.
Start with a small set of pages that cover 90% of work:
Keep navigation predictable: a left sidebar or top tabs with “Queue”, “My Cases”, “Reports”. Make the queue the default landing page.
In the case list, show only the fields that help someone decide what to do next. A good default row includes: customer, priority, current owner, status, next due date, and a warning indicator (e.g., “Due in 2h” or “Overdue by 1d”).
Add fast, practical filtering and search:
Design for scanning: consistent column widths, clear status chips, and a single highlight color used only for urgency.
The case view should answer, at a glance:
Place fast actions near the top (not hidden in menus): Reassign, Escalate, Add milestone, Add note, Set next deadline. Each action should confirm what changed and update the timeline immediately.
Your timeline should read like a clear sequence of commitments. Include:
Use progressive disclosure: show the latest events first, with the option to expand older history. If you have an audit trail, link to it from the timeline (e.g., “View change log”).
Use readable color contrast, pair color with text (“Overdue”), ensure all actions are keyboard reachable, and write labels that match user language (“Set next customer update deadline”, not “Update SLA”). This reduces mis-clicks when pressure is high.
Alerts are the “heartbeat” of an escalation timeline: they keep cases moving without forcing people to stare at a dashboard all day. The goal is simple—notify the right person, at the right moment, with the least noise.
Start with a small set of events that map directly to action:
For v1, pick channels you can deliver reliably and measure:
SMS or chat tools can come later once rules and volumes are stable.
Represent escalation as time-based thresholds tied to the case’s timeline:
Keep the matrix configurable per priority/queue so “P1 incidents” don’t follow the same pattern as “billing questions.”
Implement deduplication (“don’t send the same alert twice”), batching (digest similar alerts), and quiet hours that delay non-critical reminders while still logging them.
Every alert should support:
Store these actions in your audit trail so reporting can distinguish “no one saw it” from “someone saw it and deferred it.”
Most escalation timeline apps fail when they require people to re-type data that already exists elsewhere. For v1, integrate only what you need to keep timelines accurate and notifications timely.
Decide which channels can create or update an escalation case:
Keep inbound payloads small: case ID, customer ID, current status, priority, timestamps, and a short summary.
Your app should notify other systems when something important happens:
Use webhooks with signed requests and an event ID for deduplication.
If you sync both directions, declare a source of truth per field (e.g., ticketing tool owns status; your app owns SLA timers). Define conflict rules (“last write wins” is rarely correct) and add retry logic with backoff plus a dead-letter queue for failures.
For v1, import customers and contacts using stable external IDs and a minimal schema: account name, tier, key contacts, and escalation preferences. Avoid deep CRM mirroring.
Document a short checklist (auth method, required fields, rate limits, retries, test environment). Publish a minimal API contract (even a one-page spec) and keep it versioned so integrations don’t break unexpectedly.
Your backend needs to do two things well: keep escalation timing accurate, and stay fast as case volume grows.
Choose the simplest architecture your team can maintain. A classic MVC app with a REST API is often enough for a v1 support workflow web app. If you already use GraphQL successfully, it can work too—but avoid adding it “just because.” Pair it with a managed database (e.g., Postgres) so you spend time on escalation logic, not database operations.
If you want to validate the workflow end-to-end before committing to weeks of engineering, a vibe-coding platform like Koder.ai can help you prototype the core loop (queue → case detail → timeline → notifications) from a chat interface, then iterate in planning mode and export source code when you’re ready. Its default stack (React on the web, Go + PostgreSQL on the backend) is a practical fit for this kind of audit-heavy app.
Escalations depend on scheduled work, so you’ll need background processing for:
Implement jobs to be idempotent (safe to run twice) and retryable. Store a “last evaluated at” timestamp per case/timeline to prevent duplicate actions.
Store all timestamps in UTC. Convert to the user’s time zone only at the UI/API boundary. Add tests for edge cases: daylight saving time changes, leap days, and “paused” clocks (e.g., SLA paused when waiting on customer).
Use pagination for queues and audit trail views. Add indexes that match your filters and sorts—commonly (due_at), (status), (owner_id), and composites like (status, due_at).
Plan file storage separately from your DB: enforce size/type limits, scan uploads (or use a provider integration), and set retention rules (e.g., delete after 12 months unless legal hold). Keep metadata in your case management tables; store the file in object storage.
Reporting is where your escalation app stops being a shared inbox and becomes a management tool. For v1, aim for a single reporting page that answers two questions: “Are we meeting SLAs?” and “Where are escalations getting stuck?” Keep it simple, fast, and grounded in definitions everyone agrees on.
A report is only as trustworthy as the underlying definitions. Write these down in plain language and mirror them in your data model:
Also decide which SLA clock you’re reporting: first response, next update, or resolution (or all three).
Your dashboard can be lightweight but actionable:
Add operational views for day-to-day load balancing:
CSV export is usually enough for v1. Tie exports to permissions (team-based access, role checks) and write an audit log entry for each export (who, when, filters used, number of rows). This prevents “mystery spreadsheets” and supports compliance.
Ship the first reporting page quickly, then review it with support leads weekly for a month. Collect feedback on missing filters, confusing definitions, and “I can’t answer X” moments—those are your best inputs for v2.
Testing an escalation-timeline app isn’t just about “does it work?” It’s about “does it behave the way support teams expect when pressure is high?” Focus on realistic scenarios that stress your timeline rules, notifications, and case handoffs.
Put most of your test effort into timeline calculations, because small mistakes here create big SLA disputes.
Cover cases like business-hours counting, holidays, and time zones. Add tests for pauses (customer waiting, engineering pending), priority changes mid-case, and escalations that shift the target response/resolve times. Also test edge conditions: a case created one minute before business close, or a pause starting exactly at an SLA boundary.
Notifications often fail in the gaps between systems. Write integration tests that verify:
If you use email, chat, or webhooks, assert the payloads and the timing—not just that “something was sent.”
Create realistic sample data that reveals UX problems early: VIP customers, long-running cases, frequent reassignments, reopened incidents, and “hot” periods with queue spikes. This helps you validate that queues, the case view, and the timeline display are readable without explanation.
Run a pilot with a single team for 1–2 weeks. Collect issues daily: missing fields, confusing labels, notification noise, and exceptions to your timeline rules.
Track what users do outside the app (spreadsheets, side channels) to spot gaps.
Write down what “done” means before broad launch: the key SLA metrics match expected results, critical notifications are reliable, audit trails are complete, and the pilot team can run their escalations end-to-end without workarounds.
Shipping the first version isn’t the finish line. An escalation timeline app becomes “real” only when it survives everyday failures: missed jobs, slow queries, misconfigured notifications, and inevitable changes to SLA rules. Treat deployment and operations as part of the product.
Keep your release process boring and repeatable. At minimum, document and automate:
If you have a staging environment, seed it with realistic data (sanitized) so timeline behavior and notifications can be verified before production.
Traditional uptime checks won’t catch the worst problems. Add monitoring where escalations can silently break:
Create a small on-call playbook: “If escalation reminders aren’t sending, check A → B → C.” This reduces downtime during high-pressure incidents.
Escalation data often includes customer names, emails, and sensitive notes. Define policies early:
Make retention configurable so you don’t need code changes for policy updates.
Even in v1, admins need ways to keep the system healthy:
Write short, task-based docs: “Create an escalation,” “Pause a timeline,” “Override the SLA,” “Audit who changed what.”
Add a lightweight onboarding flow in-app that points users to queues, case view, and timeline actions, plus a link to a /help page for reference.
Version 1 should prove the core loop: a case has a clear timeline, the SLA clock behaves predictably, and the right people get notified. Version 2 can add power without turning v1 into a complicated “everything system.” The trick is to keep a short, explicit backlog of upgrades that you only pull in after you see real usage patterns.
A good v2 item is one that (a) reduces manual work at scale, or (b) prevents costly mistakes. If it mainly adds configuration options, park it until you have evidence that multiple teams truly need it.
SLA calendars per customer are often the first meaningful expansion: different business hours, holidays, or contracted response times.
Next, add playbooks and templates: pre-built escalation steps, recommended stakeholders, and message drafts that make responses consistent.
When assignment becomes a bottleneck, consider skills-based routing and on-call schedules. Keep the first iteration simple: a small set of skills, a default fallback owner, and clear override controls.
Auto-escalation can trigger when certain signals appear (severity changes, keywords, sentiment, repeat contacts). Start with “suggested escalation” (a prompt) before “automatic escalation,” and log every trigger reason for trust and auditability.
Add required fields before escalation (impact, severity, customer tier) and approval steps for high-severity escalations. This reduces noise and helps reporting stay accurate.
If you want to explore automation patterns before building them, see /blog/workflow-automation-basics. If you’re aligning scope to packaging, sanity-check how features map to tiers on /pricing.
Start with a one-sentence definition everyone agrees on (plus a few examples). Include explicit non-examples (routine tickets, internal tasks) so v1 doesn’t turn into a general ticketing system.
Then write 2–4 success metrics you can measure immediately, like SLA breach rate, time in each stage, or reassignment count.
Pick outcomes that reflect operational improvement, not feature completion. Practical v1 metrics include:
Choose a small set you can compute from day-one timestamps.
Use a small shared set of stages with clear entry/exit criteria, such as:
Write what must be true to enter and to leave each stage. This prevents ambiguity like “Resolved but still waiting on customer.”
Capture the minimum events needed to reconstruct the timeline and defend SLA decisions:
If you can’t explain how a timestamp is used, don’t collect it in v1.
Model each milestone as a timer with:
start_atdue_at (computed)paused_at and pause_reason (optional)completed_atAlso store the rule that produced (policy + calendar + reason). That makes audits and disputes far easier than storing only the final deadline.
Store timestamps in UTC, but keep a case/customer time zone for display and user reasoning. Model SLA calendars explicitly (24/7 vs business hours, holidays, region schedules).
Test edge cases like daylight saving changes, cases created near business close, and “pause starts exactly at the boundary.”
Keep v1 roles simple and aligned with real workflows:
Add scoping rules (team/region/account) and field-level controls for sensitive data like internal notes and PII.
Design the “everyday” screens first:
Optimize for scanning and reduce context switching—fast actions should not be buried in menus.
Start with a small set of high-signal notifications:
Pick 1–2 channels for v1 (usually in-app + email), then add an escalation matrix with clear thresholds (T–2h, T–0h, T+1h). Prevent fatigue with dedupe, batching, and quiet hours, and make acknowledge/snooze auditable.
Integrate only what keeps timelines accurate:
If you do two-way sync, define a source of truth per field and conflict rules (avoid “last write wins”). Publish a minimal versioned API contract so integrations don’t break. For more on automation patterns, see /blog/workflow-automation-basics; for packaging considerations, see /pricing.
due_at