Mar 16, 2025·8 min
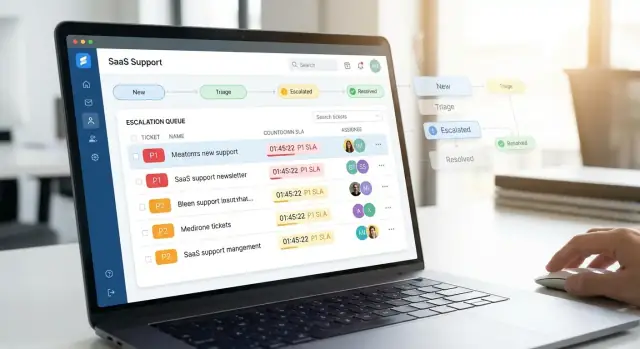
Create a Web App for Customer Escalations & Priority Support
Learn how to plan, design, and build a web app that routes escalations, enforces SLAs, and keeps priority support organized with clear workflows and reporting.
Learn how to plan, design, and build a web app that routes escalations, enforces SLAs, and keeps priority support organized with clear workflows and reporting.
Before you build screens or write code, decide what your app is for and what behavior it should enforce. Escalations aren’t just “angry customers”—they’re tickets that require faster handling, higher visibility, and tighter coordination.
Define escalation criteria in plain language so agents and customers don’t have to guess. Common triggers include:
Also define what is not an escalation (for example, how-to questions, feature requests, minor bugs) and how those requests should be routed instead.
List the roles your workflow needs and what each role can do:
Write down who owns the ticket at every step (including handoffs) and what “ownership” means (response requirement, next update time, and authority to escalate).
Start with a small set of inputs so you can ship sooner and keep triage consistent. Many teams begin with email + web form, then add chat once SLAs and routing are stable.
Pick measurable outcomes the app should improve:
These decisions become your product requirements for the rest of the build.
A priority support app lives or dies by its data model. If you get the foundations right, routing, reporting, and SLA enforcement become simpler—because the system has the facts it needs.
At minimum, each ticket should capture: requester (a contact), company (customer account), subject, description, and attachments. Treat the description as the original problem statement; later updates belong in comments so you can see how the story evolved.
Escalations need more structure than general support. Common fields include severity (how bad), impact (how many users/what revenue), and priority (how fast you’ll respond). Add an affected service field (e.g., Billing, API, Mobile App) so triage can route quickly.
For deadlines, store explicit due times (like “first response due” and “resolution/next update due”), not just an “SLA name.” The system can compute these timestamps, but agents should see the exact times.
A practical model usually includes:
This keeps collaboration clean: conversations in comments, action items in tasks, and ownership on the ticket.
Use a small, stable status set like: New, Triaged, In Progress, Waiting, Resolved, Closed. Avoid “almost the same” statuses—every extra state makes reporting and automation less reliable.
For SLA tracking and accountability, some data should be append-only: created/updated timestamps, status-change history, SLA start/stop events, escalation changes, and who made each change. Prefer an audit log (or event table) so you can reconstruct what happened without guesswork.
Priority and SLA rules are the “contract” your app enforces: what gets handled first, how fast, and who is accountable. Keep the scheme simple, document it clearly, and make it hard to override without a reason.
Use four levels so agents can classify quickly and managers can report consistently:
Define “impact” (how many users/customers) and “urgency” (how time-sensitive) in your UI to reduce mislabeling.
Your data model should allow SLAs to vary by customer plan/tier (e.g., Free/Pro/Enterprise) and priority. Typically, you track at least two timers:
Example: Enterprise + P1 might require a first response in 15 minutes, while Pro + P3 could be 8 business hours. Keep the rules table visible to agents and link it from the ticket page.
Support SLAs often depend on whether the plan includes 24/7 coverage.
Make the ticket show both “SLA remaining” and the schedule it’s using (so agents trust the timer).
Real workflows need pauses. A common rule: pause SLA when the ticket is Waiting on customer (or Waiting on third party), and resume when the customer replies.
Be explicit about:
Avoid silent breaches. Breach handling should create a visible event in the ticket history.
Set at least two alert thresholds:
Route alerts based on priority and tier so people don’t get paged for P4 noise. If you want more detail, connect this section to your on-call rules in /blog/notifications-and-on-call-alerting.
Triage and routing are where a priority support app either saves time—or creates confusion. The goal is simple: every new request should land in the right place quickly, with a clear owner and an obvious next step.
Start with a dedicated triage inbox for unassigned or needs-review tickets. Keep it fast and predictable:
A good inbox minimizes clicks: agents should be able to claim, re-route, or escalate from the list without opening every ticket.
Routing should be rule-based, but readable by non-engineers. Common inputs:
Store the “why” for every routing decision (e.g., “Matched keyword: SSO → Auth team”). That makes disputes easy to resolve and improves training.
Even the best rules need an escape hatch. Allow authorized users to override routing and trigger escalation paths like:
Agent → Team lead → On-call
Overrides should require a short reason and create an audit entry. If you have on-call alerting later, link escalation actions to it (see /blog/notifications-and-on-call-alerting).
Duplicate tickets waste SLA time. Add lightweight tools:
Linked tickets should inherit status updates and public messaging from the parent.
Define clear ownership states:
Make ownership visible everywhere: list view, ticket header, and activity log. When someone asks “Who has this?”, the app should answer instantly.
A priority support app succeeds or fails in the first 10 seconds an agent spends in it. The dashboard should answer three questions immediately: what needs attention now, why, and what can I do next.
Start with a small set of high-utility views rather than a maze of tabs:
Use clear, consistent signals so agents don’t have to “read” every row:
Keep typography simple: one primary accent color, and a tight hierarchy (title → customer → status/SLA → last update).
Every ticket row should support quick actions without opening the full page:
Add bulk actions (assign, close, apply tag, set blocker) to clear backlogs quickly.
Support keyboard shortcuts for power users: / to search, j/k to move, e to escalate, a to assign, g then q to return to the queue.
For accessibility, ensure sufficient contrast, visible focus states, labeled controls, and screen-reader friendly status text (e.g., “SLA: 12 minutes remaining”). Also make the table responsive so the same flow works on smaller screens without hiding critical fields.
Notifications are the “nervous system” of a priority support app: they turn ticket changes into timely action. The goal isn’t to notify more—it’s to notify the right people, in the right channel, with enough context to respond.
Start with a clear set of events that trigger messages. Common, high-signal types include:
Each message should include the ticket ID, customer name, priority, current owner, SLA timers, and a deep link to the ticket.
Use in-app notifications for day-to-day work, and email for durable updates and handoffs. For true on-call scenarios, add SMS/push as an optional channel reserved for urgent events (like a P1 escalation or imminent breach).
Alert fatigue kills response time. Add controls such as grouping, quiet hours, and deduplication:
Provide templates for both customer-facing updates and internal notes so tone and completeness stay consistent. Track delivery status (sent, delivered, failed) and keep a notification timeline per ticket for auditability and follow-ups. A simple “Notifications” tab on the ticket detail page makes this easy to review.
The ticket detail page is where escalation work actually happens. It should help agents understand context in seconds, coordinate with teammates, and communicate with the customer without mistakes.
Make the composer explicitly choose Customer Reply or Internal Note, with different styling and a clear preview. Internal notes should support quick formatting, links to runbooks, and private tags (e.g., “needs engineering”). Customer replies should default to a friendly template and show exactly what will be sent.
Support a chronological thread that includes emails, chat transcripts, and system events. For attachments, prioritize safety:
If you display customer-provided files, make it clear who uploaded them and when.
Add macros that insert pre-approved responses plus troubleshooting checklists (e.g., “collect logs,” “restart steps,” “status page wording”). Let teams maintain a shared macro library with version history so escalations stay consistent and compliant.
Alongside messages, show a compact event timeline: status changes, priority updates, SLA pauses/resumes, assignee transfers, and escalation level shifts. This prevents “what changed?” back-and-forth and helps with post-incident review.
Enable @mentions, followers, and linked tasks (engineering ticket, incident doc). Mentions should notify only the right people, and followers should get summaries when the ticket materially changes—not every keystroke.
Security isn’t a “later” feature for an escalation app: escalations often contain customer emails, screenshots, logs, and internal notes. Build guardrails early so agents can move fast without oversharing data or losing trust.
Start with a small set of roles you can explain in one sentence each (for example: Agent, Team Lead, On-Call Engineer, Admin). Then define what each role can view, edit, comment on, reassign, and export.
A practical approach is “default deny” permissions:
Collect only what your workflow needs. If you don’t need full message bodies or full IP addresses, don’t store them. When you do store customer data, make it clear which fields are required vs. optional, and avoid copying data from other systems unless you have a reason.
For access patterns, assume “support agents should see the minimum to solve the ticket.” Use account scoping and queue scoping before adding complex rules.
Use proven authentication (SSO/OIDC if possible), require strong passwords when passwords are used, and support multi-factor authentication for elevated roles.
Harden sessions:
Store secrets in a managed secret store (not in source control). Log access to sensitive data (who viewed an escalation, downloaded an attachment, exported a ticket), and make audit logs tamper-resistant and searchable.
Define retention rules for tickets, attachments, and audit logs (e.g., delete attachments after N days, retain audit logs longer). Provide exports for customers or internal reporting, but avoid claiming specific compliance certifications unless you can verify them. A simple “data export” flow plus an admin-only “delete request” workflow is a good start.
Your escalation app will only be effective if it’s easy to change. Escalation rules, SLAs, and integrations evolve constantly, so prioritize a stack your team can maintain and hire for.
Choose familiar tools over “perfect” ones. A few common, proven combinations:
If you already run a monolith elsewhere, matching that ecosystem often reduces onboarding time and operational complexity.
If you want to move faster without committing to a large engineering build up front, you can also prototype (and iterate) the workflow in a vibe-coding platform like Koder.ai—especially for standard pieces like a React-based agent dashboard, a Go/PostgreSQL backend, and the job-driven SLA/notification logic that’s common in support systems.
For core records—tickets, customers, SLAs, escalation events, assignments—use a relational database (Postgres is a common default). It gives you transactions, constraints, and reporting-friendly queries.
For fast searching across subject lines, conversation text, and customer names, consider adding a search index later (e.g., Elasticsearch/OpenSearch). Keep it optional at first: start with Postgres full-text search, then graduate if you outgrow it.
Escalation apps depend on time-based and integration work that shouldn’t run in a web request:
Use a job queue (e.g., Celery, Sidekiq, BullMQ) and make jobs idempotent so retries don’t create duplicate alerts.
Whether you choose REST or GraphQL, define resource boundaries up front: tickets, comments, events, customers, and users. A consistent API style makes integrations and the UI move faster. Also plan for webhook endpoints from the start (signing secrets, retries, and rate limits).
Run at least dev/staging/prod. Staging should mirror prod settings (email providers, queues, webhooks) with safe test credentials. Document deployment and rollback steps, and keep configuration in environment variables—not in code.
Integrations turn your escalation app from “another place to check” into the system your team actually works in. Start with the channels your customers already use, then add automation hooks so other tools can react to escalation events.
Email is usually the highest-impact integration. Support inbound forwarding (e.g., support@) and parse:
For outbound, send from the ticket (reply/forward) and preserve threading headers so replies return to the same ticket. Store a clean conversation timeline: show what the customer saw, not internal notes.
For chat (Slack/Teams/intercom-style widgets), keep it simple: convert a conversation into a ticket with a clear transcript and participants. Avoid syncing every message by default—offer an “Attach last 20 messages” button so agents control noise.
CRM sync is how you make “priority support” automatic. Pull company, plan/tier, account owner, and key contacts. Map CRM accounts to your tenants so new tickets can inherit priority rules immediately.
Provide webhooks for events like ticket.escalated, ticket.resolved, and sla.breached. Include a stable payload (ticket ID, timestamps, severity, customer ID) and sign requests so receivers can verify authenticity.
Add a small admin flow with test buttons (“Send test email”, “Verify webhook”). Keep docs in one place (e.g., /docs/integrations) and show common troubleshooting steps like SPF/DKIM issues, missing threading headers, and CRM field mapping.
A priority support app becomes the “source of truth” during tense moments. If SLA timers drift, routing misfires, or permissions leak data, trust evaporates quickly. Treat reliability as a feature: test what matters, measure what’s happening, and plan for failure.
Focus automated tests on the logic that changes outcomes:
Add a small suite of end-to-end tests that mimic an agent’s workflow (create ticket → triage → escalate → resolve) to catch broken assumptions between UI and backend.
Create seed data that’s useful beyond demos: a few customers, multiple tiers (standard vs. priority), varied priorities, and tickets in different states. Include tricky cases like re-opened tickets, “waiting on customer,” and multiple assignees. This makes triage practice meaningful and helps QA reproduce edge cases quickly.
Instrument the app so you can answer: “What failed, for whom, and why?”
Run load tests on high-traffic views like queues, search, and dashboards—especially around shift changes.
Finally, prepare your own incident playbook: feature flags for new rules, database migration rollback steps, and a clear procedure to disable automations while keeping agents productive.
A priority support web app is only “done” once agents trust it under pressure. The best way to get there is to launch small, measure what actually happens, and iterate in tight loops.
Resist the urge to ship every feature. Your first release should cover the shortest path from “new escalation” to “resolved with accountability”:
If you’re using Koder.ai, this MVP shape maps cleanly to its common defaults (React UI, Go services, PostgreSQL), and the ability to snapshot and roll back can be useful while you’re still tuning SLA math, routing rules, and permission boundaries.
Roll out to a pilot group (one region, one product line, or one on-call rotation) and run a weekly feedback review. Keep it structured: what slowed agents down, what data was missing, what alerts were noisy, and where escalation management broke down (handoffs, unclear ownership, or misrouted tickets).
A practical tactic: keep a lightweight changelog inside the app so agents see improvements and feel heard.
Once you have consistent usage, introduce reports that answer operational questions:
These reports should be easy to export and easy to explain to non-technical stakeholders.
Routing and triage rules will be wrong at first—and that’s normal. Tune triage rules based on misroutes, resolution times, and feedback from on-call. Do the same for macros and canned responses: remove ones that don’t reduce time, and refine those that improve incident communication and clarity.
Keep your roadmap short and visible inside the product (“Next 30 days”). Link to help content and FAQs so training doesn’t become tribal knowledge. If you maintain public-facing info, keep it discoverable via internal links like /pricing or /blog so teams can self-serve updates and best practices.
Write criteria in plain language and bake them into the UI. Typical escalation triggers include:
Also document what isn’t an escalation (how-to questions, feature requests, minor bugs) and where those should be routed instead.
Define roles by what they can do in the workflow, then map ownership at every step:
Start with a small set so triage stays consistent and you can ship faster—commonly email + web form. Add chat after:
This reduces early complexity (threading, transcript syncing, real-time noise) while you validate the core escalation workflow.
At minimum, each ticket should store:
For escalations, add structured fields like , , , and (e.g., API, Billing). For SLAs, store explicit due timestamps (e.g., , ) so agents can see exact deadlines.
Use a small, stable status set (e.g., New, Triaged, In Progress, Waiting, Resolved, Closed) and define what each status means operationally.
To make SLAs and accountability auditable, keep an append-only history for:
An event table or audit log lets you reconstruct what happened without relying on “current state” guesses.
Keep priority simple (e.g., P1–P4) and tie SLAs to customer tier/plan + priority. Track at least two timers:
Make overrides possible but controlled: require a reason and record it in the audit history so reporting stays credible.
Model time explicitly:
Define which statuses pause which timers (commonly Waiting on customer/third party) and what happens on breach (tag, notify, auto-escalate, page on-call). Avoid “silent” breaches—create a visible ticket event.
Build a triage inbox for unassigned/needs-review tickets with sorting by priority + SLA due time + customer tier. Keep routing rule-based and explainable using signals like:
Store the reason for each routing decision (e.g., “Matched keyword: SSO → Auth team”) and allow authorized overrides with a required note and audit entry.
Optimize for the first 10 seconds:
Add bulk actions for backlog cleanup, plus keyboard shortcuts for power users and accessibility basics (contrast, focus states, screen-reader-friendly status text).
Secure escalation data early with practical guardrails:
For reliability, automate tests around the rules that change outcomes (SLA calculations, routing/ownership, permissions), and run background jobs for timers and notifications with idempotent retries to avoid duplicate alerts.
For each status, specify who owns the ticket, required response/update times, and who has authority to escalate or override routing.