Mar 17, 2025·8 min
Create a Web App for Customer Onboarding & Account Setup
Learn how to plan, design, and build a web app that automates customer onboarding and account setup, from workflows and data to integrations and security.
Learn how to plan, design, and build a web app that automates customer onboarding and account setup, from workflows and data to integrations and security.
Before you design screens or wire up integrations, define what “onboarding” means for your business. The right scope depends on whether you’re onboarding free trials, paid self-serve customers, or enterprise accounts that require approvals and security checks.
Write a simple statement you can measure, such as:
“A customer is onboarded when they can log in, invite teammates, connect their data, and reach their first successful result.”
Then segment your definition by customer type:
Make a checklist of manual work you want your customer onboarding web app to handle end-to-end. Common account setup automation targets include:
Keep humans in the loop where judgment is required (e.g., credit checks, contract exceptions, custom legal terms).
Choose a small set of metrics that reflect both customer progress and operational load:
Be explicit about your primary users:
This clarity prevents building features that don’t improve onboarding analytics—or customer outcomes.
Map the onboarding journey as a series of steps that move a new customer from “signed up” to their first meaningful result. This keeps the product anchored to outcomes, not just form-filling.
Define the moment that proves the setup worked. It might be inviting teammates, connecting a data source, sending the first campaign, creating the first project, or publishing the first page.
Work backward from that point to identify everything the customer (and your team) must do to get there.
A simple journey map looks like:
List what you truly need to make progress. Common inputs include:
If a field doesn’t unlock a next step, consider postponing it until after activation.
Not every onboarding step is automatic. Note where the flow can branch:
For each decision point, define:
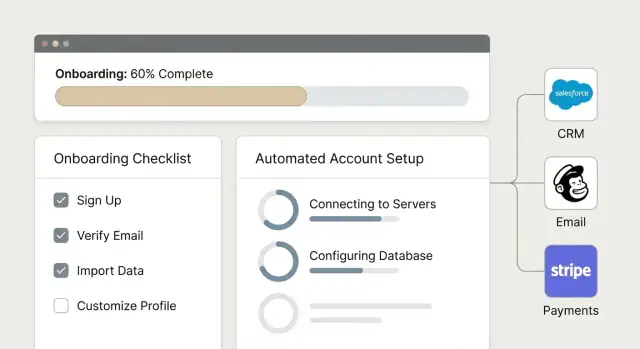
Turn milestones into a short checklist customers can see inside the app. Aim for 5–7 items max, with clear verbs and progress states (Not started / In progress / Done).
Example:
This checklist becomes the spine of your onboarding experience and a shared reference for Support, Success, and the customer.
A good onboarding UX reduces uncertainty. The goal isn’t to “show everything”—it’s to help a new customer reach a successful first moment with as little effort as possible.
Most customer onboarding web apps work best with two layers:
A practical approach: let the wizard handle the critical path (e.g., create workspace → connect a tool → invite teammates). Then keep the checklist on the home screen for everything else (billing, permissions, optional integrations).
People abandon onboarding when they hit long forms. Start with the minimum needed to create a working account, then collect details only when they unlock value.
For example:
Use conditional fields (show/hide) and save advanced settings for an “Edit later” screen.
Customers will get interrupted. Treat onboarding like a draft:
Small UX details matter here: inline validation, examples next to tricky fields, and “Test connection” buttons for integrations reduce support tickets.
Accessibility improves usability for everyone:
If you have a checklist, ensure it’s readable by screen readers (proper headings, lists, and status text) so progress is understandable, not just visual.
A smooth onboarding experience starts with a clear data model: what you store, how pieces relate, and how you know where each customer is in setup. Get this right early and your checklists, automation, and reporting become much simpler.
Most onboarding apps boil down to a few reusable building blocks:
Define relationships explicitly (e.g., a user can belong to multiple workspaces; a workspace belongs to one account). This prevents later surprises when customers ask for multiple teams, regions, or subsidiaries.
Track onboarding as a state machine so your UI and automation can respond consistently:
Store both a current state and task-level status so you can explain why a customer is blocked.
Decide which settings customers can tailor without support: role templates, default workspace naming, onboarding checklist templates, and which integrations are enabled.
Keep configuration versioned so you can safely update defaults without breaking existing accounts.
Onboarding changes often affect security and billing, so plan for an audit trail: who changed what, when, and from → to.
Record events like role changes, invite sent/accepted, integration connected/disconnected, and billing updates—these logs help support resolve disputes quickly and build trust.
Picking a stack for an onboarding app is less about “best” technology and more about fit: team skills, integration needs (CRM/email/billing), and how quickly you need to ship changes without breaking existing flows.
At a high level, these popular options cover most onboarding use cases:
Rule of thumb: onboarding systems often need background jobs, webhooks, and audit logs—choose a framework where these are familiar to your team.
For accounts, organizations, roles, onboarding steps, and workflow state, PostgreSQL is a strong default. It handles relational data cleanly (e.g., users belong to organizations; tasks belong to onboarding plans), supports transactions for “create account + provision user” flows, and offers JSON fields when you need flexible metadata.
Plan dev, staging, and production from day one. Staging should mirror production integrations (or use sandbox accounts) so you can test webhooks and email safely.
Use managed platforms when possible (e.g., container hosting + managed Postgres) and keep secrets in a dedicated secrets manager. Add basic observability early: request logs, job logs, and alerts for failed onboarding actions.
If your goal is to stand up a production-ready onboarding portal quickly—without stitching together a long pipeline—Koder.ai can help. It’s a vibe-coding platform where you build web apps through a chat interface, with an agent-based architecture and modern defaults:
For onboarding systems specifically, features like Planning Mode (to map steps before implementation), source code export, and snapshots + rollback can reduce risk while you iterate on onboarding workflow and integrations.
The workflow engine is the “conductor” of onboarding: it takes a new account from “just signed up” to “ready to use” by executing a predictable set of steps, recording progress, and handling failures without manual babysitting.
Write down the exact actions your system should run when a customer starts onboarding. A typical sequence might include:
Keep each action small and testable. It’s easier to recover from a failed “send invite” than from a single mega-step called “setup everything.”
Some steps should run instantly in the signup request (synchronous): lightweight, required actions like creating the workspace record and assigning the first owner.
Anything slow or flaky should move to background jobs: seeding lots of data, calling external APIs, importing contacts, or generating documents. This keeps signup fast and avoids timeouts—customers can land in the app while setup continues.
A practical pattern is: synchronous “minimum viable account” first, then a background queue completes the rest and updates a progress indicator.
Real onboarding automation fails: emails bounce, CRMs rate-limit, webhooks arrive twice. Plan for that:
The goal is not “never fail,” but “fail safely and recover quickly.”
Build a simple internal screen that shows each account’s onboarding steps, status, timestamps, and error messages. Include controls to re-run, skip, or mark complete for specific steps.
This lets support resolve issues in minutes without engineers—and gives you confidence to automate more over time.
Authentication and authorization are the gatekeepers of your onboarding app. Get them right early and everything else (automations, integrations, analytics) becomes safer and easier to maintain.
Most onboarding apps start with email + password or magic links (passwordless). Magic links reduce password resets and can feel smoother during first-time setup.
If you sell to larger organizations, plan for SSO (SAML/OIDC). It reduces friction for enterprise customers and makes offboarding and access control easier for their IT team.
A practical approach is to support magic link/password first, then add SSO for eligible plans.
Define roles based on real tasks:
Make permissions explicit (e.g., can_invite_users, can_manage_billing) rather than hiding everything behind broad roles. This keeps exceptions manageable.
Use TLS everywhere and encrypt sensitive fields at rest (API keys, tokens, PII). Store integration credentials in a dedicated secrets store, not in plain database fields.
Follow least privilege: each service and integration should only have the permissions it truly needs (both in your cloud provider and in third-party tools).
Record key events: logins, role changes, invites, integration connections, and billing-related actions. Include who, what, when, and where (IP/device when appropriate).
Audit logs help you answer “What happened?” quickly—and they’re often required for compliance and enterprise deals.
Integrations turn your onboarding app from a “form collector” into a system that actually sets up accounts end-to-end. The goal is to remove double entry, keep customer data consistent, and trigger the right steps automatically when something changes.
Start with the tools your team already uses to manage customers:
If you’re unsure what to do first, pick one “source of truth” to anchor the rest (often the CRM or billing system), then add the next integration that eliminates the most manual work.
Polling external systems is slow and error-prone. Prefer webhooks so you can respond immediately to events such as:
Treat webhooks as inputs into your onboarding workflow: receive the event, validate it, update onboarding state, and trigger the next action (like provisioning or a reminder email). Also plan for duplicates and retries—most providers will resend.
A clear integration settings page reduces support tickets and makes failures visible. Include:
This screen is also a good place to configure mappings: which CRM field stores “Onboarding stage,” which email list to add new users to, and which billing plan unlocks which features.
Decide upfront:
Good integration design is less about APIs and more about clarity: what triggers what, who owns the data, and how your app behaves when something goes wrong.
Clear, timely messages reduce drop-off during onboarding. The key is to send fewer, better messages that are tied to real customer actions (or lack of them), not a fixed calendar.
Build a small library of event-driven emails, each mapped to a specific onboarding state (e.g., “Workspace created” or “Billing incomplete”). Common triggers include:
Keep subject lines specific (“Connect your CRM to finish setup”) and make the CTA mirror the exact action in the app.
In-app messages work best when they appear at the moment of need:
Avoid modal overload. If a prompt isn’t tied to the current page context, prefer an email.
Offer simple controls: frequency (instant vs daily digest), recipients (owner only vs admins), and which categories they care about (security, billing, onboarding reminders).
Add rate limits per user/account, suppress repeats once a step is completed, and include unsubscribe options where appropriate (especially for non-transactional emails). Also implement “quiet hours” to prevent late-night reminders in the customer’s timezone.
A customer onboarding web app isn’t “done” when it’s shipped. Once you can see where people succeed, hesitate, or abandon account setup automation, you can improve the experience systematically.
Start with a small, reliable event taxonomy. At minimum, track:
Add context properties that make analysis practical: plan type, acquisition channel, company size, role, and whether the user took a self-serve signup path or was invited.
Dashboards should answer operational questions, not just show charts. Useful views include:
If your onboarding touches CRM integration or email automation, include breakdowns by integration enabled vs. not enabled to spot friction introduced by external steps.
Analytics events won’t tell you why something failed. Add structured error reporting for user provisioning, form automation, webhooks, and third-party APIs. Capture:
This is especially important when role-based access or permissions cause steps to silently fail.
Set up alerts for spikes in automation failures and sudden drops in completion rate. Alert on both error rate (e.g., provisioning failures) and conversion rate (started → completed). That way you catch noisy outages and subtle regressions after a change.
Shipping an onboarding automation system isn’t just “deploy and hope.” A careful release protects customer trust, prevents support spikes, and keeps your team in control when integrations misbehave.
Start with a small set of tests you can run repeatedly before each release:
Keep a short checklist of expected outcomes (what the user sees, what gets written to your database, and which events are emitted) so failures are easy to spot.
Use feature flags to release automation in stages:
Make sure you can disable a feature instantly without redeploying, and that the app falls back to a safe manual flow when automation is turned off.
If onboarding data or states change, write down:
Publish a short customer-facing guide (and keep it updated) covering common questions, required inputs, and troubleshooting. If you have a help center, link it directly from the UI (e.g., /help).
Internal docs should include runbooks: how to replay a step, inspect integration logs, and escalate incidents.
Launching your onboarding app is the start of operations, not the finish line. Maintenance is about keeping onboarding fast, predictable, and safe as your product, pricing, and team evolve.
Document a simple runbook your team can follow when a customer can’t progress. Keep it focused on diagnosis first, then action.
Common checks include: which step is blocked, last successful event/job, missing permissions, failed integrations (CRM/email/billing), and whether the account is in the expected onboarding state.
Add a small “Support snapshot” view that shows recent onboarding activity, errors, and retry history. This turns a long back-and-forth email thread into a 2‑minute investigation.
Well-designed admin tools prevent one-off fixes in the database.
Useful capabilities:
If you have a help center, link these actions to internal docs at paths like /docs/support/onboarding.
Onboarding often expands to include billing, roles, and integrations—so permissions drift over time. Schedule periodic reviews of role-based access, admin actions, token scopes for third-party tools, and audit logs.
Treat new admin features (especially impersonation and step overrides) as security-sensitive.
Create a lightweight roadmap: add new onboarding templates per customer segment, expand integrations, and improve defaults (pre-filled settings, smarter recommendations).
Use onboarding analytics to prioritize changes that reduce time-to-first-value and support tickets—then ship small improvements continuously.
If you’re experimenting rapidly, consider using a workflow that supports safe iteration in production. For example, platforms like Koder.ai offer snapshots and rollback, which can be helpful when you’re tuning onboarding flows and automation steps without risking long-lived customer setup states.
Define a measurable statement tied to customer value, not internal completion.
Example: “Onboarding is complete when the customer can log in, invite teammates, connect their data, and achieve their first successful result.” Then tailor the required steps by segment (trial vs paid vs enterprise).
Start with a short list that captures both customer progress and operational load:
Pick these early so your UX, automations, and tracking align from day one.
Map the journey backward from the first “proof it works” action (e.g., send first campaign, publish first page, create first project).
A common milestone sequence is:
Only ask for inputs that unlock the next step. If a field doesn’t change what happens next, postpone it until after activation.
Good “early” fields: workspace name, primary use case, and the minimum required to connect the first integration. Everything else can move to “Edit later.”
Use a two-layer approach:
Keep the checklist short (5–7 items), use clear verbs, show status (Not started / In progress / Done), and support “resume later” with autosave.
Model the building blocks and relationships explicitly:
Also track onboarding as states (Not started, In progress, Blocked, Complete) plus task-level statuses so you can explain someone is stuck.
Keep signup fast by doing only the minimum synchronously (create account/workspace, assign the first owner). Move slow or flaky work to background jobs:
Update a progress indicator as jobs complete so the customer can start using the app while automation runs.
Treat failures as normal and design for safe recovery:
Add an internal admin view to rerun/skip/mark steps complete with audit logs.
Start with email+password or magic links for self-serve. Plan SSO (SAML/OIDC) for enterprise.
Implement RBAC with explicit permissions (e.g., can_invite_users, can_manage_billing) and apply least privilege for internal roles. Encrypt sensitive data (tokens, PII), use TLS everywhere, and record audit logs for logins, invites, role changes, integrations, and billing actions.
Prioritize integrations that remove manual work:
Use webhooks for lifecycle events (signup, payment success, cancellation), store external IDs, define a source of truth for fields, and build an integration settings screen with connection status, last sync time, and “test connection.”