Apr 19, 2025·8 min
How to Build a Web App for Influencer Campaign Management
Learn how to plan and build a web app that manages influencer campaigns, contracts, payments, and performance metrics—from data model to dashboards.
Learn how to plan and build a web app that manages influencer campaigns, contracts, payments, and performance metrics—from data model to dashboards.
Before you pick features, get clear on who the app is for and what “done” looks like. Influencer campaign management touches multiple teams, and each one measures success differently.
Start with a simple list of roles and what they need from day one:
If you try to satisfy everyone equally in v1, you usually end up with a busy UI that nobody loves. Pick a primary user (often the campaign manager) and design outward.
A useful framing is: “After using this app, we can…”
Define what must be true for a campaign to run inside your MVP: campaign setup, creator roster, deliverables checklist, basic contract + payment status, and a simple performance view. Everything else (advanced automations, deep integrations, custom dashboards) can wait.
If you want to validate the workflow quickly, a vibe-coding platform like Koder.ai can help you prototype these core screens and flows via chat (campaign setup → deliverables → approvals → payout status) before you commit to a large engineering backlog.
Agree on measurable targets, such as:
These metrics keep scope decisions grounded when “nice-to-have” requests appear.
Before screens and databases, align on how work moves through your app. A clear user flow prevents “custom” features that are really just missing basics.
Write the happy path in plain language, from first contact to final report:
Discover → Outreach → Brief → Contract → Content production → Review/Approval → Publish → Pay → Report.
For each step, capture: who does it (brand, agency, creator), what they need to see, and what proof is required (e.g., a link to a post, screenshots, or platform analytics).
Statuses make filtering, automation, and reporting possible. Document required states for:
Keep them minimal at first—every extra status adds UI and edge cases.
List the non-negotiables that affect planning:
Agree on how clients expect to slice results:
By campaign, creator, platform, and date range—plus the exact metrics that matter (reach, views, clicks, conversions) and what “success” means for each campaign.
A clear data model prevents two common failures in an influencer campaign management app: losing track of who owes what, and arguing about what “worked.” Start by naming the core entities and the minimum fields each must have.
At a minimum, plan for: Brand/Client, Campaign, Creator/Influencer, Deliverable, Contract, Payment, Asset/File, and Metric.
Keep each entity focused. For example, a Campaign holds the brief, dates, budget, and goals; a Creator holds profile details, rates, and contact info; a Deliverable holds platform, due date, status, and a link to the content.
Model relationships explicitly:
This structure makes it easy to answer questions like “Which creators are late?” or “Which deliverables are approved but unpaid?”
Add created_by, created_at/updated_at, and a lightweight status history (who changed what, when). Include notes on Campaigns, Creators, Deliverables, and Payments so context doesn’t get buried in email threads.
Decide whether you’ll store files in-app or store links to external storage. Either way, attach files to the right record (e.g., content proofs to Deliverables, invoices to Payments) and capture metadata like version, uploader, and approval status.
If you serve multiple brands or agency clients, add a tenant/client identifier to every record and enforce it in queries. Retrofitting separation later is expensive and risky.
Good information architecture keeps campaign work from scattering across tabs, spreadsheets, and chat threads. Before you design visuals, map the “objects” users touch most—campaigns, creators, deliverables, contracts, payments, and results—then decide where each object lives and what the default navigation should be.
Start with a small set of screens that cover 80% of daily tasks:
In the campaign detail screen, design a timeline that aggregates every meaningful event in one place: outreach sent, brief approved, contract signed, content uploaded, edits requested, post went live, invoice received, payment sent.
Make it filterable (e.g., “only approvals” or “only payments”) so teams can quickly answer, “Where are we stuck?”
Influencer teams live in lists, so design fast filtering from day one:
Add saved views like “Needs approval,” “Posts due this week,” or “Waiting on invoice.”
Plan bulk actions directly in the list UI: send outreach emails, update statuses, export selected rows, and prepare payment batches.
Keep bulk steps explicit (review → confirm → log to timeline) so changes are traceable and client questions are easy to answer later.
Campaign planning is where an influencer campaign management app stops being a spreadsheet and starts being a system. The goal is to make every campaign repeatable: the team knows what to do next, creators know what’s expected, and clients can see progress without chasing updates.
Create a standard brief that becomes the “source of truth” for everyone involved. Keep it structured so it can power checklists and reports later:
Deliverables should be first-class objects with clear details:
This enables reminders, capacity planning, and later performance comparisons by deliverable type.
Model the real steps creators and brand teams follow:
Track budget in three states—planned vs. committed vs. paid—and trigger alerts when a campaign is trending over plan (e.g., added deliverables, rush fees, extra revisions). This keeps finance surprises from showing up after the content is live.
Contracts are where influencer campaigns succeed or fail operationally: one missing usage-rights clause can turn “great content” into a legal headache. Treat contracts as structured data, not just PDFs.
Alongside an uploaded document, capture key terms in your database so they’re searchable, reportable, and reusable:
This lets your team filter “creators with 6‑month exclusivity” or auto-check whether planned paid ads violate usage rights.
Start with a few templates (e.g., TikTok post, multi-post bundle, affiliate-only). Support variables such as creator name, campaign name, dates, deliverable list, and payment schedule.
A simple “preview” view helps non-legal teammates sanity-check before sending.
If you have an internal approval step, model it explicitly (who must approve, in what order, and what happens if someone rejects).
At minimum, track: drafted → sent → signed, plus expired and amended.
Every edit should create a version with a timestamp and author (“who changed what”) and preserve prior files/terms for auditability.
You have two realistic paths:
Whichever you choose, store the signed artifact, signing date, and any amendments as separate linked records so campaign ops can find the current contract in one click.
Payments are where influencer programs often get messy: scattered spreadsheets, unclear “what’s owed,” and last-minute chasing. A good web app keeps money movement auditable without turning you into a payments processor.
If you need creator payout details, prefer redirecting to a trusted provider or using tokenized collection (e.g., via a payment platform’s hosted form). Avoid storing sensitive data like full bank details or card numbers unless you have a compliance reason and the expertise to handle it.
Store only what you need for operations:
Model payments as milestones tied to campaign deliverables: upfront, on approval, on publish, and net terms (e.g., Net 15/30). Each milestone should show amount, currency, due date, and trigger event.
For invoicing, support “invoice requests” rather than forcing a single format:
Add payout status tracking: pending → submitted → paid, with failure states (failed/refunded) and a reason field.
Include CSV exports for accounting and a reconciliation log (who matched a payout to a bank entry, when, and what changed) to reduce end-of-month surprises.
If you can’t trust the numbers, you can’t manage the campaign. Start by choosing a small, clear set of metrics you’ll track everywhere—then expand only when the team agrees on definitions.
Pick primary metrics by objective:
Write short tooltips in the app that define each metric and the reporting window (for example: “7 days after posting”). This prevents “Why doesn’t your impression count match mine?” conversations.
Support multiple attribution methods because creators and platforms vary:
Store these as first-class objects tied to each deliverable so you can answer: “Which Story drove the conversions?” not just “Which creator?”
Not every platform allows full API access. Plan for:
Track metrics per deliverable, then roll them up to creator and campaign totals. Keep both raw values and calculated rates so reports stay consistent as data updates.
Integrations are where an influencer campaign management app stops being “another spreadsheet” and starts saving real time. The goal isn’t to connect everything—it’s to connect the few systems your team already trusts.
Start with the tools that directly affect daily execution:
Plan “escape hatches” from day one:
Where available, prefer webhooks (e.g., contract signed, affiliate conversion posted) instead of polling.
For APIs you must poll, add rate limiting, backoff retries, and clear error messages so a temporary outage doesn’t break reporting.
Store integration tokens and defaults per client/tenant: connected accounts, tracking templates, approved domains, and who can authorize connections. That keeps permissions clean and prevents cross-client data leaks.
Permissions are where an influencer campaign management app either stays tidy—or turns into a shared spreadsheet with anxiety. Define roles early, then translate them into clear, testable rules.
Most teams fit into a few predictable buckets:
Write permissions in plain language first, then implement role-based access control (RBAC) with exceptions only when truly necessary. Typical rules include:
If you support creator access, keep it focused: upload drafts, view the brief, confirm deliverables, and see payment status.
Avoid exposing internal notes, other creators, or full budgets.
Add an activity trail for key actions (contract edits, approvals, payout changes, exports). It reduces disputes and makes audits far easier when a client asks, “Who approved this, and when?”
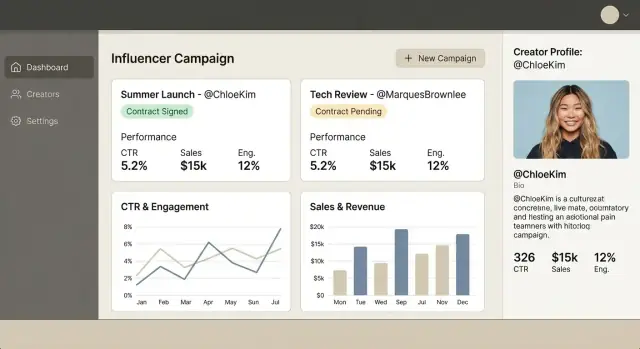
A client dashboard should answer three questions quickly: Is the campaign on track? What did we publish? What did we get? The goal isn’t to show every metric—it’s to support decisions and avoid surprises.
Start with an internal “campaign health” view that your team can check daily:
Keep each card clickable so users can drill down to the underlying creator, deliverable, or post.
Clients usually want a clean summary plus evidence. Provide a client-facing report with:
Add filters that reflect how clients think:
For sharing, support PDF summary exports (client-ready) and CSV raw exports (analyst-friendly). Make PDFs reflect the same filters the client selected.
Use tooltips and inline definitions for anything ambiguous (e.g., “Engagement rate = engagements ÷ impressions”). If attribution is partial, label it clearly (e.g., “Tracked conversions”). This keeps reporting confident and readable for non-technical stakeholders.
A maintainable influencer campaign management app is less about “perfect” tech and more about picking defaults your team can ship and support.
Start from skills you already have, then optimize for clarity:
If you’re aiming to ship faster with a modern default stack, Koder.ai is aligned with common production choices (React on the frontend, Go on the backend, and PostgreSQL). It can be a practical way to get an MVP into users’ hands quickly, then export the source code when you’re ready to take over long-term development.
Your app will quickly need supporting services:
If multiple brands/clients use the app, choose a clear tenant boundary from day one:
tenant_id on every row (fastest to build)Use feature flags to roll out new integrations for influencer tools, metrics, or attribution step-by-step—especially when clients rely on monthly reporting.
Even if you start monolithic, document endpoints early (OpenAPI is ideal): campaigns, creators, contracts, deliverables, and metrics.
Clean API docs reduce rework when you add UTM and affiliate attribution, new dashboards, or partner integrations later.
Security isn’t a “later” feature for an influencer campaign management app—you’ll store contracts, payment details, emails, and performance data. A few foundational decisions early will save you painful rework.
Start with a secure login flow and a clear plan for account recovery. If your customers are agencies or brands, support SSO (SAML/OAuth) when you can; otherwise, use a proven authentication provider.
Offer MFA (authenticator app, not just SMS) for admins and finance roles. Enforce basic password policies (length, breached-password checks) and lock down repeated failed login attempts.
Always use TLS (encryption in transit). For encryption at rest, use what your database/cloud supports, and encrypt sensitive fields when needed (e.g., tax IDs).
Apply least-privilege access: users should only see campaigns and creators they’re assigned to. Combine this with role-based access control so payments, contracts, and exports are restricted to approved roles.
Track consent for marketing emails and store only what you truly need. Define retention rules (e.g., delete inactive creator profiles after X months) and support deletion requests for privacy laws like GDPR/CCPA.
Automate backups, test restores monthly, and document a basic recovery plan: who is on call, expected downtime, and what data can be recovered.
Before each release, verify: permissions changes, audit logs for contract/payment actions, API key rotation where relevant, and an access review (especially for former employees/contractors).
A good influencer campaign management app fails in predictable places: contracts get edited mid-stream, creators post late, metrics arrive incomplete, and finance teams want split payments. Your test and launch plan should mirror real campaign messiness.
Start with end-to-end scenarios that match daily usage:
Automate these as smoke tests so every release tells you whether the app still works.
Manually test (and later automate) situations like:
Ship a sample campaign with realistic creators, deliverables, and a prebuilt report. Include a few templates (contract, briefing checklist) and short in-app guidance (tooltips or a 3-step checklist) so first-time users can succeed without training.
Recruit a small set of beta users, schedule weekly feedback, and keep a visible roadmap.
Measure adoption with product analytics: which screens are used, where users drop off, and how long key tasks take. Prioritize fixes that remove friction from the main workflow before adding new features.
If you’re iterating quickly, snapshots and rollback can be especially helpful during beta. Platforms like Koder.ai support this style of rapid experimentation (ship → measure → adjust) without turning every iteration into a multi-week release cycle.
Start by choosing a primary user (often the campaign manager) and writing 2–3 outcomes the app must enable (e.g., “run campaigns end-to-end without spreadsheets”). Then define the minimum set of objects and screens required for a campaign to run:
Anything that doesn’t unblock that “happy path” (deep integrations, advanced automations, custom dashboards) is a v2 feature.
Use statuses as the “backbone” for filtering, automation, and reporting. Keep them minimal so you don’t create UI clutter and edge cases.
A practical starting set:
Model what you need to answer day-to-day questions like “who’s late?” and “what’s approved but unpaid?”
Minimum core entities:
Key relationships:
Plan tenant separation on day one by adding a tenant/client identifier to every record and enforcing it in queries.
Two common approaches:
tenant_id on every row: fastest to buildAlso store integrations and defaults per tenant (connected accounts, tracking templates, who can authorize connections) to prevent cross-client data leaks.
Store the contract file, but also store key terms as structured fields so they’re searchable and reportable.
Fields worth capturing:
This enables filters like “6‑month exclusivity” and quick checks that planned usage doesn’t violate rights.
For v1 you have two viable options:
Whichever you choose, track states like drafted → sent → signed, and keep version history (timestamp + author). Store the signed artifact and any amendments as separate linked records so teams can always find the current contract quickly.
Avoid storing sensitive banking/card data unless you have the compliance expertise. Prefer a trusted provider’s hosted or tokenized collection.
Operational data to store safely:
Model payments as milestones tied to deliverables (upfront/on approval/on publish) with statuses (pending → paid + failure reasons), and include CSV exports plus a reconciliation log for finance.
Pick a small set of metrics and write definitions in the UI (including the reporting window, e.g., “7 days after posting”).
Support multiple attribution methods because platforms vary:
Store attribution objects per deliverable, allow manual entry with validation, and label sources (manual vs import) so reporting stays defensible.
Prioritize integrations that remove daily busywork:
Design “escape hatches” (CSV import/export), and make integrations resilient with webhooks where possible, rate limiting, retries, and clear error states when an API is down.
Use RBAC with a small set of roles and explicit rules (contracts, budgets, approvals, exports). Add least-privilege campaign assignment so users only see what they should.
Security basics that pay off quickly:
Test with end-to-end scenarios (campaign → contract → deliverables → publish → pay → report) plus weekly edge cases (late posts, contract amendments, missing metrics, split payments).
Make every status change loggable (who changed what, when) so timelines and audits work later.
Add audit fields early (created_by, timestamps, status history) and attach notes to reduce “lost context” in email threads.