Mar 07, 2025·8 min
How to Create a Web App for Internal Approval Flows (No Code)
Learn how to build an internal approvals web app without custom code: map steps, design forms, set roles, automate routing, add audit trails, and launch safely.
Learn how to build an internal approvals web app without custom code: map steps, design forms, set roles, automate routing, add audit trails, and launch safely.
An internal approval web app is a system for moving a request from “someone needs something” to “a decision was made—and we can prove it later.” The best ones do a few core jobs consistently, even when the exact process varies by team.
Most internal approval flows include:
You’ll see the same pattern across many processes:
No-code tools are often a good fit because they let teams ship quickly, iterate weekly, and keep ownership with the people who run the process. You can build forms, routing rules, notifications, and dashboards without waiting for a traditional development queue.
Bring in engineers if you have edge cases like highly conditional routing (many branches), strict data residency needs, custom SSO constraints, or complex integrations that require middleware and robust error handling. In many orgs, no-code can still handle the UI while engineering fills the gaps.
If you want something closer to “custom” without committing to a full build, a vibe-coding platform like Koder.ai can sit in between: you describe the workflow in chat, and it generates the app (commonly React on the frontend, Go + PostgreSQL on the backend) with options like source-code export, deployment/hosting, snapshots, and rollback—useful when your approval process starts simple but needs to harden over time.
Before you open a builder, pick one internal approval workflow to tackle first. The goal is to prove value quickly, then reuse the same pattern for other approval flows.
A good first candidate usually has:
Examples: purchase requests under a threshold, time-off approvals, content/legal review for a specific template, or basic vendor onboarding.
Be specific about what “submission” means in your form-to-approval process:
If approvers routinely ask for the same missing detail, make it required in v1.
Write down every person (or role) involved and where decisions happen: reviewers, approvers, finance, legal, and any delegates for vacations. Also note “edge” decisions like “send back for edits” or “request more info,” since those drive most follow-ups.
Pick 2–3 measurable outcomes:
With a defined start, finish, and success metrics, the rest of your workflow automation choices become much easier.
Before you touch a builder, map the approval path on one page. This prevents “almost works” workflows—where requests get stuck, routed to the wrong person, or bounce around without a clear end.
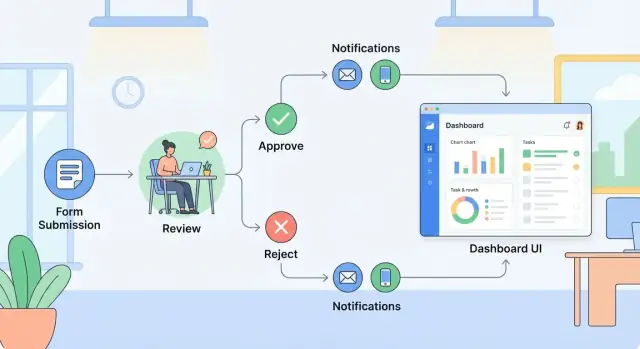
Start with a simple backbone you can read aloud:
Submit → Review → Approve/Reject → Close
For each step, name who does it (role or team), what they need to see, and what they can decide. If you can’t describe a step in one sentence, it’s usually hiding multiple actions that should be separated.
Clarify whether reviews happen:
Parallel flows need a rule for “done”: all must approve, any one can approve, or majority. Pick one now—changing it later often forces a rebuild.
A rejection can mean:
Choose what’s correct for compliance and reporting. “Edit and resubmit” is common, but you should still record the original decision.
Map the non-happy paths upfront:
If you capture these on paper first, the build becomes configuration instead of guesswork.
A no-code approval app works best when the data model is simple, consistent, and easy to report on later. Before you build screens, decide what records you’re storing and how they relate.
For most internal approval workflows, you can cover 90% of needs with a few tables (or collections):
Keep Request as the single source of truth. Everything else should point back to it.
Define the must-have fields needed to route and decide. Typical required fields are:
Everything else can start optional. You can always add fields later once you see what approvers actually ask for.
Decide upfront what documents must be stored (quotes, contracts, screenshots) and for how long.
Use a small, clear status set so everyone interprets progress the same way:
Draft → Submitted → In Review → Approved / Rejected → Completed
Avoid inventing too many custom statuses early. A consistent status field makes filtering, reminders, and reporting much easier.
A good approval app succeeds or fails on usability. If people dread submitting a request or can’t tell what’s happening next, they’ll fall back to email.
Most internal approval workflows can be covered with a small set of pages:
Keep the navigation simple: “New request”, “My requests”, “Needs my approval”, and “Settings” (for admins).
Start with the minimum required fields, then use conditional fields to keep the form short. For example: only show “Vendor details” if “Purchase type = New vendor”, or show “Reason for exception” only if a policy checkbox is unchecked.
This is where no-code tools shine: you can show/hide sections based on dropdowns, amounts, or department—without creating separate forms.
On every request record, display:
A simple progress indicator plus a “Waiting on: <name/role>” line eliminates most “Any update?” messages.
Add short helper text and examples directly under tricky fields (“Attach the signed quote (PDF)”, “Use cost center like 4102-Operations”). Use validation to prevent avoidable rework: required attachments for certain request types, allowed ranges for amounts, and clear error messages.
The goal is fewer clarifying questions, faster decisions, and cleaner records for reporting.
If your approval app is a building, roles and permissions are the locks and keys. Routing rules are the hallway signs that make sure each request lands on the right desk—without manual chasing.
Start with a small set of roles you’ll reuse across workflows:
Write down what each role can do in plain language before you touch the builder.
Approvals break when everyone can see or edit everything. Define permissions at each stage:
A practical default: once submitted, lock key fields (amount, vendor, dates), and allow edits only via a “send back” action.
Hard-coding names doesn’t scale. Prefer routing rules like:
This keeps the workflow accurate even when people join, leave, or change teams.
Approvals often stall due to vacations and inbox overload. Add:
These rules protect throughput without sacrificing control.
Automation is what turns a simple form into a dependable internal approval workflow. The goal is straightforward: when a request changes status, the next person should instantly get the right task—without manual chasing or copy-pasting links.
Set up rules like: Draft → Submitted → Manager Review → Finance Review → Approved/Rejected. Each status change should automatically:
Keep routing rules readable. If you need exceptions (e.g., “If amount > $5,000, add CFO approval”), define them as clear conditions tied to data fields.
At minimum, send two kinds of messages:
Use the channels your company already checks—email plus Slack/Teams if available. Keep messages short and consistent so they don’t feel like noise.
Approvals stall when no one is accountable for time. Add:
Make escalations predictable (and visible) so approvers trust the system.
Automation should also stop common failure modes:
These guardrails reduce rework and ensure every request follows the same path.
An approval app only works when everyone can see what’s waiting, what’s stuck, and what’s done—without asking around. Dashboards turn “Where is this request?” into a self-serve answer.
Create a single place reviewers can trust every day. Your inbox view should include:
Keep each row actionable: requester, department, amount/type, submitted date, due date, and one-click approve/reject.
Most follow-ups are predictable: “Show me all pending requests from Sales this month,” or “Find the PO I submitted last Tuesday.” Build filters for:
If your tool supports it, add saved views like “My team’s pending” or “Finance queue.”
Dashboards don’t need to show every field to be useful. Focus on operational metrics:
Use aggregated counts and durations so leaders can spot slow steps without seeing confidential request content.
Even if you’re not using a BI tool yet, make reporting easy:
This reduces ad-hoc requests and helps you prove the workflow is improving over time.
If approvals affect spending, risk, or customer commitments, you need evidence—not just “Approved” as a final status. Governance is easiest (and cheapest) to add while you’re designing the workflow, not after people already rely on it.
Your app should record a clear history of who did what, and when. At minimum, log:
Make the audit log viewable to admins and reviewers, but don’t expose it to everyone by default.
Approvals with no context create confusion later. Add an optional comment on approval, and a required “reason for rejection” field. This prevents vague “Rejected” outcomes and makes resubmissions faster because the requester knows what to fix.
A practical pattern:
Use a least-privilege approach so people only see what they need:
If your tool supports row-level permissions, use them. If not, separate sensitive workflows into distinct apps.
Decide early how long to keep records (e.g., 1–7 years depending on policy), how deletions work (soft-delete is often safer), and who reviews access quarterly. Document these rules in a short internal page and link it from the app (for example: /policies/approvals).
Approval flows rarely live on an island. The fastest way to get adoption is to plug your app into the systems people already use: login, HR data, finance records, ticketing queues, and messaging.
If your company already uses Google Workspace, Microsoft Entra ID (Azure AD), Okta, or similar, enable SSO so employees don’t need a new password.
Beyond convenience, SSO helps with access control: you can map groups (e.g., “Finance”, “People Ops”, “IT”) to roles in your approval app, reducing manual admin and lowering the risk of the wrong person seeing sensitive requests.
Most approval requests need reference data:
Use native connectors where available so your forms can auto-fill fields and your routing rules can make better decisions (for example, route by department or spend threshold).
If your tool doesn’t have a built-in integration, you can still connect without building an entire custom application. Many platforms let you:
Keep the payload simple: request ID, requester, decision, timestamp, and the key fields needed by the target system.
Integrations fail—tokens expire, APIs rate-limit, fields change. Build in:
This prevents “approved but never executed” outcomes, which erode trust quickly.
Testing an internal approval workflow isn’t just “does the button work?” It’s whether real people can move real requests from start to finish without confusion or workarounds.
Create a small set of realistic requests and run them through the full process:
Watch for bottlenecks: unclear fields, missing context for approvers, and steps that force people back into email or chat to understand what they’re approving.
Start with a small group—one team or one request type—and keep the pilot long enough to hit edge cases (typically 2–4 weeks). Schedule a short weekly check-in and track feedback in one place (a form or shared doc). Prioritize fixes that reduce back-and-forth: field clarity, routing rules, and notification timing.
Keep documentation short and practical:
Publish it where users already go (for example, an internal page like /help/approvals).
Expand one group at a time. Use early metrics—cycle time, rejection reasons, time spent in each step—to refine rules and form fields. Small iterations (weekly or biweekly) keep trust high and prevent the workflow from turning into a workaround magnet.
Even with no-code tools, approval flows get messy without a few guardrails. These are the failure modes that most often slow teams down—and practical ways to prevent them.
A common instinct is to capture every detail “just in case.” The result is a form nobody wants to fill out and an approval path that’s hard to maintain.
Start simple: the minimum fields needed to make a decision, and the shortest approval path that still meets policy. Launch it, watch where people get stuck, then add only what’s clearly needed.
Routing rules, approver lists, and role-based access need a clear owner. If nobody owns the workflow, exceptions pile up, access becomes outdated, and approvals get blocked when someone changes roles.
Assign a named process owner (and a backup). Put rule changes behind a lightweight change process (even a short checklist), and schedule a monthly review of approver groups and permissions.
If requesters can’t see status or the next approver, they will chase people manually—defeating the purpose of automation.
Include a status page with: current stage, last updated time, next approver (or team), and an estimated SLA. Add a simple dashboard view so managers can spot bottlenecks.
Real workflows have edge cases: urgent requests, out-of-office approvers, or policy exceptions.
Build in safe exception handling: an “urgent” flag that triggers a defined fast path, delegation rules, and a controlled override that requires a reason and is recorded in the audit trail.
If you anticipate frequent changes to the workflow logic (new thresholds, extra approvers, or new request types), consider a build approach that’s easy to iterate without losing governance. For example, teams use Koder.ai to generate and evolve internal workflow apps quickly from a chat-based spec, while still keeping the option to export source code and enforce tighter controls as the process matures.
Start with one workflow that is high pain, low complexity:
Examples include purchase requests under a threshold, time-off approvals, or a basic access request flow. Prove value, then reuse the same pattern for other approvals.
Capture the minimum data needed to route and decide. Common required fields:
If approvers repeatedly ask for a detail (like vendor name or a quote), make it required in v1.
Most apps need only a few core screens:
Keep navigation simple so users can reliably find “New request,” “My requests,” and “Needs my approval.”
Use a small, standardized status set so filtering, reminders, and reporting are easy:
If you need more detail, show the current step (e.g., “Manager review”) as a separate field rather than inventing many statuses.
Pick based on whether order matters or speed matters:
For parallel reviews, define the completion rule early: all must approve, any one, or majority—changing this later often forces rework.
Decide what “rejected” means for your process:
Even with edit/resubmit, keep an audit record of the original decision and rejection reason.
Define roles and permissions per stage:
A practical guardrail: once submitted, lock key fields (amount/vendor/dates) and only allow changes via a “send back” action.
Use organization-based rules instead of hard-coding names:
This keeps routing accurate when people change roles or teams.
Add stall-prevention rules from the start:
Make escalation behavior visible and consistent so the system feels predictable, not arbitrary.
Log enough detail to answer “who did what, when, and why”:
Also set retention expectations early (e.g., 12–24 months for operational requests, longer for finance/legal) and use least-privilege access so users only see what they need.