Jul 21, 2025·8 min
How to Build a Web App for Procurement Approval Workflows
A step-by-step guide to plan, design, and build a procurement web app with purchase requests, approval routing, audit trails, integrations, and security.
A step-by-step guide to plan, design, and build a procurement web app with purchase requests, approval routing, audit trails, integrations, and security.
Before you write specs or pick tools, get very clear on why you’re building a procurement web app. If you skip this step, you can end up with a purchase request system that technically works but doesn’t reduce the real friction—slow approvals, unclear ownership, or “shadow procurement” happening in email and chat.
Start by naming the pain in plain language and tying it to measurable outcomes:
A helpful prompt: What would we stop doing if the app worked perfectly? For example: “stop approving via email threads” or “stop re‑entering the same data into an ERP.”
A purchase approval workflow touches more people than you think. Identify stakeholders early and capture their non‑negotiables:
Bring at least one person from each group into a short working session to agree on how approval routing should work.
Write down what “better” means using metrics you can measure after launch:
These become your north star when you later debate features.
Scope choices drive your data model, business rules, and integrations. Confirm:
Keep phase 1 tight, but document what you’re deliberately not doing yet. That makes future expansion easier without blocking the first release.
Before you design screens or databases, get a clear picture of what actually happens from “I need to buy this” to “it’s approved and ordered.” This prevents you from automating a process that only works on paper—or only in someone’s head.
List every entry point people use: emails to procurement, spreadsheet templates, chat messages, paper forms, or requests created directly in an ERP.
For each entry point, note what information is typically provided (item, vendor, price, cost center, business justification, attachments) and what’s usually missing. Missing fields are a big reason requests bounce back and stall.
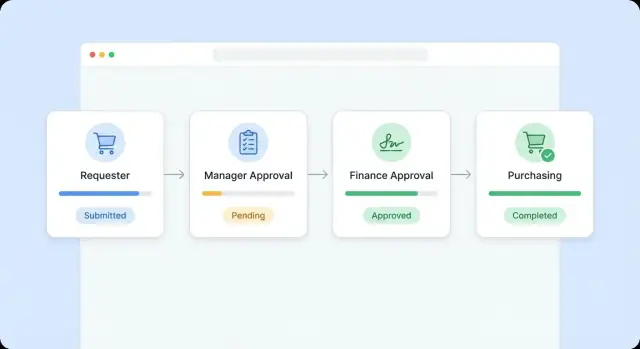
Map the “happy path” first: requester → manager → budget owner → procurement → finance (if applicable). Then document the variations:
A simple diagram is enough. What matters is capturing where decisions branch.
Write down the cases people handle manually:
Don’t judge the exceptions yet—just record them so your workflow rules can handle them intentionally.
Collect specific examples of delays: unclear approver, missing budget confirmation, duplicated data entry, and no reliable audit trail. Also note who owns each handoff (requester, manager, procurement, finance). If “everyone” owns a step, nobody does—and your app should make that visible.
A workflow diagram is useful, but your team still needs something buildable: a set of clear requirements that describe what the app must do, what data it must collect, and what “done” looks like.
Start with the most common scenario and keep it simple:
Request created → manager approves → procurement reviews → PO issued → goods received → request closed.
For each step, capture who does it, what they need to see, and what decision they make. This becomes your baseline user journey and helps prevent v1 from becoming a catch‑all for every exception.
Procurement approvals often fail because requests arrive without enough information to make a decision. Define the required fields up front (and which are optional), for example:
Also define validation rules: required attachments over a threshold, numeric fields, and whether prices can be edited after submission.
Make explicit exclusions so the team can deliver quickly. Common v1 exclusions include full sourcing events (RFPs), complex supplier scoring, contract lifecycle management, and three‑way match automation.
Create a simple backlog with clear acceptance criteria:
This keeps expectations aligned and gives you a practical build plan.
A procurement workflow succeeds or fails on data clarity. If your objects and relationships are clean, approvals, reporting, and integrations become much simpler.
At minimum, model these entities:
Keep PR totals derived from line items (and taxes/shipping), rather than manually edited, to prevent mismatches.
Real requests often mix items that require different approvers or budgets. Design for:
A practical approach is a PR header status plus independent line statuses, then a rollup status for what the requester sees.
If you need accounting fidelity, store cost center, project, and GL code at the line level (not just on the PR), because spend is usually booked per line.
Add tax fields only when you can define rules clearly (e.g., tax rate, tax type, tax‑included flag).
Quotes and contracts are part of the audit story. Store attachments as objects linked to PRs and/or lines with metadata (type, uploaded by, timestamps).
Define retention rules early (e.g., keep 7 years; delete on vendor request only when legally allowed) and whether files live in your database, object storage, or a managed document system.
Clear roles and permissions prevent approval ping‑pong and make audit trails meaningful. Start by naming the people involved, then translating that into what they can do in the app.
Most procurement teams can cover 90% of cases with five roles:
Define permissions as actions, not titles, so you can mix‑and‑match later:
Also decide field‑level rules (e.g., requesters can edit description and attachments, but not GL codes; finance can edit coding but not quantity/price).
Every request should have:
This avoids orphaned requests and makes it obvious who must act next.
People take vacations. Build delegation with start/end dates, and log actions as “Approved by Alex (delegated from Priya)” to preserve accountability.
For approvals, prefer named approvals (better auditability). Use shared inboxes only for queue‑based steps (e.g., “Procurement Team”), and still require an individual to claim and approve so one person is recorded as the decision maker.
A procurement web app succeeds or fails on how quickly people can submit a request and how easily approvers can say “yes” or “no” with confidence. Aim for fewer screens, fewer fields, and fewer clicks—while still collecting the details Finance and Procurement need.
Use guided forms that adapt to what the requester selects (category, vendor type, contract vs. one‑time purchase). This keeps the form short and reduces back‑and‑forth.
Add templates for common purchases (software subscription, laptop, contractor services) that pre‑fill fields like GL/cost center hints, required attachments, and the expected approver chain. Templates also standardize descriptions, which improves reporting later.
Use inline validation and completion checks (e.g., missing quote, budget code, or delivery date) before submission. Make requirements visible early, not only after an error message.
Approvers should land on a clean queue with the essentials: amount, vendor, cost center, requester, and due date. Then provide context on demand:
Keep comments structured: allow quick reasons for rejection (e.g., “missing quote”) plus optional free text.
Users should be able to find requests by status, cost center, vendor, requester, date range, and amount. Save common filters like “Waiting on me” or “Pending > $5,000.”
If approvals happen in hallways or between meetings, design for small screens: large tap targets, fast‑loading summaries, and attachment previews. Avoid workflows that require spreadsheet‑style editing on mobile—route those tasks back to desktop.
Approval routing is the traffic control system of your procurement web app. Done well, it keeps decisions consistent and fast; done poorly, it creates bottlenecks and workarounds.
Most purchase approval workflow rules can be expressed with a handful of dimensions. Typical inputs include:
Keep the first version simple: use the smallest set of rules that covers most requests, then add edge cases once you have real data.
Some approvals must happen in order (manager → budget owner → procurement), while others can happen in parallel (security + legal). Your purchase request system should support both patterns, and show requesters who is currently blocking the request.
Also distinguish between:
Real workflows need safety rails:
Nothing frustrates teams like surprise re‑approvals—or worse, approvals that should have been re‑run.
Common approval reset triggers include changes to price, quantity, vendor, category, cost center, or delivery location. Decide which changes require a full reset, which require only certain approvers to re‑confirm, and which can be logged without restarting the whole approval routing chain.
A procurement app feels fast when people always know what happens next. Notifications and status tracking reduce follow‑ups, while audit trails protect you during disputes, finance reviews, and compliance checks.
Use a small, understandable set of states and keep them consistent across purchase requests, approvals, and orders. A typical set:
Be explicit about transitions. For example, a request should not move from Draft to Ordered without passing through Submitted and Approved.
Start with email + in‑app notifications and add chat tools only if they’re already part of daily work.
Avoid notification spam by bundling reminders (e.g., daily digest) and escalating only when approvals are overdue.
Capture a tamper‑evident history of key actions:
This log should be readable by auditors but also helpful to employees. A “History” tab on each request often prevents long email threads.
Make comments mandatory for certain actions, like Reject or Request changes, and for exceptions (e.g., over‑budget approvals). Store the reason alongside the action in the audit trail so it’s not lost in private messages.
Integrations are what make a procurement web app feel real to the business. If people still have to retype vendor details, budgets, and PO numbers, adoption drops fast.
Start by deciding which tools are the systems of record, and treat your app as a workflow layer that reads and writes to them.
Be explicit about where the “truth” lives:
Document what your purchase request system needs from each source (read‑only vs. write‑back), and who owns data quality.
Plan SSO early so permissions and audit trails map to real identities.
Match the method to your partner system’s capabilities:
Decide what must be real‑time (SSO login, vendor validation) vs. scheduled (nightly budget refresh).
Design for failures: retries with backoff, clear admin alerts, and a reconciliation report so finance can confirm totals across systems. A simple “last synced at” timestamp on key records prevents confusion and support tickets.
Security is not a “later” feature in a procurement web app. You’re handling supplier details, contract terms, budgets, and approvals that can impact cash flow and risk. A few foundational decisions early will prevent painful rewrites when finance or auditors get involved.
Start by classifying what’s sensitive and controlling it explicitly. Set access controls for fields like vendor banking details, negotiated rates, contract attachments, and internal budget lines.
In many teams, requesters should see only what they need to submit and track a request, while procurement and finance can view pricing and vendor master data.
Use role‑based access control with deny‑by‑default for high‑risk fields, and consider masking (e.g., show last 4 digits of an account) instead of full exposure.
Encrypt data in transit (TLS everywhere) and at rest (database and file storage). If you store attachments (contracts, quotes), ensure the object storage is encrypted and access is time‑limited.
Treat secrets as production data: don’t hardcode API keys; store them in a secrets manager, rotate them, and limit who can read them. If you integrate with ERP or accounting systems, lock down tokens to the smallest scope needed.
Approvals are only as trustworthy as the evidence behind them. Log admin actions and permission changes, not just business events like “approved” or “rejected.” Capture who changed an approval rule, who granted a role, and when a vendor banking field was edited.
Make audit logs append‑only and searchable by request, vendor, and user, with clear timestamps.
Plan compliance needs early (SOC 2/ISO alignment, data retention rules, and least privilege).
Define how long you keep requests, approvals, and attachments, and how you handle deletions (often “soft delete” with retention policies).
Document data ownership: who can approve access, who responds to incidents, and who reviews permissions periodically.
Choosing whether to build a procurement web app or buy one isn’t about “best”—it’s about fit. Procurement touches approvals, budgets, audit trails, and integrations, so the right choice depends on how unique your purchase approval workflow is and how quickly you need results.
Buy (or configure an existing purchase request system) when:
Build when:
A useful rule: if 80–90% of your needs match a product and integrations are proven, buy. If integrations are hard or your rules are core to how you operate, building may be cheaper long‑term.
Keep the stack boring and maintainable:
If you want to accelerate the “build” path without committing to months of custom engineering upfront, a vibe‑coding platform like Koder.ai can help you prototype and iterate on a procurement automation app through a chat interface. Teams often use it to quickly validate approval routing, roles, and core screens, then export the source code when they’re ready to run it in their own pipeline. (Koder.ai’s common baseline—React on the frontend, Go + PostgreSQL on the backend—also maps well to the reliability and auditability requirements procurement systems tend to have.)
Procurement automation fails when actions double‑run or status becomes unclear. Design for:
Plan from day one for dev/staging/prod, automated tests in CI, and simple deploys (containers are common).
Add monitoring for:
This groundwork keeps your purchase order workflow dependable as usage grows.
Shipping the first version of a procurement web app is only half the job. The other half is making sure real teams can run their purchase approval workflow quickly, correctly, and with confidence—then tightening the process based on what actually happens.
A purchase request system often “works” in a demo and breaks in daily life. Before you roll out, test workflows using scenarios pulled from recent requests and purchase order workflow history.
Include edge cases and exceptions such as:
Don’t test only routing—test permissions, notifications, and the full audit trail end‑to‑end.
Start with a small group that represents typical usage (for example, one department and one finance approver chain). Run the pilot for a few weeks, and keep the rollout lightweight:
This prevents organization‑wide confusion while you refine approval routing and procurement automation rules.
Treat administration as a product feature. Write a short internal playbook covering:
This keeps day‑to‑day operations from turning into ad hoc engineering work.
Define a few metrics and review them regularly:
Use what you learn to simplify forms, adjust rules, and improve status tracking.
If you’re evaluating options for rolling out a procurement web app quickly, see /pricing or reach out via /contact.
If you’d like to validate your workflow and screens before investing in a full custom build, you can also prototype a purchase request system in Koder.ai, iterate in “planning mode,” and export the source code once your stakeholders agree on the process.
Start by writing down the friction you want to eliminate (e.g., approvals stuck in email, missing quotes, unclear owners) and tie each to a measurable metric:
Those metrics become your “north star” when feature debates come up.
Keep phase 1 narrow and explicit. Decide:
Also document what’s out of scope for v1 (like RFPs or contract lifecycle management) so you can ship without blocking future expansion.
Map what actually happens today, not what the policy says. Do three things:
This gives you the inputs needed to build routing rules that match real behavior.
Turn the workflow into a small set of buildable requirements:
This prevents v1 from becoming a catch-all for every edge case.
At minimum, model:
Keep totals derived from line items (plus tax/shipping rules) to avoid mismatches and make reporting/integrations easier.
Design for mixed-item reality:
This avoids forcing users into workarounds when only part of a request needs changes.
Start with a small set of roles and express permissions as actions:
Add field-level rules (e.g., requester can edit description/attachments, finance can edit GL/cost center) and ensure every request always has an owner and a current approver to prevent “orphaned” items.
Build delegation with accountability:
This prevents approvals from becoming untraceable.
Aim for decision-first UX:
Add strong search/filters (status, cost center, vendor, requester, amount) and make approvals mobile-friendly (fast summaries, big tap targets, attachment preview).
Treat auditability as a core feature:
For integrations, define systems of record (ERP/accounting, vendor master, HR directory), then choose APIs/webhooks/CSV based on capability. Add retries, admin alerts, reconciliation reports, and “last synced at” timestamps to reduce confusion.