Jul 01, 2025·8 min
How to Create a Web App to Replace Manual Approval Emails
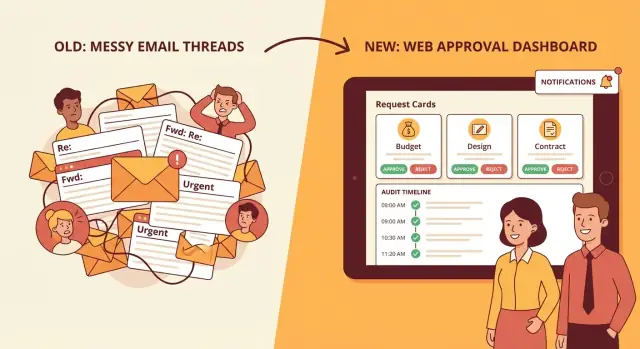
Learn how to build a simple web app that replaces manual approval emails with a clear workflow, approvals dashboard, notifications, and an audit trail.
Why Approval Emails Break Down
Approval-by-email feels simple because everyone already has an inbox. But as soon as requests become frequent—or involve money, access, policy exceptions, or vendor commitments—email threads start creating more work than they save.
What “manual approval emails” usually look like
Most teams end up with a messy mix of:
- A request email with a description, a deadline, and “please approve”
- Attachments (PDFs, screenshots, spreadsheets) and links to shared drives
- Reply-all discussions that change the scope (“actually, make it $8k not $5k”)
- Forwarding to the “real” approver or a delegate (“can you take this?”)
- Side conversations in chat, then a final “Approved” message buried in the thread
The result is a process that’s hard to follow—even when everyone is trying to be helpful.
The most common pain points
Email breaks down because it doesn’t provide a single source of truth. People lose time answering basic questions:
- What’s the current status—pending, approved, rejected, or needs changes?
- Who is the decision-maker, and did they actually see the latest version?
- Which attachment is the final one?
- What was approved exactly (amount, dates, scope, terms)?
- Can we prove the approval later during an audit, dispute, or handover?
It also slows work down: requests sit in overflowing inboxes, approvals happen in different time zones, and reminders either feel rude or get forgotten.
What a web app should deliver instead
A good request and approval system doesn’t need to be complicated. At minimum it should create:
- Clarity: one request page with the latest details and supporting files
- Speed: a clear queue for approvers plus lightweight nudges
- Accountability: who decided, when they decided, and what they decided on
Start small, then iterate
You don’t need to replace every approval flow on day one. Pick one high-value use case, get it working end-to-end, and then expand based on what people actually do—not what a perfect process diagram suggests.
Who this guide is for
This guide is written for non-technical owners of approval processes—operations, finance, HR, IT, and team leads—plus anyone tasked with reducing risk and speeding up decisions without creating more admin work.
Pick One Use Case and Document the Current Flow
Replacing approval emails is easiest when you start with a single, high-volume use case. Don’t begin by “building an approvals platform.” Begin by fixing one painful thread that happens every week.
Choose a starter scenario
Pick one approval scenario with clear business value, a consistent pattern, and a manageable number of approvers. Common starters include:
- Purchase requests (software, equipment, vendors)
- Access requests (systems, shared drives, admin rights)
- Content approval (marketing pages, policy docs)
- PTO requests
- Invoice approvals
A good rule: choose the scenario that currently generates the most back-and-forth or delays—and where the outcome is easy to verify (approved/rejected, done/not done).
Map the current process end-to-end
Before you design screens, document what really happens today—from the first request to the final “completed” step. Use a simple timeline format:
- Request is created (who writes it, what triggers it)
- Request is sent (email, CCs, attachments, subject conventions)
- Decision is made (who decides, what they need to see)
- Follow-ups happen (nudges, reminders, clarifying questions)
- Completion occurs (who executes the approved action and how it’s confirmed)
Capture the messy parts too: forwarding to the “real approver,” approvals given in chat, missing attachments, or “approved if under $X.” These are exactly what your web app must handle.
Identify stakeholders and their goals
List the people involved and what they need:
- Requester: fast submission, clear status, no repeated questions
- Approver(s): context, low-effort decisions, delegation when unavailable
- Admin: manage rules, fix mistakes, report on throughput
- Observer (optional): visibility without decision rights (finance, compliance)
Write down the rules, thresholds, and SLAs
Document decision rules in plain language:
- Who can approve what (by department, cost center, system)
- Thresholds (e.g., manager up to $1,000; director above)
- Required steps (legal review, security review)
- Target timing (e.g., approve within 2 business days)
List required fields and documents
For your chosen use case, define the minimum data needed to avoid follow-up questions: request title, justification, amount, vendor/system, due date, cost center, attachments, and any reference links.
Keep it short—every extra field is friction—then add “optional details” later once the flow works.
Design the Approval Workflow States
Workflow states are the backbone of an approval workflow web app. If you get them right, you’ll eliminate the “Where is this approval?” confusion that email threads create.
Start with the minimum viable workflow
For an approval app MVP, keep the first version simple and predictable:
- Submitted: a request is created and awaits review
- In review: an approver has opened it (optional, but useful)
- Approved / Rejected: an explicit decision is recorded
- Done: the system has completed the post-decision steps (or confirmed there are none)
This “submit → review → approve/reject → done” spine is enough for most business process approvals. You can always add complexity later, but removing states after launch is painful.
Single-step vs multi-step approvals
Decide early whether your request and approval system supports:
- Single-step approvals (one approver or one approval group). This fits many teams and keeps the approval dashboard easy to scan.
- Multi-step approvals (sequence like Manager → Finance → Legal). This is common for spend, contracts, or access requests.
If you’re unsure, start with single-step plus a clean path to extend: model “steps” as optional. Your UI can still show one approver today while your data model can grow into multi-step later.
Add an optional “Needs changes” / “Request info” loop
Email approvals often stall because an approver asks a question and the original request gets buried.
Add a state like:
- Needs changes (or Request info) when the approver requires updates
Make the transition explicit: the request returns to the requester, the approver is no longer responsible, and the system can track how many back-and-forth cycles happen. This also improves approval notifications because you can notify only the next responsible person.
Define “what happens after approval” as part of the state design
Approvals don’t end with “Approved.” Decide what your system will do next and whether it’s automated or manual:
- Create a task for fulfillment
- Trigger a payment or purchasing step
- Update a ticket in your helpdesk tool
If these actions are automatic, keep a Done (or Completed) state that is only reached after automation succeeds. If automation fails, introduce a clear exception like Action failed so requests don’t look finished when they’re not.
Agree on success metrics
State design should support measurement, not just process. Pick a few metrics you’ll track from day one:
- Cycle time (Submitted → Approved/Rejected)
- Fewer follow-ups (less “checking in” messages)
- Fewer missed approvals (reduced stale requests)
When your workflow states are clear, these metrics become straightforward queries—and you’ll quickly prove you really did replace approval emails.
Define Your Data Model (Requests, Decisions, Audit Events)
Before you design screens or automation, decide what “things” your app must store. A clear data model prevents the two classic email problems: missing context (what exactly is being approved?) and missing history (who said what, when?).
Requests: the object everyone talks about
A Request should hold the business context in one place so approvers don’t need to dig through threads.
Include:
- Title and description (what is being asked, and why)
- Amount and category (or another key attribute that drives policy)
- Owner (the requester) and optionally a cost center / project
- Due date (helps prioritize)
- Attachments (quotes, PDFs) and tags for filtering
Tip: keep the request’s “current state” (e.g., Draft, Submitted, Approved, Rejected) on the Request itself, but keep the reasons in Decisions and Audit Events.
Approvals: decisions as first-class records
An approval isn’t just a yes/no—it’s a record you may need months later.
Each Decision (or Approval) should capture:
- Decision (approved / rejected / needs changes)
- Approver (user ID, not just a name string)
- Timestamp (when it was decided)
- Comments (human explanation)
- Conditions (e.g., “approved up to $5,000” or “approved if vendor is X”)
If you support multi-step approvals, store an approval step (sequence number or rule name) so you can reconstruct the path.
Users, roles, and optional teams
Keep roles simple early:
- Requester creates and responds to changes
- Approver decides
- Admin configures policies and access
If your company works in departments, add groups/teams as an optional layer so a request can route to “Finance Approvers” rather than a single person.
Audit log: an immutable event timeline
An AuditEvent should be append-only. Don’t overwrite it.
Track events like: created, updated, attachment added, submitted, viewed, decided, reassigned, reopened. Store who did it, when, and what changed (a short “diff” or a reference to the updated fields).
Notifications: subscriptions and channels
Model notifications as subscriptions (who wants updates) plus delivery channels (email, Slack, in-app). This makes it easier to reduce spam: you can later add rules like “notify on decision only” without changing core workflow data.
Plan the Key Screens and User Experience
Connect approvals to tools
Create endpoints for intake and webhooks so approvals trigger the next step.
If people can’t complete a request or approve it in under a minute, they’ll fall back to email. Your goal is a small set of screens that are obvious, fast, and forgiving.
1) Request submission form
Start with a single “New request” page that guides the requester step by step.
Use clear validation (inline, not after submit), sensible defaults, and plain-language help text (“What happens next?”). File upload should support drag-and-drop, multiple files, and common limits (size/type) explained before an error happens.
Add a preview of the “summary” that approvers will see so requesters learn what good submissions look like.
2) Approver inbox (the approval dashboard)
Approvers need an inbox, not a spreadsheet. Show:
- A queue with filters (team, request type, status) and quick search
- “Aging” indicators (e.g., submitted 2 days ago) and priority cues
- A compact row layout that shows requester, amount/risk signal, and next action
Make the default view “My pending” to reduce noise. Keep this area focused on decisions: approvers should be able to scan, open, and act—fast.
3) Request detail page
This is where trust is built. Combine everything needed to decide:
- A timeline of events (submitted, edited, escalated, approved/denied)
- Comments that stay attached to the request (no lost email context)
- Attachments with quick preview/download
- Decision buttons that are hard to mis-click (Approve / Request changes / Reject)
Add confirmation dialogs for destructive actions (reject, cancel) and show what will happen next (“Finance will be notified”).
4) Admin views (lightweight, not scary)
Admins typically need three tools: manage request templates, assign approvers (by role/team), and set simple policies (thresholds, required fields).
Keep admin pages separate from the approver flow, with clear labels and safe defaults.
5) Accessibility and clarity
Design for skimming: strong labels, consistent statuses, readable timestamps, and helpful empty states (“No pending approvals—check ‘All’ or adjust filters”). Ensure keyboard navigation, focus states, and descriptive button text (not just icons).
Access Control and Security Basics
Email-based approvals fail partly because access is implicit: anyone forwarded the thread can weigh in. A web app needs the opposite—clear identity, clear roles, and sensible guardrails that prevent “oops” moments.
Authentication: how people sign in
Pick one primary login method and make it easy.
- SSO (SAML/OIDC): best for companies using Google Workspace, Microsoft Entra ID, Okta, etc. It reduces password risk and makes offboarding automatic.
- Email magic links: great for external approvers or occasional users. Links should be short-lived and single-use.
- Password-based login: fine for small teams, but require strong passwords and reset flows. Consider adding optional MFA later.
Whichever you choose, ensure every approval action is tied to a verified user identity—no “Approved ✅” from an untraceable inbox.
RBAC: who can see, edit, approve, administer
Define roles early and keep them simple:
- Requester: creates requests, uploads attachments, sees status.
- Approver: can approve/reject within assigned scope.
- Admin: manages policies, routing rules, and user access.
Use least privilege: users should only see requests they created, are assigned to approve, or administer. This matters even more if requests include salary info, contracts, or customer data.
Prevent conflicts and risky approvals
Decide whether to enforce separation of duties:
- No self-approval: prevent a requester from approving their own request (or approving within their own cost center).
- Delegate rules: allow temporary coverage while keeping an audit record of who acted.
Sessions, storage, and basic abuse prevention
Keep sessions secure with short idle timeouts, secure cookies, and a clear sign-out.
For attachments, use secure file storage (private buckets, signed URLs, virus scanning if feasible) and avoid sending files as email attachments.
Finally, add basic rate limiting for logins and sensitive endpoints (like magic-link requests) to reduce brute-force and spam attempts.
Notifications That Replace Email Threads (Without Spam)
Email threads fail because they mix three different jobs: alerting the next approver, collecting context, and recording the decision. Your web app should keep context and history on the request page, and use notifications only to pull people back in at the right moments.
The three essential email notifications
Keep email for what it does well: reliable delivery and easy searching.
- Assignment: “You’re the approver for Request #123.” Include a single button/link back to the request detail page (for example: /requests/123).
- Reminders: only when an item is actually overdue (based on your SLA), not “every day until done.”
- Decision results: notify the requester (and optionally watchers) when the request is approved/rejected, with a link to the final record.
Each message should be short, contain the request title, due date, and one clear call to action back to the same source of truth: /requests/:id.
Slack/Teams for speed: actionable and link-driven
Chat tools are great for fast approvals—if the action stays inside the app.
- Send an actionable message (approve/reject buttons if supported) that records the decision in your system.
- Always include a deep link to the request detail page (/requests/123) for context, attachments, and comments.
- Post decision outcomes to the requester via DM or a dedicated channel, based on preference.
Reminders, escalation, and vacation coverage
Define a simple policy:
- Reminder schedule: e.g., 24 hours before due, then at due.
- Escalation rules: after X hours overdue, notify the approver’s manager or reassign to a backup.
- Vacation coverage: allow temporary delegates so work doesn’t stall.
Prevent notification spam by design
Use preferences (email vs chat, quiet hours), batching (one summary for multiple pending items), and optional daily/weekly digests (e.g., “5 approvals waiting”). The goal is fewer pings, higher signal, and every ping points back to the request page—not a new thread.
Build an Audit Trail You Can Trust
Prototype an approvals MVP
Describe your approval flow in chat and get a working React app with a Go backend.
Email approvals fail audits because the “record” is scattered across inboxes, forwarded chains, and screenshots. Your app should create a single, reliable history that answers four questions every time: what happened, who did it, when, and from where.
What to record (and why it matters)
For each request, capture audit events such as: created, edited, submitted, approved, rejected, canceled, reassigned, comment added, attachment added/removed, and policy exceptions.
Each event should store:
- Actor: user ID, role at the time, and (if relevant) “on behalf of”
- Timestamp: in UTC, plus displayed in the viewer’s timezone
- Source: IP address, device/browser fingerprint or user agent, and app channel (web/mobile/API)
- Context: which fields changed, old value → new value, and any decision notes
Make logs tamper-resistant
Use an append-only audit log: never update or delete past events—only add new ones. If you need stronger guarantees, chain entries with a hash (each event stores the hash of the previous event) and/or copy logs to write-once storage.
Set a retention policy early: keep audit events longer than requests (for compliance and dispute resolution), and document who can view them.
Versioning prevents “he said, she said”
Approvals often hinge on what the request looked like at decision time. Keep a version history of editable fields (amount, vendor, dates, justification) so reviewers can compare versions and see exactly what changed between submission and approval.
Exports and reporting
Auditors rarely want screenshots. Provide:
- CSV export for analysis
- PDF summary for attachment to compliance tickets
- API access for governance tools (read-only, scoped tokens)
How this reduces disputes and rework
When everyone can see the same timeline—who changed what, when, and from where—there’s less back-and-forth, fewer “lost approvals,” and faster resolution when something goes wrong.
Integrations and Automation After Approval
Approvals are only useful if they trigger the next step reliably. Once a request is approved (or rejected), your app should update the system of record, notify the right people, and leave a clean trace of what happened—without someone copy‑pasting decisions into other tools.
Connect to the systems you already use
Start with the destination where work actually happens. Common targets include:
- Ticketing tools (create/close a ticket, set priority, attach the approval decision)
- HRIS (update employee attributes, store policy exceptions, trigger onboarding steps)
- Accounting (create a bill, mark spend as approved, assign cost centers)
- CRM (approve discounts, renewals, and contract exceptions)
A practical pattern is: the approval app is the decision layer, while the external tool remains the system of record. That keeps your app simpler and reduces duplication.
Inbound channels: make requests easy to create
If people can’t submit requests quickly, they’ll fall back to email.
- Forms: a guided web form for humans (with required fields, dropdowns, and templates).
- API: let internal tools create requests programmatically (useful for IT and ops automation).
- Email forwarding: a bridge for migration—forward to a unique address, parse key fields, and create a draft request that someone confirms.
Email forwarding is especially helpful during rollout; treat it as an intake method, not the approval thread.
Outbound actions: turn decisions into automated work
After a decision, trigger actions in a few tiers:
- Webhooks for near real-time updates to your internal services.
- Zapier/Make for fast, low-code automation when requirements change frequently.
- Custom integrations for high-volume or sensitive workflows where reliability and control matter.
Make outbound actions idempotent (safe to retry) and log each attempt in your audit trail so failures don’t become invisible work.
Files: storage, scanning, and permissions
Approvals often involve attachments (quotes, contracts, screenshots). Store files in a dedicated storage provider, run virus scanning on upload, and enforce download permissions based on who can view the request. Link every file to the request and decision so you can prove what was reviewed.
If you’re comparing packaging options for integrations and file handling, see /pricing.
Rollout Plan: MVP, Pilot, and Migration from Email
Make adoption easier
Set a custom domain so people treat the approvals app like a real system.
Rolling out an approval workflow web app is less about a “big launch” and more about proving it works, then expanding safely. A clear rollout plan also prevents users from falling back to email the first time they hit friction.
1) Start with an MVP you can actually ship
Pick one request type (e.g., purchase request) and one approver group (e.g., department leads). Keep the first version focused:
- A simple request form with only essential fields
- Approve / reject with a required comment
- Basic notifications (request submitted, decision made, reminder)
The goal is to replace the email thread for one workflow end-to-end, not to model every business rule on day one.
If speed is the constraint (it usually is), teams sometimes prototype this MVP on a vibe-coding platform like Koder.ai: describe the request flow in chat, generate a React UI with a Go + PostgreSQL backend, and iterate quickly with snapshots/rollback. When you’re ready, you can export source code, deploy, and add custom domains—useful for moving from “pilot” to a real internal system without a full legacy pipeline.
2) Run a pilot and measure against email
Pilot with a small team that has enough volume to learn quickly, but not so much that mistakes become expensive. During the pilot, compare the new system to the old email process:
- Time-to-decision (how long approvals take)
- Number of back-and-forth clarifications
- Missed approvals and “who approved this?” moments
Ask for feedback weekly, and keep a running list of changes—then batch updates rather than shipping daily surprises.
3) Migrate: handle in-flight email approvals deliberately
Decide upfront what happens to requests already mid-thread:
- Option A: finish them in email, and only new requests start in the app
- Option B: recreate them in the app with a “migrated” tag and attach key context
Whichever you choose, publish one rule, stick to it, and communicate the cutoff date.
4) Training that respects people’s time
Skip long workshops. Provide a one-page cheat sheet, a couple of request templates, and short office hours for questions during week one.
5) Iterate based on real usage
After the pilot, expand to the next request type or approver group. Prioritize improvements that reduce friction: better field defaults, clearer status labels, smarter reminders, and simple reporting for managers.
Common Pitfalls and How to Avoid Them
Most teams don’t fail because they can’t build an approval workflow web app—they fail because the new system recreates the same email problems with a nicer UI. These are the issues that repeatedly derail a request and approval system, plus practical ways to avoid them.
Pitfall 1: Unclear ownership and “who approves?” confusion
If no one can answer “who is responsible for this request right now?”, you’ll still have stalls—just inside an approval dashboard instead of an inbox.
Avoid it by making ownership explicit at every state (e.g., Submitted → Pending Manager → Pending Finance → Approved/Rejected), and by showing one accountable approver (even if others can view).
Pitfall 2: Missing context (and a comment ping-pong)
Approval emails break down when the approver has to ask for basics: scope, cost, due date, links, prior decisions.
Avoid it by enforcing required fields, embedding key artifacts (links, PDFs), and adding a structured “What changed?” note when a request is resubmitted. Keep comments tied to the request, not scattered across notification threads.
Pitfall 3: Too many steps and exceptions on day one
Teams often over-model the process with conditional routing, edge-case branches, and long chains of reviewers. The result is slow approvals and constant rule edits.
Avoid it by picking one use case and launching an approval app MVP with a small set of states. Track what exceptions you actually see, then add rules gradually.
Pitfall 4: Performance bottlenecks that feel like email again
If the app is slow to load “My approvals,” people revert to email.
Avoid it by planning for fast inbox-style queries (e.g., filter by assigned approver + status), full-text search that’s scoped and indexed, and sensible limits for attachments (size caps, async uploads, background virus scanning).
Pitfall 5: No governance for templates and rule changes
When anyone can change approval notifications or routing rules, trust erodes—especially for audit trail approvals.
Avoid it by defining an owner for templates and workflow automation rules, requiring review for changes, and logging configuration updates in the audit trail.
Pitfall 6: Shipping without measurement
If you can’t prove impact, adoption suffers.
Avoid it by tracking baseline metrics from the start: median approval time, common rejection reasons, backlog size, and rework loops (resubmissions). Make these visible to process owners.
Next features worth planning (but not necessarily v1)
Once the core flow is stable, prioritize delegation (out-of-office coverage), conditional routing based on amount/type, and mobile-friendly approvals that keep decisions quick without increasing spammy approval notifications.