Aug 15, 2025·8 min
How to Create a Web App for Vendor Onboarding & Verification
Learn how to plan, design, and build a web app for vendor onboarding and verification: workflows, KYB/KYC checks, documents, approvals, and audit-ready records.
What a Vendor Onboarding & Verification Web App Does
A vendor onboarding & verification web app turns “we want to work with this supplier” into “this supplier is approved, set up correctly, and ready to be paid”—without endless email threads, scattered PDFs, or manual copy/paste.
The goal: faster setup with fewer manual steps
The primary goal is speed and control. Vendors should submit correct information the first time, and internal teams should review it efficiently and consistently.
A well-designed app typically reduces:
- Back-and-forth emails (“Can you resend that certificate?”)
- Duplicate data entry into ERP/accounting systems
- Time-to-approval for low-risk, standard vendors
Onboarding vs verification: what’s included
These terms are often used interchangeably, but they’re distinct parts of the same flow:
- Onboarding collects and organizes vendor information: company details, contacts, addresses, tax forms, banking details, insurance certificates, and required policies.
- Verification validates that information: confirming the business exists, checking beneficial owners where required, screening against sanctions/watchlists, confirming tax IDs, and ensuring banking details are plausible and belong to the right entity.
In practice, your app should support both: structured data capture (onboarding) plus automated and manual checks (verification).
Who benefits (and how)
A single workflow helps multiple teams work from the same source of truth:
- Procurement gets clear status (“invited / in progress / approved”) and fewer delays.
- Finance/AP receives accurate payment details and cleaner vendor master data.
- Compliance/Risk can apply consistent checks, document decisions, and escalate edge cases.
- Vendors get a straightforward portal to submit information, upload documents, and track what’s missing.
What you’ll build: portal + admin console + checks
By the end of this guide, you’re essentially building three connected pieces:
- A vendor portal for invitations, form completion, and document uploads.
- An admin review console to evaluate submissions, request changes, approve/reject, and leave internal notes.
- Verification checks (automated where possible) plus a clear path for manual review when the app flags risk or missing data.
Together, these components create a repeatable supplier onboarding workflow that’s easier to run, easier to audit, and easier for vendors to complete.
Start With Requirements: Vendor Types, Regions, and Outcomes
Before you design screens or pick verification tools, get clear on who your vendors are and what “done” looks like. A vendor onboarding web app succeeds when it consistently collects the right information, produces a clear decision, and sets expectations for both vendors and internal reviewers.
1) Map your vendor types
Define the initial vendor categories you’ll support, because each type drives different data and verification steps:
- Individuals / sole proprietors: often need personal identity details plus proof they can receive payments.
- Small businesses: may have limited documentation, informal structures, and faster support needs.
- Enterprises: typically have more paperwork, multiple contacts, and stricter contractual requirements.
Keep this list short at first—add edge cases later, based on real submissions.
2) Set required outcomes (and what they mean)
Define a small set of consistent statuses that your approval workflow can rely on:
- Approved: vendor can transact; any remaining steps are non-blocking.
- Rejected: vendor cannot transact; include reason codes for reporting.
- Needs more info: missing/unclear data or documents; vendor must take action.
Decide whether you need intermediate states like “Under review” or “Pending verification” to manage expectations.
3) Choose documents and data fields per vendor type
Create a checklist per vendor type: basic profile, business details, owners/controllers (if applicable), tax forms, and payout/bank details.
Be explicit about optional vs required fields, file formats, and whether you accept regional alternatives (for example, different registration documents by country).
4) Identify constraints: regions, languages, and timing
List the countries/regions you’ll operate in, supported languages, and any response-time targets (e.g., “instant pre-checks, manual review within 24 hours”). These constraints shape validation rules, staffing, and user messaging.
Compliance Basics: KYB/KYC, Sanctions, Tax, and Banking
Compliance requirements are the difference between a smooth vendor setup and endless rework. Before you build forms and workflows, decide what checks you must run, when to run them, and what “pass” looks like.
KYB basics (companies)
Know Your Business (KYB) verifies that the vendor is a real, legally registered organization and that you understand who’s behind it. Common KYB checks include:
- Company registration details (legal name, registration number, incorporation date, status)
- Registered address and operating address checks
- Beneficial ownership information (who ultimately owns or controls the business)
Even if a provider returns “verified,” store the evidence you relied on (source, timestamp, reference ID) so you can explain the decision later.
KYC basics (people behind the business)
If individuals are involved—beneficial owners, directors, authorized signers—you may need KYC (identity verification). Typical steps include capturing legal name, date of birth (where permitted), and a government ID check or alternative verification method.
Sanctions, PEP, and watchlist screening
If your program requires it, screen the business and relevant individuals against sanctions lists, PEP (Politically Exposed Person) databases, and other watchlists.
Define match-handling rules up front (for example: auto-clear low-confidence matches, route potential matches to manual review).
Tax and banking validation
Vendors usually can’t be paid until tax and banking details are valid:
- Tax: W-9/W-8 (US), VAT IDs (EU/UK), local equivalents
- Banking: IBAN/routing/account number formats, account-holder name checks (where available)
Mandatory vs conditional (avoid over-collecting)
Make fields conditional based on region, vendor type, payment method, and risk level. For example, a low-risk domestic supplier might not need beneficial owner IDs, while a high-risk cross-border vendor might.
This keeps the portal shorter, improves completion rates, and still meets your compliance bar.
Design the End-to-End Workflow (From Invite to Approval)
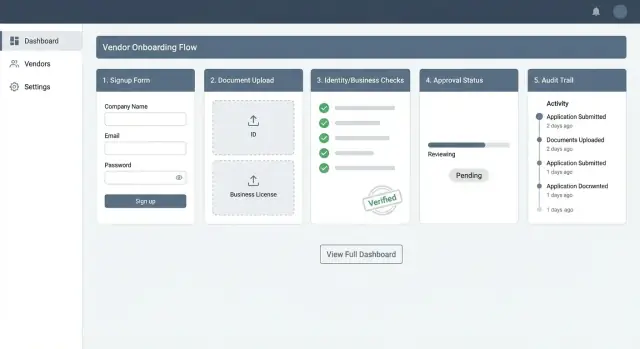
A vendor onboarding flow should feel linear for the vendor, while giving your team clear checkpoints for verification and decision-making. The goal is to reduce back-and-forth while catching risk early.
1) Vendor signup: invite-only, self-serve, or both
Most teams support two entry paths:
- Invite links for known suppliers (procurement starts the record, vendor finishes it). Invite links should be single-use, time-limited, and tied to an email.
- Self-serve registration for marketplaces or open programs. Add basic spam controls (email verification, rate limits) and set expectations up front about required documents.
If you offer both, standardize downstream steps so reporting and review remain consistent.
2) Step-by-step onboarding (progressive disclosure)
Use a guided sequence with a visible progress indicator. A typical order:
- Profile: contact person, role, preferred language.
- Business details: legal name, registration number, address, beneficial owners if required.
- Documents: certificates, IDs, proof of address, tax forms.
- Payout: bank account details, payout method, beneficiary name matching.
Save drafts automatically and allow vendors to return later—this alone can cut abandonment significantly.
3) Verification: automated checks + manual review
Run automated checks as soon as enough data is available (not only at the end). Route exceptions to manual review: mismatched names, unclear documents, high-risk regions, or sanctions hits requiring analyst confirmation.
4) Approval flow: close the loop with the vendor
Model decisions as Approve / Reject / More info required. When information is missing, send a task-based request (“Upload tax form”, “Confirm bank beneficiary”) with a due date, rather than a generic email.
5) Ongoing monitoring after approval
Onboarding doesn’t end at approval. Track changes (new bank account, address updates, ownership changes) and schedule periodic re-verification based on risk—e.g., annually for low risk, quarterly for high risk, and immediately on critical edits.
User Experience: Vendor Portal vs Admin Review Console
A vendor onboarding app succeeds or fails on two experiences: the vendor’s self-serve portal (speed and clarity) and the internal review console (control and consistency). Treat them as separate products with different goals.
Vendor portal: reduce effort, increase confidence
Vendors should be able to complete everything without emailing PDFs back and forth. Core pages typically include:
- Account: sign-up/invite acceptance, password/SSO options, MFA setup.
- Company profile: legal name, registration number, address, beneficial owners (if required), and contacts.
- Document upload: clear requirements by vendor type/region, file size guidance, and acceptable formats.
- Status: a simple timeline (Submitted → In review → Changes requested → Approved/Rejected) with next steps.
Make forms mobile-friendly (large inputs, camera upload for documents, save-and-resume) and accessible (labels, keyboard navigation, error messages that explain how to fix issues).
Where possible, show examples of acceptable documents and explain why a field is needed to reduce drop-offs.
Admin review console: fast decisions with strong controls
Internal users need a purpose-built workspace:
- Queue: prioritized list with filters (risk level, region, SLA age, missing items).
- Vendor profile: consolidated view of submitted data, verification results, and documents.
- Decision: approve, reject, or request changes with structured reasons.
- Notes & history: reviewer comments, attachments, and a full activity timeline.
Roles, notifications, and audit copies
Use role-based access to separate duties (e.g., requester vs reviewer vs approver vs finance). Notifications should be template-driven (email/SMS/in-app), include clear CTAs, and store audit copies of what was sent and when—especially for “changes requested” and final decisions.
Data Model: What You Need to Store (and Why)
Brand the vendor experience
Put the vendor portal on your own custom domain for a cleaner experience.
A vendor onboarding web app succeeds or fails based on its data model. If you only store “uploaded documents” and a single “approved/rejected” flag, you’ll quickly get stuck when requirements change, auditors ask questions, or you add new KYB checks.
Core entities (your “source of truth”)
Start with a clean separation between the vendor company and the people using the portal.
- Organization (vendor): legal name(s), registration numbers, tax IDs, business type, operating countries.
- User: login identity for vendor users and internal reviewers (with roles/permissions).
- Addresses: registered address, operating address, mailing address—store as a separate table to support multiple countries and formats.
- Documents: metadata first (type, issuer, issue/expiry dates, file status). Keep the file itself in object storage; your database should store references.
This structure supports multiple contacts per vendor, multiple locations, and multiple documents per requirement.
Verification entities (what was checked and what happened)
Model verification as events over time, not as a single “verification result.”
- Checks: “Sanctions screening,” “Business registry lookup,” “Bank account verification,” etc.
- Results: provider response snapshot (normalized fields + raw payload reference), match confidence, timestamps.
- Risk score: store both the numeric score and the inputs used to calculate it.
- Reviewer actions: who reviewed, what they decided, why, and what evidence they used.
Workflow entities (how work moves)
Onboarding is a queueing problem.
- Tasks and statuses: granular steps like “Awaiting tax form,” “Manual review needed,” “Resubmission requested.”
- SLA timers: when a task started, paused, breached, and resolved.
- Comments: internal notes vs vendor-visible messages (separate fields to avoid accidental disclosure).
Integration data (traceability across systems)
For each external provider call, store:
- External references (provider applicant/vendor ID)
- Webhook events (event ID, signature status, processing outcome)
- Request/response linkage (so support can replay issues)
Design for change: versioning and history
Compliance onboarding rules evolve. Add version fields to checks and questionnaires, and maintain history tables (or immutable audit records) for key objects.
That way, you can prove what you knew at the time of approval, even if requirements change later.
Integrations: Verification Providers, Storage, and Back Office
Integrations are where a vendor onboarding web app turns from a form into an operational system. The goal is simple: vendors submit once, your team verifies once, and downstream systems stay in sync without manual re-entry.
Build vs buy: outsource the checks that change often
For most teams, it’s faster and safer to outsource KYB checks, sanctions screening, and (when relevant) identity verification to established providers. These vendors keep up with regulatory changes, data sources, and uptime requirements.
Build in-house only what differentiates you: your approval workflow, risk policy, and how you combine signals (for example: “sanctions clear + tax form valid + bank account verified”). Keep integrations modular so you can swap providers later without rewriting your app.
Document collection: storage, scanning, and file rules
Vendor verification typically requires sensitive files (W-9/W-8, certificates, bank letters). Use object storage with encryption and short-lived, signed upload URLs.
Add security guardrails at ingestion time: virus/malware scanning, file type allow-lists (PDF/JPG/PNG), size limits, and basic content checks (for example, reject password-protected PDFs if reviewers can’t open them). Store document metadata (type, issue/expiry dates, uploader, checksum) separately from the file.
E-signatures (when agreements are part of onboarding)
If you need terms, DPAs, or MSAs signed before approval, integrate an e-sign provider and save the final executed PDF plus signing audit data (signer, timestamps, envelope ID) to your vendor record.
Back office sync + webhooks for events
Plan an Accounting/ERP integration to sync the “vendor master” data after approval (legal name, tax IDs where permitted, payment details, remit-to address).
Use webhooks for status updates (submitted, checks started, approved/declined) and append-only event logs so external systems can react without polling.
Security & Privacy: Protect PII and Sensitive Documents
Turn requirements into a plan
Map vendor types, required docs, and outcomes before generating any code.
Vendor onboarding collects some of your most sensitive data: identity details, tax IDs, bank documents, and incorporation files. Treat security and privacy as product features—not a final checklist.
Authentication: make access hard to fake
For vendors, reduce password risk by offering email magic links (short-lived, single-use) or SSO when onboarding vendors from large organizations.
For your internal team, require MFA for admins and anyone who can view or export documents.
Also consider session controls: short timeouts for admin sessions, device-based step-up verification for risky actions (like changing bank details), and alerts for unusual login locations.
Authorization: least privilege and separated approvals
Use least-privilege roles so people only see what they need (e.g., “Viewer,” “Reviewer,” “Approver,” “Finance”).
Separate duties so the person who requests changes (like a bank account update) can’t be the same person who approves them. This simple rule prevents a lot of internal fraud.
Encryption: in transit and at rest
Always use HTTPS/TLS for data in transit. For data at rest, encrypt databases and file storage.
Keep keys in a managed key service, rotate them periodically, and restrict who can access keys. Ensure backups are encrypted too.
PII handling: minimize, redact, and limit exposure
Collect only what you need for your KYB/KYC and tax outcomes. Show redacted views by default in the UI (e.g., mask tax IDs and bank numbers), with “reveal” requiring extra permissions and generating an audit event.
Secure uploads: control, scan, and verify
Use signed URLs so vendors can upload directly to storage without exposing credentials.
Enforce file size limits and allowed types, and scan uploads for malware before they become visible to reviewers. Store documents in private buckets/containers and serve them via time-limited links.
If you publish security expectations, keep them accessible in your portal (e.g., /security) so vendors understand how their data is protected.
Verification Logic: Rules, Risk Scoring, and Manual Review
Verification logic is where your app turns “uploaded documents” into an approval decision you can defend later. The goal isn’t to automate everything—it’s to make the easy decisions fast and make the hard decisions consistent.
Automated rules (fast, predictable checks)
Start with clear, deterministic rules that block progress or route vendors to review. Examples:
- Missing fields/documents: required legal name, registration number, beneficial owner details, tax form, bank proof.
- Country restrictions: vendor country not supported, high-risk jurisdiction, or mismatched “registered country” vs “operating country.”
- Duplicate vendors: same registration number, tax ID, bank account, or email domain already exists.
Make validation messages specific (“Upload a bank letter dated within the last 90 days”) and support “Save & continue later” so vendors don’t lose progress.
Risk scoring (simple tiers with explainable reasons)
Use an easy-to-understand model first: Low / Medium / High. Each tier should be calculated from transparent signals, with the reasons shown to reviewers.
Example signals:
- High: sanctions match (even partial), high-risk country, inconsistent ownership, unverifiable registration.
- Medium: new company, limited web presence, minor document mismatch.
- Low: verified registry data, clean sanctions screening, consistent documents.
Store both the score and the reason codes (e.g., COUNTRY_HIGH_RISK, DOC_MISMATCH_NAME) so users can explain outcomes without guessing.
Manual review checklist (consistent decisions)
Give reviewers a structured checklist: identity match, registration validity, beneficial owners, sanctions results, tax compliance, banking proof, and “notes for exceptions.”
Exception handling (overrides with accountability)
Allow overrides, but require a mandatory reason and, when needed, a second approver. This prevents silent risk acceptance and reduces rework when auditors ask why something was approved.
Auditability & Reporting: Make Reviews Easy to Prove
A vendor onboarding decision is only as defensible as the evidence you can reconstruct later. Auditability isn’t just for regulators—it reduces internal friction when Finance, Procurement, and Compliance need to understand why a vendor was approved, rejected, or sent back for more information.
Build an audit trail you can trust
Capture “who changed what and when” for every meaningful event: profile edits, document uploads, verification results received, risk score changes, and status transitions.
Keep audit entries append-only (no editing), time-stamped, and linked to the actor (admin user, vendor user, or system). Log context that matters: previous value → new value, source (manual vs integration), and an immutable identifier for the vendor record.
Decision records: document the why
For each approval or rejection, store a decision record that includes:
- The final decision and timestamp
- The decision maker (or escalation chain)
- Supporting evidence: provider results, matched entity data, notes, and document references
- The policy/rule version used at the time (so you can explain decisions after rules change)
This turns tribal knowledge into a clear, reviewable history.
Retention and deletion that matches policy
Define retention by data type (PII, tax forms, bank details, documents, audit logs). Align with legal requirements and internal risk policy, and make deletion enforceable—ideally via automated schedules.
When you must delete, consider selective redaction (e.g., remove documents and sensitive fields) while preserving minimal audit metadata needed for accountability.
Reporting that improves throughput
Operational reports should reveal bottlenecks: invite-to-start rate, drop-off points in the document collection portal, average time-to-approve by vendor type/region, and manual review volume.
Auditor-friendly exports (with controls)
Support CSV/PDF exports for specific cases and time ranges, but gate them with role-based access, approval workflows for bulk export, and export logs. Auditors should get what they need—without turning exports into a data leak risk.
Build Plan: Tech Stack, Architecture, APIs, and Testing
Design verification workflows
Model KYB, sanctions, and banking checks as trackable events in your workflow.
A vendor onboarding web app succeeds when it’s easy to maintain and hard to misuse. The build plan should prioritize: secure data handling, clear workflow states, and predictable integrations (verification providers, storage, email/SMS).
Tech stack options (simple picks)
- React (frontend): Great for building a smooth vendor portal (forms, uploads, progress steps) and a fast admin console.
- Django (Python): Strong “batteries included” backend—admin tools, authentication, and a clean way to model workflows.
- Laravel (PHP): Productive for CRUD-heavy apps with queues, notifications, and a well-known ecosystem.
- Node.js (e.g., NestJS/Express): Good when your team prefers JavaScript end-to-end and you want flexible integrations.
Pick what your team can operate confidently; onboarding apps are long-lived.
If you want to validate the workflow quickly before committing to a full build, tools like Koder.ai can help you prototype the vendor portal and admin console from a chat-driven specification. Because it can generate React-based frontends and Go/PostgreSQL backends, it’s a practical way to iterate on roles, queues, and status transitions early—then export source code once the flow is proven.
Architecture: monolith vs modular services
Start with a modular monolith for most teams: one app, one database, clear modules (vendors, documents, checks, reviews). You’ll ship faster and keep auditing simpler.
Move toward separate services when verification traffic is high, integrations multiply, or teams need independent deployment (e.g., a dedicated “checks” service). Don’t split early if it slows compliance changes.
API design: practical REST endpoints
Keep endpoints aligned to the workflow:
POST /vendors(create vendor record),GET /vendors/{id}POST /vendors/{id}/invite(send portal link)POST /vendors/{id}/documents(upload metadata),GET /documents/{id}POST /vendors/{id}/checks(start KYB/KYC/sanctions),GET /checks/{id}POST /vendors/{id}/submit(vendor attests completeness)POST /vendors/{id}/decision(approve/reject/request-changes)
Model status transitions explicitly to protect the approval workflow.
Background jobs: verification and reminders
Use a queue for provider calls, retries, webhook processing, and timed nudges (e.g., “upload missing tax form”). Jobs also handle document virus scanning and OCR without slowing the UI.
Testing plan that prevents painful incidents
Focus on:
- Form validation (required docs per region/vendor type)
- Permission tests (vendor vs reviewer vs admin; least privilege)
- Integration mocks for verification providers and storage
- Workflow tests (cannot approve without required checks; audit trail always written)
If you need a tighter operational checklist, pair this with /blog/security-privacy-pii for deployment hygiene.
Launch, Operate, and Improve: A Practical Roadmap
A vendor onboarding app only works when vendors finish it and reviewers can clear cases without bottlenecks. Plan your launch like an operational change, not just a deployment.
Phase 1: Ship the simplest usable flow
Start with document collection + manual review. That means: invite vendors, capture required company info, upload documents, and give your team a clear approve/reject loop with notes. Keep rules minimal at first so you can learn what your reviewers actually need.
If you need to limit scope, restrict the first release to one region, one vendor type, or one internal business unit.
Pilot with a small, real vendor group
Run a pilot with a handful of vendors who represent your typical mix (new, international, high/low risk). Track:
- Completion rate (started vs submitted)
- Time to submit (median, not just averages)
- Top drop-off steps (where vendors abandon)
Use feedback to fix confusing fields, reduce duplicate uploads, and clarify rework messages.
Day-2 operations: make a playbook
Define an operational playbook before opening the floodgates:
- SLAs (e.g., “review within 2 business days”)
- Escalation paths (fraud flags, urgent suppliers, exec-sponsored vendors)
- Reviewer training (examples of good/bad documents, rejection reasons, tone guidelines)
Monitoring that prevents surprises
Monitor onboarding error rates, review queue time, and verification provider uptime. Set alerts when the queue grows or a provider fails, and have a fallback plan (pause auto-checks, switch to manual).
Next upgrades that usually pay off
After stability, prioritize: multilingual support, scheduled re-verification (expiry-based), and self-serve vendor updates with change history and reviewer re-approval when needed.