Nov 15, 2025·8 min
How to Create a Web App for Warranty Claims and Service Requests
Learn how to plan, build, and launch a web app for warranty claims and service requests: forms, workflows, approvals, status updates, and integrations.
What a Warranty & Service Web App Should Do
A warranty and service web app replaces scattered emails, PDFs, and phone calls with a single place to request help, validate eligibility, and track progress.
Before you think about features, decide the exact problem you’re solving and the outcomes you need to improve.
Define the scope: claims, service requests, or both
Start by drawing a clear line between two similar (but different) flows:
- Warranty claims: “Is this covered?” plus proof of purchase, warranty terms, and an approval/denial decision.
- Service requests (out of warranty or general support): “Can you fix it?” plus troubleshooting, scheduling, and payment when needed.
Many teams support both in one portal, but the app should still guide users to the right path so they don’t submit the wrong type of request.
Know the users you’re building for
A functional system typically serves four groups:
- Customers who submit requests, upload documents, and check status.
- Support agents who triage, ask follow-up questions, and approve next steps.
- Technicians/service partners who diagnose, repair, and record parts and labor.
- Managers who oversee performance, exceptions, and cost drivers.
Each group needs a tailored view: customers need clarity; internal teams need queues, assignments, and history.
Define “success” in measurable terms
Good goals are practical and trackable: fewer back-and-forth emails, faster first response, fewer incomplete submissions, shorter time to resolution, and higher customer satisfaction.
These outcomes should shape your must-have features (status tracking, notifications, and consistent data capture).
Self-service only, or also back-office tools?
A simple self-service portal is often not enough. If your team still manages work in spreadsheets, the app should also include internal tools: queues, ownership, escalation paths, and decision logging.
Otherwise, you’ll move intake online while keeping the chaos behind the scenes.
Define the Workflow Before You Build
A warranty claims web app succeeds or fails based on the workflow underneath it. Before you design screens or pick a ticketing system, write down the end-to-end path a request will take—from the moment a customer submits it to the moment you close it and record the outcome.
Map the end-to-end flow (and keep it readable)
Start with a simple flow like: request → review → approval → service → closure. Then add the real-world details that usually derail projects:
- What information is required at each step (serial number, proof of purchase, photos, error codes)?
- What decisions are made (eligible vs not eligible, repair vs replacement, ship-in vs on-site)?
- What gets created behind the scenes (case, RMA number, repair order, shipping label)?
A good exercise is to map the flow on one page. If it doesn’t fit, that’s a sign your process needs simplification before your service request portal can be simple.
Separate warranty claims vs paid service requests
Don’t force two different journeys into one.
Warranty claims and paid service requests often have different rules, tone, and expectations:
- Warranty: validation, eligibility rules, possible no-charge service, clear policy messaging.
- Paid service: estimates, payment steps, approvals, and a different set of customer questions.
Keeping them separate reduces confusion and prevents “surprise” outcomes (like a customer thinking a paid repair is covered).
Define customer-visible statuses
Customers should always know where they are. Pick a small set of statuses you can reliably maintain—e.g., Submitted, In Review, Approved, Shipped, Completed—and define what each one means internally.
If you can’t explain a status in one sentence, it’s too vague.
Identify handoffs and owners
Every handoff is a risk point. Make ownership explicit: who reviews, who approves exceptions, who schedules, who handles shipping, who closes.
When a step has no clear owner, queues pile up and customers feel ignored—no matter how polished the app looks.
Design the Claim and Service Request Forms
Your form is the “front door” of the warranty claims web app. If it’s confusing or asks for too much, customers abandon it—or submit low-quality requests that create manual work later.
Aim for clarity, speed, and just enough structure to route the case correctly.
Collect the right essentials (and nothing extra)
Start with a tight set of fields that support warranty validation and the RMA process:
- Customer details (name, email, phone, address if shipping may be required)
- Product model, serial number, and purchase date
- Issue description (a short prompt helps: “What happened? When did it start? Any error codes?”)
If you sell through resellers, include “Where did you buy it?” as a dropdown and show an “Upload receipt” prompt only when needed.
Attachments that help technicians act
Attachments reduce back-and-forth, but only if you set expectations:
- Allow photos, short videos, and invoice/receipt uploads
- Set clear file-type and size limits (e.g., JPG/PNG/PDF, and a video max size)
- Show tips next to the upload button (“Photo of serial label,” “Video of the issue in action”)
Consent and privacy wording customers understand
Use plain, specific consent checkboxes (no legal walls of text). For example: consent to process personal data for claim handling, and consent to share shipping details with carriers if a return is required.
Link to /privacy-policy for full details.
Validation rules that prevent bad submissions
Good validation makes the service request portal feel “smart,” not strict:
- Required fields only where truly required
- Format checks (email, phone, purchase date)
- Serial number pattern checks where possible
When something is wrong, explain it in one sentence and keep the customer’s entered data intact.
Warranty Validation and Decision Rules
Validation rules are where your app stops being “a form” and starts being a decision-making tool. Good rules reduce back-and-forth, speed up approvals, and keep outcomes consistent across agents and regions.
Warranty eligibility rules
Start with clear eligibility checks that run as soon as a request is submitted:
- Time window: calculate coverage from purchase date (or ship date if you use that policy). Handle edge cases like “90 days from registration” or extended plans.
- Proof of purchase: accept receipt upload, invoice number, or retailer order ID. If proof is missing, route the request to a “Needs info” queue instead of rejecting it.
- Serial number format: validate length/prefix/check digit, and block impossible values. If you have multiple product lines, detect the model from the serial and pre-fill fields.
Coverage logic (what’s actually covered)
Separate “eligible” from “covered.” A customer may be within the time window, but the issue might be excluded.
Define rules for:
- Parts vs. labor: some warranties cover parts only; labor becomes paid service.
- Exclusions: consumables, cosmetic damage, misuse, unauthorized repairs.
- Accidental damage: often requires a different plan or paid repair authorization.
- Regional differences: warranty terms, return addresses, and legal wording can vary by country/state.
Keep these rules configurable (by product, region, and plan) so policy changes don’t require a code release.
Duplicate detection
Prevent duplicate tickets before they become duplicate shipments:
- Flag repeated serial numbers within a set time range.
- Detect repeated customer requests using email/phone + similar issue category.
- Merge or link cases automatically, while preserving the audit trail.
Escalation rules
Auto-escalate when risk is high:
- Safety issues (smoke, overheating, shocks) should jump to a priority queue with scripted next steps.
- Repeated failures (e.g., third claim for the same serial/model) should trigger engineering review or a higher-tier approval.
These decisions should be explainable: every approval, denial, or escalation needs a visible “why” for agents and customers.
User Roles, Permissions, and Internal Queues
A warranty claims web app succeeds or fails on “who can do what” and how work moves through your team. Clear roles prevent accidental edits, protect customer data, and keep service requests from stalling.
Define roles and permissions
Start by listing the minimum set of roles your service request portal needs:
- Customer: create claims, upload proof (receipt, photos), see status, approve quotes, and view shipping/appointment details.
- Agent: review submissions, request missing info, apply warranty validation outcomes, and communicate decisions.
- Technician: access assigned repair tasks, diagnostics notes, parts used, and completion updates (without seeing sensitive billing data if not needed).
- Admin: manage rules, user access, templates, SLAs, and audit logs.
- Partner service center: limited access to only the RMAs/repairs assigned to that partner, with scoped customer details.
Use permission groups rather than one-off exceptions, and default to least-privilege access.
Plan the agent queue (filtering, assignment, priorities, SLAs)
Your ticketing system needs an internal queue that feels like a control panel: filters by product line, claim type, region, “waiting on customer,” and “breach risk.”
Add priority rules (e.g., safety issues first), auto-assignment (round-robin or skill-based), and SLA timers that pause when you’re waiting on the customer.
Internal notes vs. customer-visible comments
Separate internal notes (triage, fraud signals, part compatibility, escalation context) from customer-visible updates.
Make the visibility explicit before posting, and log edits.
Response templates for consistency
Create templates for common replies: missing serial number, out-of-warranty denial, approved repair authorization, shipping instructions, and appointment confirmation.
Allow agents to personalize while keeping language consistent and compliant.
Customer Status Tracking and Notifications
Design for Security
Add audit logs and least-privilege access early so decisions stay traceable.
A warranty or service portal feels “easy” when customers never have to wonder what’s happening. Status tracking isn’t just a label like Open or Closed—it’s a clear story of what’s next, who needs to act, and when.
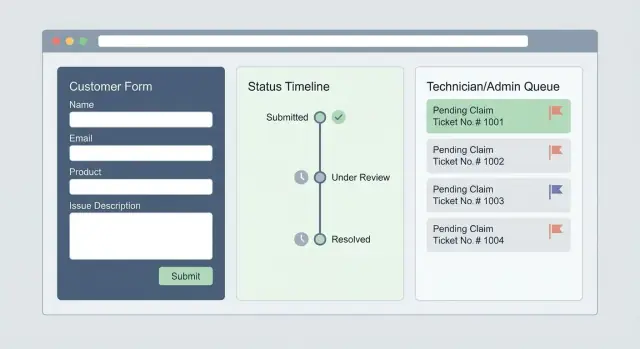
Build a status page people can trust
Create a dedicated status page for each claim/service request with a simple timeline.
Each step should explain what it means in plain language (and what the customer should do, if anything).
Typical milestones include: request submitted, item received, verification in progress, approved/denied, repair scheduled, repair completed, shipped/ready for pickup, closed.
Add “what happens next” under every step. If the next action is on the customer (e.g., upload proof of purchase), make it a prominent button—not a buried note.
Send updates at the moments that matter
Automatic email/SMS updates reduce “any update?” calls and keep expectations aligned.
Trigger messages for key events such as:
- We received your request
- We received your item
- Claim approved/denied (with reason and next steps)
- Service scheduled/rescheduled
- Repair completed / replacement approved
- Ticket closed (with summary)
Let customers choose channels and frequency (e.g., SMS only for scheduling). Keep templates consistent, include the ticket number, and link back to the status page.
Add a message center (with auditability)
Include a message center for questions so conversation stays attached to the case.
Support attachments (photos, receipts, shipping labels) and keep an audit trail: who sent what, when, and which files were added. This becomes invaluable when decisions are disputed.
Reduce support volume with in-context help
Use short FAQs and contextual help near form fields to prevent bad submissions: examples of acceptable proof of purchase, where to find serial numbers, packaging tips, and turnaround-time expectations.
Link deeper guidance when needed (e.g., /help/warranty-requirements, /help/shipping).
Service Operations: Scheduling, Shipping, and Repairs
Once a claim is approved (or tentatively accepted pending inspection), the web app needs to turn “a ticket” into real work: an appointment, a shipment, a repair job, and a clear closeout.
This is where many portals fall apart—customers get stuck, and service teams end up back in spreadsheets.
Service scheduling that matches how you actually work
Support both on-site visits and depot/in-shop repairs.
The scheduling UI should present available time slots based on technician calendars, business hours, capacity limits, and service region.
A practical flow is: customer selects service type → confirms address/location → chooses a slot → receives confirmation and preparation steps (e.g., “have proof of purchase ready,” “backup data,” “remove accessories”).
If you use dispatching, allow internal users to reassign technicians without breaking the customer’s appointment.
Shipping and returns: RMAs that don’t require email back-and-forth
For depot repairs, make shipping a first-class feature:
- Generate an RMA number automatically and display it prominently.
- Provide printable shipping labels (or a pickup request) and clear packing instructions.
- Show inbound/outbound tracking links so customers can see where the item is without calling.
Internally, the app should track key scan events (label created, in transit, received, shipped back) so your team can answer “where is it?” in seconds.
Parts and inventory touchpoints (optional, but valuable)
Even if you’re not building a full inventory system, add lightweight parts handling:
- “Request parts” per job (with approval if needed)
- Track parts used per repair for cost and warranty recovery
- Note backorders and expected arrival dates
If you already have an ERP, this can be a simple sync rather than a new module.
Proof of completion and clean closeout
A repair isn’t “done” until it’s documented.
Capture:
- Technician notes (what was found, what was replaced)
- Photos (before/after) as attachments
- Customer confirmation: signature on-site or an in-portal “service completed” acknowledgment
End with a clear closure summary and next steps (e.g., warranty remaining, invoice if out-of-warranty, and a link to reopen if the issue returns).
Integrations: CRM, ERP, Payments, and Logistics
Own the Source Code
Generate React plus Go and PostgreSQL, then export source code when you are ready.
Integrations turn a warranty claims web app from “yet another portal” into a system your team can actually run. The goal is simple: eliminate double entry, reduce mistakes, and keep customers moving through the RMA process with fewer handoffs.
CRM / helpdesk: one customer, one conversation
Most companies already track customer interactions in a CRM or helpdesk. Your service request portal should sync the essentials so agents don’t work in two systems:
- Create or update a ticket when a claim is submitted (including attachments, serial number, and requested outcome).
- Sync status changes both ways (e.g., “Waiting for photos,” “Approved,” “Shipped,” “Repaired,” “Closed”).
- Link the claim to the customer profile so support history is visible during follow-ups.
If you already use workflows/macros in the helpdesk, map your internal queues to those states rather than inventing a new parallel process.
ERP / order data: purchase verification and product catalogs
Warranty validation depends on reliable purchase and product data. A lightweight ERP integration can:
- Verify proof of purchase using order number, customer email, or invoice ID.
- Pull product SKUs, warranty terms, and eligible service options.
- Prevent mismatches (wrong model selected, invalid serial format, duplicate claims).
Even if your ERP is messy, start by integrating read-only verification first—then expand to write-back (RMA numbers, service costs) once the flow is stable.
Payments for out-of-warranty work
For out-of-warranty service, connect a payment provider to support quotes, invoices, and payment links.
Key details:
- Tie payments to a claim ID and store the transaction reference.
- Support “pay first, then schedule” or “approve quote, then pay,” depending on your policy.
- Make refunds/adjustments explicit in the claim timeline.
Logistics: shipping labels, tracking, and exceptions
Shipping integrations reduce manual label creation and give customers automatic tracking updates.
Capture tracking events (delivered, failed delivery, return-to-sender) and route exceptions to an internal queue.
Plan your API and document the data you expose
Even if you start with only a couple of integrations, define a webhook/API plan early:
- Webhooks for events like claim.created, claim.approved, shipment.created, payment.received.
- An API for reading claim status and writing notes/status updates.
- Clear field definitions (IDs, timestamps, status enums) so future systems can integrate without guesswork.
A small integration spec now prevents expensive rewrites later.
Security, Privacy, and Auditability
Security isn’t a “later” feature in a warranty claims web app—it shapes how you collect data, how you store it, and who can see it.
The goal is to protect customers and your team without making the service request portal painful to use.
Collect only what you need
Every field you add increases risk and friction. Ask for the minimum information required to validate warranty and route the claim (e.g., product model, serial number, purchase date, proof of purchase).
When you do request sensitive or “extra” data, explain why in plain language (“We use your serial number to confirm warranty coverage” or “We need photos to assess shipping damage”). This reduces abandonment and support back-and-forth.
Access control and safe storage
Use role-based access so people see only what they need:
- Customers: only their own tickets and attachments
- Support agents: assigned queues; limited access to payment data
- Technicians: repair details and photos, not customer billing info
- Admins: configuration and reporting, with elevated actions logged
Encrypt data in transit (HTTPS) and at rest (database and backups).
Store uploads (receipts, photos) in secure object storage with private access and time-limited download links—not public URLs.
Audit logs you can trust
Warranty decisions need traceability. Keep an audit log of who changed what, when, and from where:
- Status changes (Submitted → In Review → Approved/Denied)
- Warranty validation outcomes and rule versions
- Repair authorization (RMA created, labels issued)
- Notes edits and attachment actions
Make audit logs append-only and searchable, so disputes can be resolved quickly.
Retention and deletion rules
Define how long you keep customer data and attachments, and how deletion works (including backups).
For example: receipts retained for X years for compliance; photos deleted after Y months if the case is closed. Provide a clear path to honor customer deletion requests where applicable.
Architecture and Tech Choices (Without Overengineering)
A warranty claims web app doesn’t need a complex microservices setup to work well.
Start with the simplest architecture that supports your workflow, keeps data consistent, and is easy to change when policies or products evolve.
Choose a build approach that fits your reality
You typically have three paths:
- Extend an existing helpdesk/ticketing system if you mainly need a service request portal, internal queues, and email updates. This is often fastest, but can get awkward when you add warranty validation, RMA process steps, or repair authorization logic.
- Low-code if your team can configure forms, statuses, and automations quickly—great for early versions, but watch out for limits around integrations and reporting.
- Custom build when decision rules, integrations (CRM/ERP/logistics), and data ownership really matter. A simple monolith with a clean database is usually the best starting point.
If you want to ship a working prototype quickly (form → workflow → status page) and iterate with stakeholders, a vibe-coding platform like Koder.ai can help you generate a React-based portal and a Go/PostgreSQL backend from a chat-driven spec—then export the source code when you’re ready to productionize.
Start with a clear, boring data model
Most warranty claims web app projects succeed when the core entities are obvious:
- Customers (and contacts)
- Products (with serial numbers, purchase dates, proof-of-purchase files)
- Claims (the request itself: reason, photos, notes, status)
- Service jobs (repair events, parts used, technician notes)
- Messages (threaded communication and attachments)
Design these so you can answer basic questions: “What happened?”, “What did we decide?”, and “What work was performed?”
Mobile-first UI and a lightweight admin panel
Assume many users will submit from phones. Prioritize fast pages, big form controls, and effortless photo uploads.
Keep configuration out of code by building a small admin panel for statuses, reason codes, templates, and SLAs.
If changing a status label requires a developer, the process will slow down quickly.
Testing, Training, and Launch Checklist
Start with Integrations Ready
Connect CRM, ERP, payments, and logistics events without rewriting your core app later.
Shipping a warranty claims web app isn’t just “make it work.” It’s making sure real customers can submit a request in two minutes, your team can process it without guesswork, and nothing breaks when volume spikes.
A short, practical checklist will save you weeks of post-launch cleanup.
Prototype the form and status page first
Before building every integration, prototype the two screens that matter most:
- the claim/service request form
- the claim status page (what the customer sees after submission)
Put the prototype in front of real users (customers and internal staff) and time a 30-minute test.
Watch where they hesitate: serial number field? upload step? “purchase date” confusion? This is where customer support forms succeed or fail.
Test the edge cases that create support tickets
Most failures happen in “messy reality,” not happy paths.
Explicitly test:
- Missing receipt or proof of purchase (what options does the customer have?)
- Wrong serial number formats (do you validate and show helpful error text?)
- Large attachments (photos, videos, PDFs) and slow connections
- Spam and repeated submissions (rate limiting, CAPTCHA, email verification)
Also test your decision points: warranty validation rules, repair authorization (RMA process), and what happens when a claim is rejected—does the customer still get a clear explanation and next steps?
Create a staging environment and release checklist
Use a staging environment that mirrors production settings (email sending, file storage, permissions) without touching real customer data.
For each release, run a quick checklist:
- Form submission, confirmation email, and ticket creation
- Status updates and customer notifications
- Internal queues and role-based access (support vs. technicians)
- Attachment handling and virus scanning (if enabled)
- Audit trail entries for key actions (approve/deny, RMA issued, refund processed)
This turns each deploy from a gamble into a routine.
Train support and technicians (and make it easy)
Training should focus on the claims workflow, not the UI.
Provide:
- A one-page quick guide per role (support, warehouse, repair tech)
- A small library of canned replies for common scenarios (missing receipt, out-of-warranty, shipping instructions)
- Clear “definition of done” for each queue state
If your team can’t explain the status labels to a customer, the labels are the problem. Fix them before launch.
Analytics, Reporting, and Continuous Improvements
Analytics isn’t just “nice to have” for a warranty claims web app—it’s how you keep the service request portal fast for customers and predictable for your team.
Build reporting around the real flow: what customers try to do, where they get stuck, and what happens after a request is submitted.
Funnel metrics: reduce abandoned requests
Start with simple funnel tracking that answers, “Are people able to complete the form?”
Measure:
- Started vs. submitted requests (overall and by device type)
- Drop-off step (e.g., “serial number,” “proof of purchase,” “photos”)
- Drop-off reasons via lightweight prompts like “What blocked you?” (missing info, unclear policy, too many fields)
If your customer support forms show high drop-off on mobile, you may need fewer required fields, better photo upload UX, or clearer examples.
Operational metrics: improve service performance
Operational reporting helps you manage the ticketing system side of the process:
- Time to first response (by queue, product line, and priority)
- Time to resolution (including repair authorization/RMA steps)
- Reopen rate (a strong signal that outcomes or instructions weren’t clear)
Make these visible to team leads weekly, not only in quarterly reviews.
Tags and reason codes: spot product issues early
Add structured tags/reason codes to every claim (e.g., “battery swelling,” “screen defect,” “shipping damage”).
Over time, these reveal patterns: specific batches, regions, or failure modes. That insight can reduce future claims by triggering packaging changes, firmware updates, or clearer setup guidance.
Continuous improvement loop (and share it)
Treat the portal like a product. Run small experiments (field order, wording, attachment requirements), measure impact, and keep a changelog.
Consider a public roadmap or updates page (for example, /blog) to share what’s improved—customers appreciate transparency, and it reduces repeat questions.
FAQ
What’s the difference between a warranty claim web app and a service request portal?
Start by separating two flows:
- Warranty claim: validate eligibility (time window, proof of purchase, exclusions) and issue an approval/denial.
- Service request: troubleshoot, schedule service, and collect payment when needed.
Then build around outcomes like fewer incomplete submissions, faster first response, and shorter time to resolution.
Who are the main users of a warranty and service web app?
A typical portal supports:
- Customers: submit requests, upload receipts/photos, track status.
- Support agents: triage, request missing info, approve/deny, communicate decisions.
- Technicians/partners: record diagnostics, parts/labor, completion.
- Managers/admins: configure rules, monitor SLAs, review costs and exceptions.
Design separate views so each role sees only what they need.
How do you map a warranty claim workflow before building the app?
Keep it readable and end-to-end. A common baseline is:
- Submit request
- Review/triage
- Validate warranty / decide approval
- Schedule service or create RMA/shipping
- Repair/replace
- Close with documentation
If it won’t fit on one page, simplify the process before adding features.
What customer-visible statuses should a claims portal include?
Use a small set you can reliably maintain, such as:
- Submitted
- In review
- Waiting on customer
- Approved / Denied
- Scheduled / Shipping label created
- Item received
- Repair in progress
- Shipped / Ready for pickup
- Completed / Closed
What information should the claim or service request form require?
Collect only the essentials needed to validate and route the case:
- Contact info (and address only if shipping/on-site service is possible)
- Product model + serial number
- Purchase date (or ship date, depending on policy)
- Issue description with prompts (error codes, when it started)
Show receipt upload only when required (for example, reseller purchases).
How should the app handle photos, videos, and proof-of-purchase uploads?
Make uploads useful and predictable:
- Accept photos, short videos, and PDFs (receipts/invoices)
- Set clear limits (file types and maximum size)
- Add inline tips like “Photo of serial label” or “Video showing the issue”
Keep the user’s entered data if an upload fails, and explain the error in one sentence.
How can a web app automate warranty eligibility checks?
Automate the first pass immediately after submission:
- Calculate coverage from purchase/ship date (including edge cases like registration-based rules)
- Validate serial number format (and detect product line from serial when possible)
- Verify proof of purchase (receipt upload, invoice ID, retailer order ID)
If proof is missing, route to a “Needs info” queue instead of rejecting the request.
What security and privacy features are essential for warranty apps?
Use role-based access with least privilege:
- Customers see only their own tickets and files
- Agents see assigned queues; limit payment data access
- Technicians see repair tasks and photos, not billing details
- Admin actions (rule changes, user access) are logged
Store attachments in private object storage with time-limited download links, encrypt data in transit and at rest, and keep append-only audit logs for decisions and status changes.
Which integrations matter most (CRM, ERP, payments, logistics)?
Integrate where it reduces double entry:
- CRM/helpdesk: create/update tickets, sync statuses, keep conversation history
- ERP/order data: verify purchases, pull SKUs/warranty terms
- Payments: quotes/invoices tied to claim IDs; refunds logged in the timeline
- Logistics: label creation, inbound/outbound tracking, exception routing
Plan webhooks like , , , early so you don’t redesign later.
What should you test before launching a warranty claims web app?
Test messy realities, not just happy paths:
- Missing receipt, wrong serial formats, and incomplete fields
- Large files and slow connections
- Duplicate submissions, spam, rate limits/CAPTCHA
- Rejections/denials (clear reason + next steps)
Use a staging environment that mirrors production (email, storage, permissions), and verify audit log entries for key actions like approvals, RMAs, and refunds.