

How to Create a SaaS Status Website with Incident History
Learn how to plan, build, and publish a SaaS status page with incident history, clear messaging, and subscriptions so customers stay informed during outages.
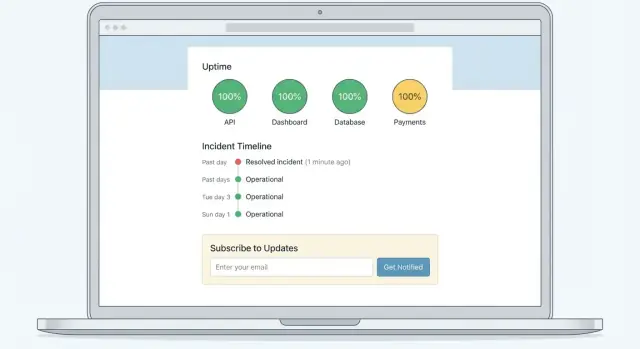
What a SaaS Status Page Is (and Why It Matters)
A SaaS status page is a public (or customer-only) website that shows whether your product is working right now—and what you’re doing if it isn’t. It becomes the single source of truth during incidents, separate from social media, support tickets, and rumor.
It helps more people than you might expect:
- Customers can quickly confirm “Is it just me?” and decide whether to wait, retry, or use a workaround.
- Support teams can link to one canonical update instead of repeating explanations in dozens of tickets.
- Sales and Customer Success teams can proactively manage renewals and key accounts with accurate, timestamped information.
Real-time status vs. incident history vs. postmortems
A good service status website usually contains three related (but different) layers:
- Real-time status: what’s up, down, or degraded right now across your components (API, dashboard, billing, etc.).
- Incident history page: a timeline of past incidents and maintenance, so customers can understand patterns and see that issues were addressed.
- Post-incident reviews (postmortems): deeper write-ups explaining root cause, fixes, and prevention steps. These may be public or shared privately with affected customers.
The goal is clarity: real-time status answers “Can I use the product?” while history answers “How often does this happen?” and postmortems answer “Why did this happen, and what changed?”
Setting expectations: transparency, speed, and clarity
A status page works when updates are fast, plain-language, and honest about impact. You don’t need a perfect diagnosis to communicate. You do need timestamps, scope (who’s affected), and the next update time.
Common moments you’ll use it
You’ll rely on it during outages, degraded performance (slow logins, delayed webhooks), and planned maintenance that could cause brief disruption or risk.
Once you treat the status page as a product surface (not a one-off ops page), the rest of the setup becomes a lot easier: you can define owners, build templates, and connect monitoring without reinventing the process during every incident.
Set Goals, Audience, and Ownership
Before you pick a tool or design a layout, decide what your status page is supposed to do. A clear goal and a clear owner are what keep status pages useful during an incident—when everyone is busy and information is messy.
Define the goal (what “success” looks like)
Most SaaS teams create a status page for three practical outcomes:
- Reduce support tickets by answering “Is it down?” in one public place
- Build trust by sharing timely, plain-language updates
- Speed up communication across Support, Engineering, Sales, and Customer Success
Write down 2–3 measurable signals you can track after launch: fewer duplicate tickets during outages, faster time-to-first-update, or more customers using subscriptions.
Identify the audience and reading level
Your primary reader is usually a non-technical customer who wants to know:
- Is the product working right now?
- What’s impacted (login, API, billing, etc.)?
- What should I do next?
- When will it be fixed?
That means minimizing jargon. Prefer “Some customers can’t log in” over “Elevated 5xx rates on auth.” If you do need technical detail, keep it as a short secondary sentence.
Choose tone, rules, and ownership
Pick a tone you can maintain under pressure: calm, factual, and transparent. Decide upfront:
- Who can post updates (single role or an on-call rotation)
- Who approves updates (if anyone) and how long approval can take
- Minimum update frequency during an active incident (for example, every 30 minutes)
Make ownership explicit: the status page should not be “everyone’s job,” or it becomes no one’s job.
Decide where it lives
You have two common options:
- Standalone site (e.g., status.yourcompany.com): clearer separation and often more outage-resistant
- Subpath (e.g., /status): simpler branding and analytics
If your main app can go down, a standalone status site is usually safer. You can still link to it prominently from your app and help center (for example, /help).
Map Your Services and Component Status Model
A status page is only as useful as the “map” behind it. Before you pick colors or write copy, decide what you’re actually reporting on. The goal is to reflect how customers experience your product—not how your org chart is arranged.
Start with a component inventory
List the pieces a customer might describe when they say “it’s broken.” For many SaaS products, a practical starting set looks like:
- API
- Web app
- Dashboard / admin
- Authentication (login, SSO)
- Billing
- Integrations (Slack, Salesforce, webhooks, etc.)
If you offer multiple regions or tiers, capture that too (e.g., “API – US” and “API – EU”). Keep names customer-friendly: “Login” is clearer than “IdP Gateway.”
Decide how to group components
Choose a grouping that matches how customers think about your service:
- By product: best if you have distinct offerings (Product A vs. Product B)
- By region: best if availability differs meaningfully by geography
- By feature/workflow: best if customers rely on specific jobs (Reporting, Imports, Notifications)
Try to avoid an endless list. If you have dozens of integrations, consider one parent component (“Integrations”) plus a few high-impact children (e.g., “Salesforce,” “Webhooks”).
Define your status levels (and what they mean)
A simple, consistent model prevents confusion during incidents. Common levels include:
- Operational: working as expected
- Degraded Performance: slower than normal or intermittent errors
- Partial Outage: a meaningful subset of users/features is unavailable
- Major Outage: the service is broadly unavailable
Write internal criteria for each level (even if you don’t publish it). For example, “Partial Outage = one region down” or “Degraded = p95 latency above X for Y minutes.” Consistency builds trust.
Capture dependencies—and choose what to show
Most outages involve third parties: cloud hosting, email delivery, payment processors, or identity providers. Document these dependencies so your incident updates can be accurate.
Whether to display them publicly depends on your audience. If customers can be directly impacted (e.g., payments), showing a dependency component can be helpful. If it adds noise or invites blame games, keep dependencies internal but reference them in updates when relevant (e.g., “We are investigating elevated errors from our payment provider”).
Once you have this component model, the rest of your status page setup becomes much easier: every incident gets a clear “where” (component) and “how bad” (status) from the start.
Design a Simple, Customer-Friendly Status Page
A status page is most useful when it answers customer questions in seconds. People typically arrive stressed and want clarity—not a lot of navigation.
Start with what customers need first
Prioritize the essentials at the very top:
- Current state: Are things operational, degraded, or down?
- Impact: What’s affected (who/which regions/features) and what users might experience
- ETA (if you have one): Be careful—only share time estimates you can defend
- Next update time: A specific promise like “Next update by 14:30 UTC” reduces repeat tickets
Write in plain language. “Elevated error rates on API requests” is clearer than “Partial outage in upstream dependency.” If you must use technical terms, add a short translation (“Some requests may fail or time out”).
Use a simple, scannable layout
A reliable pattern is:
- Top banner for overall status (All Systems Operational / Degraded Performance / Major Outage)
- Component list with clear statuses (Web App, API, Billing, Integrations, etc.)
- Active incidents and scheduled maintenance directly below, sorted by newest update
For the component list, keep labels customer-facing. If your internal service is “k8s-cluster-2,” customers likely need “API” or “Background Jobs.”
Accessibility and mobile basics
Make the page readable under pressure:
- Strong color contrast and text labels (don’t rely on color alone)
- Clear icons with consistent meaning (e.g., green = operational, yellow = degraded, red = outage)
- Mobile-friendly spacing and tap targets; many users will check status from their phone
Add quick links where people expect them
Place a small set of links near the top (header or right under the banner):
- Subscribe (for email/SMS/webhook notifications)
- Incident History (for past incidents and timelines)
- Contact Support at /support
The goal is confidence: customers should immediately understand what’s happening, what it affects, and when they’ll hear from you next.
Create Incident and Maintenance Update Templates
When an incident hits, your team is juggling diagnosis, mitigation, and customer questions at the same time. Templates remove guesswork so updates stay consistent, clear, and fast—especially when different people might be posting.
Define the incident fields you’ll always publish
A good update starts with the same core facts every time. At minimum, standardize these fields so customers can quickly understand what’s going on:
- Incident start time (with timezone)
- Affected components/services (mapped to your status model)
- Customer impact (who is impacted and how)
- Current status (Investigating, Identified, Monitoring, Resolved)
- Updates log (timestamped entries)
- Resolved time (when service returned to normal)
If you publish an incident history page, keeping these fields consistent makes past incidents easy to scan and compare.
Use a simple, repeatable incident update template
Aim for short updates that answer the same questions customers have every time. Here’s a practical template you can copy into your status page tool:
Title: Brief, specific summary (e.g., “API errors for EU region”)
Start time: YYYY-MM-DD HH:MM (TZ)
Affected components: API, Dashboard, Payments
Impact: What users are seeing (errors, timeouts, degraded performance) and who is affected
What we know: One sentence on the cause if confirmed (avoid speculation)
What we’re doing: Concrete actions (rollback, scaling, vendor escalation)
Next update: Time you’ll post again
Updates:
- HH:MM (TZ) — Investigating: …
- HH:MM (TZ) — Identified: …
- HH:MM (TZ) — Monitoring: …
- HH:MM (TZ) — Resolved: …
Set clear update cadence rules
Customers don’t just want information—they want predictability.
- For major incidents, commit to updates every 30–60 minutes, even if the update is “We’re still investigating; no ETA yet; next update at X.”
- For minor issues, you can post less frequently, but still set a promised “next update” time.
- If you can’t meet the cadence, post a quick note acknowledging the delay and resetting expectations.
Add maintenance announcement templates
Planned maintenance should feel calm and structured. Standardize maintenance posts with:
- Maintenance window: start/end time (with timezone)
- Expected impact: none / degraded / intermittent / downtime
- Affected components
- Customer actions (if any): “No action needed” or clear steps
- Reminder update: a short post when maintenance begins, and another when it ends
Keep maintenance language specific (what changes, what users might notice), and avoid overpromising—customers value accuracy over optimism.
Build an Incident History That’s Easy to Scan
An incident history page is more than a log—it’s a way for customers (and your own team) to quickly understand how often issues happen, what types of problems repeat, and how you respond.
Why incident history is worth the effort
A clear history builds confidence through transparency. It also creates trend visibility: if you see recurring “API latency” incidents every few weeks, that’s a signal to invest in performance work (and to prioritize a post-incident review process). Over time, consistent reporting can reduce support tickets because customers can self-serve answers.
Decide retention: how far back should you keep it?
Pick a retention window that matches your customer expectations and product maturity.
- 90 days: common for early-stage SaaS, keeps the page lightweight
- 6–12 months: better for enterprise buyers evaluating reliability
- Longer: consider exporting older records to a separate archive page if the timeline becomes noisy
Whatever you choose, state it clearly (e.g., “Incident history is retained for 12 months”).
Make each entry instantly understandable
Consistency makes scanning easy. Use a predictable naming format such as:
YYYY-MM-DD — Short summary (e.g., “2025-10-14 — Delayed email delivery”)
For each incident, show at least:
- affected components
- start/end time (with timezone)
- impact level (minor/major)
- a short resolution note
Link to deeper context when available
If you publish postmortems, link from the incident detail page to the write-up (for example: “Read the postmortem” linking to /blog/postmortems/2025-10-14-email-delays). This keeps the timeline clean while still offering detail for customers who want it.
Add Subscriptions and Notifications
A status page is helpful when customers think to check it. Subscriptions flip that around: customers get updates automatically, without refreshing the page or emailing support for confirmation.
Offer the channels your customers already use
Most teams expect at least a couple of options:
- Email (the default for many customers)
- SMS (best for urgent, high-signal alerts)
- Slack or Microsoft Teams (ideal for business customers and ops teams)
- RSS/Atom (still popular with technical users and for internal tooling)
If you support multiple channels, keep the setup flow consistent so customers don’t feel like they’re signing up four different ways.
Make opt-in and preferences crystal clear
Subscriptions should always be opt-in. Be explicit about what people will receive before they confirm—especially for SMS.
Give subscribers control over:
- Scope: all incidents vs. only selected components (e.g., “API” but not “Marketing site”)
- Type: incidents only, maintenance only, or both
- Severity (optional): only “Major outage” vs. “All updates”
These preferences reduce alert fatigue and keep your notifications trusted. If you don’t have component-level subscriptions yet, start with “All updates” and add filtering later.
Don’t let notifications fail during the exact moment you need them
During an incident, message volume spikes and third-party providers can throttle traffic. Double-check:
- Deliverability: SPF/DKIM/DMARC for email; verified sending domains; “from” addresses customers recognize
- Rate limits and throttling: your email/SMS provider caps, Slack/Teams webhook limits, and retry behavior
- Fallbacks: if Slack posts fail, do you still email? If SMS is delayed, do you show a clear banner on the status homepage?
It’s worth running a scheduled test (even quarterly) to ensure subscriptions still work as expected.
Put “Subscribe to updates” where no one can miss it
Add a clear callout on the status homepage—above the fold if possible—so customers can subscribe before the next incident. Make it visible on mobile, and include it in places where customers look for help (like a link from your support portal or /help center).
Choose a Build Method: Hosted Tool vs. DIY
Picking how you’ll build your status page is less about “can we build it?” and more about what you want to optimize for: speed to launch, reliability during incidents, and ongoing maintenance effort.
Option 1: Use a hosted status page tool
A hosted tool is usually the fastest path. You get a ready-made status page, subscriptions, incident timelines, and often integrations with common monitoring systems.
What to look for in a hosted tool:
- Reliability and independence: the status page should stay reachable even if your main app is down
- API and automation: create incidents, update components, and post progress updates via API or webhooks
- Access control: roles for who can publish updates vs. draft them; SSO is a bonus
- Branding and custom domain: your logo/colors, plus a domain like status.yourcompany.com
- Analytics: subscriber count, update views, and email delivery metrics (helpful for improving incident communication)
- Compliance needs: audit logs and retention if you operate in regulated environments
Option 2: Build it yourself (DIY)
DIY can be a great choice if you want full control over design, data retention, and how incident history is presented. The trade-off is you own reliability and operations.
A practical DIY architecture is:
- Static site (fast, cache-friendly) for the status UI and incident history pages
- API-backed data source (or a lightweight CMS) that stores incidents, components, and updates
- Aggressive caching + CDN so your status page stays fast under traffic spikes during an outage
If you self-host, plan for failure modes: what happens if your primary database is unavailable, or your deploy pipeline is down? Many teams keep the status page on separate infrastructure (or even a separate provider) from the main product.
If you want the control of DIY without rebuilding everything from scratch, a vibe-coding platform like Koder.ai can help you stand up a custom status site (web UI plus a small incident API) quickly from a chat-driven spec. That’s especially useful for teams who want tailored component models, custom incident history UX, or internal admin workflows—while still being able to export source code, deploy, and iterate fast.
Cost planning
Hosted tools have predictable monthly pricing; DIY has engineering time, hosting/CDN costs, and ongoing maintenance. If you’re comparing options for your team, outline the expected monthly spend and the internal time you’ll need—then sanity-check it against your budget (see /pricing).
Connect Monitoring and Incident Workflow
A status page is only useful if it reflects reality quickly. The easiest way to do that is to connect the systems that detect problems (monitoring) with the systems that coordinate your response (incident workflow), so updates are consistent and timely.
Where status updates should come from
Most teams combine three data sources:
- Monitoring alerts (health checks, synthetic tests, error rates, latency, queue depth). These are great for detection, but they don’t always describe customer impact.
- Manual updates from the on-call or support team. Humans can add context: who is affected, what’s the workaround, what changed.
- Incident management tools (PagerDuty, Opsgenie, Jira Service Management, etc.). These provide the timeline, roles, and resolution notes your status page can summarize.
A practical rule: monitoring detects; incident workflow coordinates; the status page communicates.
Automation that helps (without overpromising)
Automation can save minutes when it matters:
- Create an incident from an alert when a high-severity monitor triggers (e.g., “API error rate > 5% for 5 minutes”). Pre-fill title, affected components, and initial severity.
- Update components from health checks for objective signals (e.g., “Web app: Degraded Performance” when latency thresholds are breached).
- Sync status changes to your incident channel (Slack/Teams) so responders see what customers see.
Keep the first public message conservative. “Investigating elevated errors” is safer than “Outage confirmed” when you’re still validating.
Don’t go fully automatic without human review
Fully automated messaging can backfire:
- A noisy alert can post false incidents.
- A partial failure can look “down” to one monitor but be fine for customers.
- Auto-resolved updates can close an incident while users are still impacted.
Use automation to draft and suggest updates, but require a human to approve customer-facing wording—especially for Identified, Mitigated, and Resolved states.
Keep an audit trail
Treat the status page like a customer-facing logbook. Ensure you can answer:
- Who changed the incident status?
- What was changed (text, components, timestamps)?
- When was it changed?
This audit trail helps with post-incident review, reduces confusion during handoffs, and builds trust when customers ask for clarification.
Make It Reliable: Hosting, DNS, and Outage-Proofing
A status page only helps if it’s reachable when your product isn’t. The most common failure mode is building the status site on the same infrastructure as the app—so when the app goes down, the status page vanishes too, leaving customers with no source of truth.
Isolate it from your core stack
When possible, host the status page on a different provider than your production app (or at least a different region/account). The goal is blast-radius separation: an outage in your app platform shouldn’t also take down your incident communications.
Also consider separating DNS. If your main domain’s DNS is managed in the same place as your app edge/CDN, a DNS or certificate issue can block both at once. Many teams use a dedicated subdomain (for example, status.yourcompany.com) with DNS hosted independently.
Make the page fast and resilient
Keep assets lightweight: minimal JavaScript, compressed CSS, and no dependencies that require your app’s APIs to render. Put a CDN in front of the status page and enable caching for static resources so it loads even under heavy traffic during incidents.
A practical safety net is a fallback static mode:
- pre-render the last known status and incident banner
- serve it from object storage or static hosting
- update dynamically when systems are healthy, but degrade gracefully when they’re not
Public by default, with secure admin access
Customers shouldn’t need to log in to see service health. Keep the status page public, but put your admin/editor tools behind authentication (SSO if you have it), with strong access controls and audit logs.
Finally, test failure scenarios: temporarily block your app origin in a staging environment and confirm the status page still resolves, loads quickly, and can be updated when you need it most.
Operational Process: Who Updates and When
A status page only builds trust if it’s consistently updated during real incidents. That consistency doesn’t happen by accident—you need clear ownership, simple rules, and a predictable cadence.
Define the roles (before anything breaks)
Keep the core team small and explicit:
- Incident Commander (IC): runs the response, decides priority, and confirms when you’re stable
- Communications Lead: posts updates to the status page and keeps wording customer-friendly
- Engineers on call: investigate, mitigate, and feed confirmed facts to the IC
If you’re a small team, one person can hold two roles—just decide in advance. Document role handoffs and escalation paths in your on-call handbook (see /docs/on-call).
A simple update checklist to follow every time
When an alert turns into a customer-impacting incident, follow a repeatable flow:
- Acknowledge: post an “Investigating” update quickly (even if details are limited)
- Assess impact: confirm which components, regions, or customer segments are affected
- Post update: share what users might notice, workarounds (if any), and when you’ll update next
- Resolve: confirm service is restored and what you’re monitoring
- Recap: add a short summary and link to the full review when available
A practical rule: post the first update within 10–15 minutes, then every 30–60 minutes while impact continues—even if the message is “No change, still investigating.”
After resolution: review and improve
Within 1–3 business days, run a lightweight post-incident review:
- Timeline: key events from detection to recovery
- Root cause (best-known): explain in plain language
- Action items: specific fixes, owners, and due dates
Then update the incident entry with the final summary so your incident history stays useful—not just a log of “resolved” messages.
Launch Checklist and Ongoing Improvements
A status page is only useful if it’s easy to find, easy to trust, and consistently updated. Before you announce it, do a quick “production-ready” pass—and then set up a lightweight cadence to improve it over time.
Launch checklist (the practical version)
Copy and structure
- Confirm your component names match what customers recognize (e.g., “Dashboard” vs. internal service names).
- Add a short “What this page shows” intro and a clear link to support (e.g., /support) for account-specific issues.
- Ensure incident updates explain customer impact (“payments failing”) and provide next steps (“retry after 10 minutes”).
Branding and trust
- Add your logo, favicon, and a simple color system for statuses (avoid overly subtle shades).
- Include a clear timestamp format and time zone.
Access and permissions
- Verify who can publish incidents, schedule maintenance, and edit page settings.
- Set up an “on-call backup” so updates aren’t blocked by a single person.
Test the full workflow
- Run a test incident (mark it as resolved and label it clearly as a test).
- Subscribe via email/SMS and confirm notifications arrive and include correct links.
Announce
- Add the status page link in your app footer, help center, and support auto-replies.
- Send a short customer announcement explaining what to expect and how to subscribe.
If you’re building your own status site, consider running the same launch checklist in a staging environment first. Tools like Koder.ai can speed up this iteration loop by generating the web UI, admin screens, and backend endpoints from a single spec—then letting you export the code and deploy it wherever you need.
Measure what “better” looks like
Track a few simple outcomes and review them monthly:
- Reduced tickets: Compare incident-related ticket volume before/after launch.
- Faster first update: Measure time from detection to first public update.
- Subscriber growth: Track subscribers by channel and which components they follow.
Learn from incident patterns
Keep a basic taxonomy so history becomes actionable:
- Tag incidents by category (performance, partial outage, third-party, maintenance, security-related).
- Note recurring components and repeat offenders.
- Use this to prioritize fixes and inform your post-incident review process.
SEO basics (so customers can find the right page)
- Use clear page titles like “Service Status” and “Incident History.”
- Keep headings structured (H2/H3) so history pages are easy to scan.
- Prefer indexable incident history pages (unless there’s a security/privacy reason not to), and ensure links between the main status page and each incident are crawlable.
Over time, small improvements—clearer wording, faster updates, better categorization—compound into fewer interruptions, fewer tickets, and more customer confidence.
FAQ
What is a SaaS status page, and why does it matter?
A SaaS status page is a dedicated page that shows current service health and incident updates in one canonical place. It matters because it reduces “Is it down?” support load, sets expectations during outages, and builds trust with clear, timestamped communication.
What’s the difference between real-time status, incident history, and postmortems?
Real-time status answers “Can I use the product right now?” with component-level states.
Incident history answers “How often does this happen?” with a timeline of past incidents and maintenance.
Postmortems answer “Why did it happen and what changed?” with root cause and prevention steps (often linked from the incident entry).
How do we set clear goals for a status page before building it?
Start with 2–3 measurable outcomes:
- Reduce duplicate support tickets during incidents
- Improve time-to-first-update (for example, within 10–15 minutes)
- Increase notification subscriptions (email/SMS/Slack)
Write these goals down and review them monthly so the page doesn’t become stale.
Who should own status page updates, and how do we avoid confusion during incidents?
Assign an explicit owner and a backup (often the on-call rotation). Many teams use:
- Incident Commander to confirm facts and priority
- Communications Lead to post customer-friendly updates
Also define rules in advance: who can publish, whether approvals are required, and your minimum update cadence (for example, every 30–60 minutes during major incidents).
How do we decide what components to show on the status page?
Choose components based on how customers describe problems, not internal service names. Common components include:
- API
- Web app / Dashboard
- Authentication (Login/SSO)
- Billing
- Integrations (with key children like Webhooks or Salesforce)
If reliability differs by geography, split by region (for example, “API – US” and “API – EU”).
What status levels should we use, and how do we keep them consistent?
Use a small, consistent set of levels and document internal criteria for each:
- Operational
- Degraded Performance
- Partial Outage
- Major Outage
Consistency matters more than perfect precision. Customers should learn what each level means based on repeated, predictable usage.
What should every incident update include to be useful to customers?
A practical incident update should always include:
- Start time (with timezone)
- Affected components/regions
- Plain-language customer impact
- Current state (Investigating/Identified/Monitoring/Resolved)
- A next update time you can meet
Even if you don’t know the root cause yet, you can still communicate scope, impact, and what you’re doing next.
How often should we update the status page during an outage?
Post an initial “Investigating” update quickly (often within 10–15 minutes of confirmed impact). Then:
- Major incidents: update every 30–60 minutes
- Minor incidents: less frequently, but always include a promised next update time
If you’re going to miss your cadence, post a brief note resetting expectations rather than going silent.
Should we use a hosted status page tool or build our own?
Hosted tools optimize for speed and reliability (often staying online even if your app is down) and usually include subscriptions and integrations.
DIY can give full control but you must design for resilience:
- Prefer a static site + CDN
- Separate hosting (and ideally DNS) from your production stack
- Ensure updates can still be published when core systems are degraded
What notification channels should we offer, and how do we prevent alert fatigue?
Offer the channels customers already rely on (commonly email and SMS, plus Slack/Teams or RSS). Keep subscriptions opt-in and clarify:
- What they’ll receive (incidents, maintenance, or both)
- Optional filtering by component or severity
Test deliverability and rate limits periodically so notifications still work when traffic spikes during an incident.