

Create a Website Today That Can Grow Into a Product Later
Learn how to design a simple website today that can grow into a real product later—without rewrites—using clear goals, data, and modular choices.
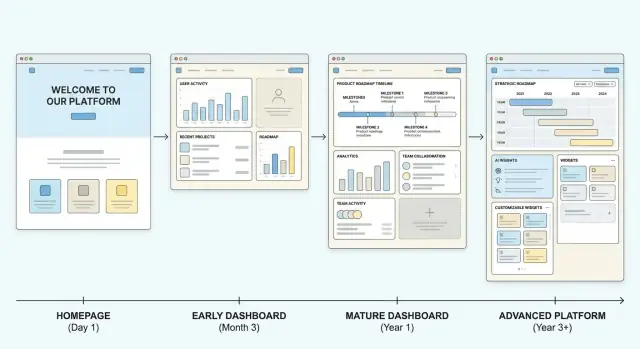
What It Means to Grow a Website Into a Product
A “website that can become a product” is built with a clear path to something more than pages: a repeatable experience people can return to, pay for, and rely on. Early on, it may look like a simple marketing site or a polished MVP website. Over time, it evolves into a product interface—often without needing to throw everything away.
What it is (and what it’s not)
It is a way to validate demand while keeping future options open: clear positioning, structured content, and data capture that can later power onboarding, personalization, or paid access.
It is not “build the whole app now.” Planning for growth doesn’t mean shipping complex features before you understand the customer. If you overbuild, you create a different kind of rework: maintaining functionality nobody asked for.
The typical evolution path
Most teams follow a progression like this:
- Content: explain the problem, who it’s for, and why your approach is different.
- Lead capture: collect emails, demo requests, waitlists, or quotes to measure intent.
- Workflow: turn a manual service into a repeatable process (forms, scheduling, templates, onboarding steps).
- App: introduce interactive features—accounts, dashboards, automations, or usage-based value.
This “content → lead capture → workflow → app” path is how many website-to-product stories actually happen: validation with increasing commitment.
What you can plan early vs. what should wait
Plan early:
- Your primary promise
- Your audience
- Your core conversion action
- A modular website design that can expand (new pages, new offers, new CTAs)
Wait on:
- Feature roadmap details
- Pricing tiers
- Complex user journeys
Those should be driven by real user feedback loops and analytics for early products.
Who this is for, and the outcome you should expect
This approach is ideal for founders, marketers, and small teams who need momentum now but don’t want to corner themselves later.
The outcome isn’t perfection—it’s less rework while you validate demand, so when you do build product features, you’re building on evidence rather than guesses.
Start With One Clear Problem and One Primary Goal
A site that can grow into a product starts with focus. Not “we help everyone,” but a specific person with a specific job they’re trying to get done. When you can name that job clearly, you can design a site that behaves like an early product: it makes a promise, guides people to one action, and produces measurable learning.
Identify the target user and their “job to be done”
Define one primary user. Not an audience segment list—one person you’re building for first. Then describe the job they’re hiring a solution for in plain language.
Example:
- Target user: Operations manager at a small logistics company
- Job: “Reduce late deliveries by spotting issues earlier without adding more meetings”
This keeps you from building a generic marketing site. It also gives you a north star for later product decisions: any feature that doesn’t help this user do this job is a “not yet.”
Write a one-sentence value proposition (plus 3 supporting points)
Your value proposition should fit on one line and be testable.
Template: “We help [target user] achieve [desired outcome] without [major pain/cost].”
Then add three supporting points that explain why it’s believable. Keep them concrete:
- What you do (in one step)
- What makes it faster/easier
- What risk you remove (accuracy, compliance, learning curve, cost)
These supporting points often become your first homepage sections, pricing bullets, and future onboarding copy.
Choose one primary conversion goal
Pick a single action that matches where you are today:
- Newsletter (content-first)
- Waitlist (pre-product)
- Demo request (service or high-touch MVP)
- Checkout (simple paid offer)
Design everything to support that one action: page structure, navigation, and calls to action. Secondary links are fine, but they should never compete with your main goal.
Define success metrics you can measure from day one
If you can’t measure it, you can’t learn from it. Choose 2–4 metrics that reflect progress, such as:
- Conversion rate to your primary goal
- Cost per lead (if running ads)
- Reply rate to a follow-up email
- Number of qualified conversations per week
These metrics become the early validation system that tells you whether to iterate, reposition, or double down.
Set scope boundaries: what you will not build yet
Write a short “not yet” list and treat it as protection, not limitation. Examples: account dashboards, multi-role permissions, a mobile app, advanced integrations. This keeps the website lightweight while leaving room for a real product roadmap based on evidence—not guesses.
Design the Website as a Product Funnel
A site with a product future should guide people through a simple, repeatable journey: first visit → trust → action → follow-up. Think less like “pages” and more like a path that turns curiosity into a measurable next step.
Map the simplest journey that still works
Start by deciding what you want a first-time visitor to do. For an early-stage product, the best actions are usually: start a trial, join a waitlist, request a demo, or book a call. Everything else should support that single action.
A useful funnel structure is:
- First visit: a clear promise and who it’s for
- Trust: proof, clarity, and answers to obvious concerns
- Action: one primary call to action (CTA)
- Follow-up: confirmation + next step (email sequence, calendar link, or onboarding)
Define your “minimum useful pages”
Resist building a big site. Most teams need only:
- Home: the promise, benefits, and the main CTA
- Pricing (even if it’s “starting at” or “request pricing”): qualifies leads and reduces back-and-forth
- About: credibility, values, and why you’re the right team
- Contact: clear ways to reach you (and response expectations)
Add optional pages only if they answer repeated questions. Common ones are FAQ and Use Cases—but only when you already hear those questions from real people.
Keep each page focused (and navigation shallow)
Every page should have one main CTA (with optional secondary links kept subtle). Keep navigation to a few top-level items so you can add new sections later without a redesign—your menu can expand into “Solutions,” “Resources,” or “Product” when the offering grows.
Use Modular Layouts That Can Expand
A website that can grow into a product shouldn’t be a collection of one-off pages. Think in reusable “blocks” you can rearrange as your MVP evolves, your messaging changes, and new features arrive.
Start with reusable content blocks
Create a small library of sections you can reuse across pages:
- Hero (headline, subhead, primary CTA)
- Benefits (3–6 outcomes, not features)
- Social proof (logos, testimonials, short case snippets)
- Comparison (vs. alternatives or “before/after”)
When you repeat these blocks, visitors learn how to scan your site faster—and you avoid redesigning every time you test positioning.
Consistency beats clever layouts
Use the same heading levels, spacing rules, and component styles everywhere (buttons, cards, forms, badges). The payoff is practical: new pages feel cohesive, and future “product pages” won’t require a full refresh.
A lightweight style guide is enough:
- Fonts and sizes for H1/H2/body
- Color palette (primary, neutral, warning)
- Button styles (primary/secondary/link)
- Icon rules (one set, consistent stroke/size)
Leave “slots” for future features
Plan visible placeholders for what’s likely coming next—without pretending you already built it. Examples:
- A dashboard preview section labeled “Preview”
- An integrations row with “Join the waitlist” CTAs
- A pricing layout that can expand from 1 plan to 3
This makes the website-to-product transition smoother because your layout already anticipates new content.
Keep copy modular
Write copy in self-contained chunks (headline, one-paragraph explanation, 3 bullets). That way you can swap positioning or add “build in public” updates without touching the layout—or breaking your scalable content strategy.
Choose Technology With an Upgrade Path
The “right” tech for a future product isn’t the fanciest stack—it’s the one you can upgrade without rebuilding everything. Start simple, but make a few intentional choices so your site can evolve into an MVP product when you’re ready.
Start with a stack you can outgrow gradually
A modern CMS (or a quality site builder) is often the fastest path to launch—especially if your first job is explaining the offer and collecting leads. If you’re already technical, a lightweight framework can be fine too. The key question: can you migrate content and keep URLs stable later?
A practical rule: pick tools that export content cleanly (API access, CSV export, or structured collections), not just “pages.”
If you expect to move from marketing site to working app quickly, consider tools that let you build both without a full rewrite. For example, Koder.ai is a vibe-coding platform where you can go from a chat-based spec to a working web app (React frontend, Go backend, PostgreSQL) and iterate fast as your requirements become real. It also supports source code export, snapshots, and rollback—useful when you’re evolving a live site into product functionality.
Separate content from design early
Even if you’re a one-person team, treat content like data. Use CMS collections/fields for things like:
- Feature list items
- Pricing tiers
- FAQs
- Case studies
This keeps you from rewriting everything when the site becomes more dynamic.
Avoid hard-coding anything that might become dynamic
Pricing is the classic trap. Don’t bake pricing tiers into custom HTML that’s painful to change. Same for feature matrices, integrations, testimonials, and “what’s included.” If it could later be personalized, filtered, or tied to an account—store it as structured content.
Protect SEO with URL stability and redirects
Choose a platform that lets you control slugs and set 301 redirects. When you later move from a marketing site to a product app, your best-performing pages should keep their URLs (or redirect cleanly). This prevents traffic losses right when you need momentum.
Know the triggers for switching from static pages to an app
Move beyond static when you see clear signals, like:
- Users need accounts, onboarding, or saved progress
- Pricing requires billing and plan management
- A “calculator,” “dashboard,” or “workspace” becomes central to the value
Until then, keep the stack light and focus on learning.
Build Lead Capture That Feeds Product Discovery
A signup form isn’t just for “leads.” If you design it well, it becomes your fastest product research channel—because it attracts people who already want the outcome you plan to sell.
Collect only what you’ll actually use
Keep the form short and purposeful. Every field should drive a follow-up action or a clear segmentation decision.
Ask for:
- Email (obvious)
- Role (e.g., founder, marketer, ops)
- Use case (what they’re trying to do)
- Pain point (what’s blocking them)
If you can’t explain how a field changes your next step, remove it.
Use a waitlist that segments from day one
Instead of a generic “Join our newsletter,” offer a waitlist that helps you understand demand. Add 1–2 lightweight segmentation inputs:
- Checkboxes for use cases (“I want to… validate an idea / automate reporting / manage clients”)
- A short dropdown (“Team size: 1 / 2–10 / 11+”)
This lets you prioritize which segment to build for first—and tailor follow-ups without writing different websites.
Add a high-intent path: request access or book a call
Some visitors are ready now. Give them a clear next step:
- Request access (signals early adopters for an MVP)
- Book a call (great when you’re still productizing a service)
You’ll learn more from five real conversations than 500 anonymous pageviews.
Use confirmation emails to set expectations (and ask one more thing)
Your confirmation email should do two jobs:
- Set a timeline (“We’re inviting 20 people per week; you’ll hear back soon.”)
- Collect a bit more context with a single question or link (“Reply with your biggest challenge,” or “Pick your top priority”).
Track conversations with a simple workflow
Start with a lightweight CRM—or even a spreadsheet—with columns like:
- Segment
- Problem statement (their words)
- Current workaround
- Urgency (low/medium/high)
- Next step + date
This turns lead capture into a living backlog of validated needs, not a pile of emails.
Instrument Analytics and Feedback From Day One
If you want the website-to-product journey to be smooth, you need proof—early and continuously—of what people try to do on your site and what stops them. Analytics gives you the “what.” Feedback gives you the “why.” Together, they turn your website into a learning system instead of a static brochure.
Track events that match your goal
Pageviews are fine, but they don’t tell you intent. Define a small set of events tied to your primary goal and product validation:
- CTA clicks (for example, “Book a demo,” “Join the waitlist,” “Start free”)
- Form submits (newsletter, contact, application)
- Pricing views (and scroll depth on pricing)
- Key navigation steps (homepage → features → pricing, etc.)
Keep the list short so you actually use it. If everything is “important,” nothing is.
Set a baseline dashboard you’ll actually check
Create a simple dashboard that answers: “Where are visitors coming from, and do they do the thing?” At minimum:
- Traffic sources (search, referrals, social, direct)
- Conversion rate for your primary CTA
- Top pages by entrances and exits
This baseline is your reference point. Without it, every change can feel like progress—even when it isn’t.
Add qualitative feedback (lightweight, not annoying)
Numbers won’t tell you why someone hesitated. Add one qualitative channel:
- A short on-site survey (one question is enough), like “What brought you here today?”
- A follow-up question after form submit: “What problem are you trying to solve?”
Save the answers in a place your team will read weekly (not buried in an inbox).
Create a weekly review routine with one test
Pick a consistent time each week to review signals, choose one change, and set a clear expectation (your hypothesis). Example: “If we clarify the promise above the fold, pricing views will increase.” Run one test at a time so you can attribute results.
Avoid vanity metrics; focus on intent and repeat interest
High traffic can hide low-quality demand. Prioritize indicators of real intent: repeat visits, pricing engagement, demo requests, and people returning after you follow up. Those are the behaviors that help you graduate from an MVP website to an early product with confidence.
Create Trust Assets That Still Work Later
Trust is an asset you can build early—then keep using when you shift from “service website” to “product.” The goal is to reduce uncertainty without overpromising.
Positioning that’s clear (and stays true)
Start with a simple statement: who it’s for, what problem you solve, and what outcome people should expect. Avoid vague claims like “best” or “guaranteed.” If you can’t prove it, don’t say it.
If you have screenshots, use real ones. If you only have concepts, that’s okay—label them as mockups. A small line like “Concept UI (mockup)” protects credibility and prevents awkward conversations later.
Social proof—only what you can verify
Social proof works, but it’s fragile. Add it carefully:
- Testimonials should include a name, role, and company (or clear context like “Founder, 2-person agency”).
- Logos and “as seen in” should only be used if you have permission and a real relationship.
- Quotes should be traceable to a real person you can reference if asked.
If you’re early, use “proof of work” instead: before/after examples, a short case study, or a simple breakdown of what changed and what result it produced.
Explain how it works (so signup feels safe)
People hesitate when they don’t know what happens after they click.
Use a short “How it works” block that covers: the timeline, what the customer needs to provide, what you deliver, and who it’s not for. This section transitions well later into onboarding for a product.
Link to a deeper page if needed (for example, /how-it-works), but keep the essentials on the main path.
Pricing that’s transparent, even if it’s not final
You don’t need perfect pricing—you need understandable pricing. If you’re still validating, use “Starting at,” “Pilot pricing,” or “Limited early access.” The key is to set expectations about ranges, what’s included, and what would increase cost.
Clear pricing also helps product discovery: the questions people ask about price are often hints about what they truly value.
A contact page that feels like a commitment
Your contact page shouldn’t be a dead end. Include:
- What channels you support (form, email, call)
- Typical response time (“Within 24 hours on weekdays”)
- What to include in the message (goal, timeline, budget range)
This becomes even more important later when support shifts from “talk to the founder” to “support for a product.”
Productize the Service Behind the Website
A website can feel “done” once it looks good and starts generating leads. But if you want it to grow into a product, treat the site as the front door to a service you can deliver today—manually or semi-manually—while you learn what customers actually need.
Start manual, on purpose
Begin with a simple offer you can fulfill using everyday tools: a form, email, a calendar link, and a spreadsheet. The goal isn’t to build software immediately—it’s to prove you can consistently deliver an outcome and understand what “success” means for your customers.
For example, if your future product is “automated reporting,” start with a paid reporting service. Collect inputs via a form, produce the report manually, and deliver it via email. You’ll quickly find what data people struggle to provide, what format they prefer, and what questions they ask every time.
Document the repeatable steps
As you fulfill requests, write down the steps you repeat. Keep it lightweight: a checklist in a doc is enough. Over time, this becomes your blueprint for product features because it captures:
- What information you must collect up front
- Which steps can be standardized vs. customized
- Where approvals and handoffs happen
Track where manual work hurts
Pay attention to friction points: tasks that take too long, cause errors, or delay delivery. These are your best signals for what to automate first.
Common “pain” metrics to track in your spreadsheet:
- Time spent per delivery
- Number of back-and-forth emails
- Most frequent customer corrections
- Reasons projects get stuck
Turn the biggest bottleneck into your first workflow
Resist the urge to build lots of features. Productize the single bottleneck that saves the most time or reduces the most confusion. That first workflow might be as small as an onboarding form that validates inputs, a status page for customers, or a templated deliverable generator.
If you want to capture this process publicly, add a simple “How it works” section on your site and iterate it as you learn.
Plan a Roadmap Based on Evidence, Not Ideas
A roadmap matters—but not the kind built from opinions, competitor envy, or internal brainstorming. Your roadmap should translate real user behavior and real requests into a small set of bets you can ship quickly.
Turn insights into “Now, Next, Later”
Keep the roadmap intentionally small and easy to explain:
- Now (0–4 weeks): fixes and small features tied directly to the primary goal (e.g., more qualified leads, more trials, more demo bookings).
- Next (1–3 months): the first product-like capabilities (templates, calculators, onboarding flows, self-serve purchase).
- Later (3–12 months): heavier work you only earn after validation (automation, integrations, advanced permissions).
Prioritize with a simple evidence score
When a feature request appears, score it using three inputs:
- User pain: how strongly users feel it (support tickets, call notes, survey comments).
- Frequency: how often it shows up (count requests, watch sessions).
- Business impact: how directly it supports the core goal.
If it’s not high on at least two of these, it’s probably not a “Now” item.
Define an MVP you can ship in weeks
Your MVP isn’t “the smallest app.” It’s the smallest outcome. Aim for something deliverable in weeks, not months—often a guided flow, a limited self-serve feature, or one repeatable template.
If you’re trying to compress build cycles while you learn, tools like Koder.ai can help you prototype the “Next” items quickly (for example, a basic dashboard, onboarding flow, or internal admin panel) and iterate from customer feedback—without committing to a long build pipeline upfront.
Decide what becomes self-serve vs assisted
A good rule: make repetitive, low-risk steps self-serve, and keep high-trust, high-stakes steps assisted (at least early on).
A clear rule for saying no
If a feature doesn’t support the core goal—or can’t be measured against it—say no (or “later”). Protect focus so you evolve with momentum, not complexity.
Set Up SEO So You Can Scale Without Rework
SEO is easier when your site is small—so use that stage to make structural decisions you won’t regret later. The goal isn’t to publish a lot; it’s to publish the right pages, with clean URLs and clear intent, so you can expand into a product without rebuilding your navigation or changing what search engines already understand about you.
Match page titles and headings to real search intent
Write page titles and H1s the way your audience searches, not the way you describe yourself internally. A good test: could someone read the title and immediately know what problem it helps solve?
For example, a product-oriented homepage title like “Acme — Inventory tracking for small warehouses” is clearer than “Acme — Modern operations platform.” Keep the main keyword close to the front, and make sure each page has one obvious topic.
Build a content plan that answers the questions people actually ask
A scalable content strategy starts with a few foundational pieces that cover high-intent questions:
- Use cases (who it’s for and when it helps)
- Comparisons (alternatives people evaluate)
- How-tos (the steps people struggle with)
Each article should naturally point to a next step—usually /pricing, /contact, or a signup page—so content isn’t just “traffic,” it’s part of product validation.
If you publish in public (updates, teardown posts, lessons learned), consider formalizing it: some platforms—including Koder.ai—offer ways to earn credits by creating content or referring other users. That can make “build in public” a little more sustainable while you’re still early.
Keep URLs stable and design categories for expansion
Changing URLs later is one of the most common “SEO rewrites.” Avoid it by choosing a simple structure now:
- Use short, readable slugs (e.g., /blog/inventory-audit-checklist)
- Plan future categories (e.g., /blog/guides, /blog/comparisons) even if they start empty
Stability matters more than cleverness. If you’re unsure, pick the simplest structure you can keep for years.
Add a basic internal linking system
Internal links help users discover your funnel and help search engines understand what matters. Make it a habit to link:
- From /blog posts to /pricing (when relevant)
- From feature or use-case pages to /blog guides
- Between related posts (e.g., a how-to linking to a checklist)
Keep links relative (like /pricing), so they remain valid across environments.
Don’t publish “future feature” pages that mislead users
It’s tempting to create pages for features you plan to build to attract searches. But misleading pages increase bounce, erode trust, and can create a messy site you later have to clean up. If you must mention upcoming capabilities, do it transparently on a /roadmap page or inside a FAQ—without pretending it already exists.
A Practical 4-Phase Upgrade Path (Site → Product)
You don’t have to “build the product” on day one. A better approach is to ship a credible site first, then add product-like behavior in steps—each one validating demand and reducing risk.
Phase 1: Polished marketing site + one clear conversion goal
Start with a site that explains the problem, your promise, and the next step. Pick one primary conversion (book a call, join a waitlist, request a demo) and make it obvious.
Keep pages lean: Home, Pricing/How it works, About, and a simple contact path. Your site’s job here is clarity, not features.
Phase 2: Gated content or onboarding flow + early access program
Add a lightweight “product taste.” This can be a gated guide, an assessment, a template library, or a short onboarding questionnaire that ends with early access.
The goal: learn who wants this and why—before you build accounts or complex flows.
Phase 3: Simple account area (even if limited) + billing or scheduling
Introduce a basic logged-in area: saved results, a dashboard with a few actions, or a client portal. Pair it with a real transaction, even if the “product” is still partly manual.
Common options:
- Subscription billing for access to tools/content
- One-time payment for a packaged deliverable
- Scheduling + payment for sessions or implementation
If you’re moving into this phase and want speed without locking yourself into a dead-end prototype, a platform like Koder.ai can help you stand up a working account area quickly, iterate with snapshots/rollback, and export the source code once you’re ready for a longer-term codebase.
Phase 4: Full product experience + docs + support workflows
Now expand into the complete product: deeper functionality, self-serve onboarding, and the “unsexy” parts that prevent chaos—documentation, support, and reliable operations.
Add /docs (or a help center) and define support channels, response times, and escalation paths.
Quick review checklist at each phase (metrics, messaging, UX)
Use this checklist before moving to the next phase:
- Metrics: Are you hitting a clear target (conversion rate, activation, paid starts, retention signals)? What’s the single metric that proves progress?
- Messaging: Can visitors repeat your value in one sentence? Are objections answered where they appear?
- UX: Is the next step obvious on mobile? Are forms short, error-free, and fast?
- Friction points: Where do people drop off, hesitate, or ask the same question?
- Decision: What did you learn that changes the next build step (or stops it)?
FAQ
What does it mean for a website to “grow into a product”?
It’s a site designed to validate demand now (clear positioning, measurable conversions, lead capture) while keeping structure and technology flexible enough to add workflows, accounts, and paid access later—without rebuilding from scratch.
Why shouldn’t I just build the full app right away?
Because premature complexity creates a different kind of rework: you end up maintaining features nobody asked for. Start with the smallest experience that proves a real outcome, then add product capabilities only when behavior and conversations justify them.
What’s the typical “website → product” evolution path?
A common progression is:
- Content that explains the problem, audience, and promise
- Lead capture (waitlist, demo requests, quotes)
- Workflow (forms, scheduling, templates, onboarding steps)
- App features (accounts, dashboards, automation)
Each step increases commitment only after you’ve earned it with evidence.
How do I choose the right problem and value proposition to focus on?
Start with one primary user and one “job to be done,” then write a one-sentence value proposition: “We help [target user] achieve [outcome] without [pain/cost].” Add 3 concrete supporting points and build the site around that message.
What should my website’s primary conversion goal be?
Pick one action that matches your stage and design the entire funnel around it (CTA, navigation, page order, follow-up).
Good options include:
- Join a waitlist (pre-product)
- Request a demo (high-touch)
- Book a call (service/productizing)
- Checkout (simple paid offer)
Everything else should be secondary and non-competing.
What are the minimum pages I need for a site that can become a product?
Keep it lean:
- Home (promise, benefits, main CTA)
- Pricing (even “starting at” or “request pricing”)
- About (credibility and why you)
- Contact (clear channels and response expectations)
Add pages like FAQ or Use Cases only when they answer questions you repeatedly hear.
How do modular layouts reduce rework as I add features later?
Use reusable blocks (hero, benefits, social proof, comparison) and consistent styles (typography, spacing, button types). Store frequently updated items (pricing, features, testimonials, FAQs) as structured content so you can later personalize, filter, or connect them to logged-in experiences.
What technology decisions matter most for an upgrade path?
Choose tools that:
- Export content cleanly (API/CSV/collections), not just static pages
- Let you control URLs and set 301 redirects
- Keep content separate from presentation
Avoid hard-coding things that will change often (pricing tables, feature matrices). This preserves SEO and makes later app transitions smoother.
What analytics and feedback should I set up from day one?
Track a small set of intent-focused events:
- Primary CTA clicks and form submits
- Pricing views (and scroll depth)
- Key path steps (e.g., home → pricing → contact)
Pair analytics with one qualitative channel (a single-question survey or a post-submit prompt). Review weekly and run one test at a time with a clear hypothesis.
How do I build lead capture that supports product discovery (not just a mailing list)?
Keep it short and purposeful:
- Always: email
- Add 1–2 segmentation fields you’ll actually use (role, team size, use case)
- Optional: one open question about the pain point
Use confirmation emails to set expectations and ask one more thing (e.g., “Reply with your biggest challenge”). Track responses in a simple CRM or spreadsheet so leads become product discovery.