Jul 24, 2025·8 min
Dentist Website Checklist: Pages, SEO, and Booking Buttons
Use this dentist website checklist to build the right pages, improve local SEO, and add booking buttons that get more calls and appointments.
Use this dentist website checklist to build the right pages, improve local SEO, and add booking buttons that get more calls and appointments.
A “good” dental website has three jobs: inform, reassure, and convert.
This checklist focuses on the pages and settings that most directly affect whether a new patient chooses you over another nearby practice. It’s not about trendy design—it’s about making your site easy to use, easy to find in local search, and easy to book.
You can use this whether you’re:
If you already have a site, treat this as an audit: open each page type and check off what’s present, missing, outdated, or hard to find.
If you’re building a new site, treat it as a build plan: use the sections as your page blueprint, then layer SEO and performance checks after the content is drafted.
If you want the fastest improvements, start here:
Once those are in place, the rest of the checklist helps you expand service coverage, build trust, and improve search visibility page by page.
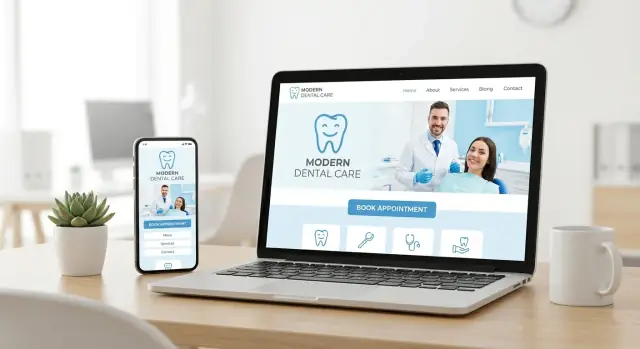
Your homepage has one job: help a new patient understand who you help, what you do, and how to book—in about five seconds. If visitors have to hunt for basics (location, phone, booking), they bounce and keep searching.
Above the fold (what’s visible before scrolling), make these elements obvious:
Add trust cues, but keep them factual: star rating with source (e.g., Google), years in practice, or “Same-day emergency slots available.” Avoid big claims that can’t be backed up.
Keep the top navigation short and predictable. Most dental sites do best with:
If you offer emergency care, “Emergency” can be a top-level item. Everything else can live in the footer without hurting usability.
Most patients will visit on a phone. Prioritize:
Right after the hero section, include two or three short blocks: key services (cleanings, implants, Invisalign—only what you offer), insurance highlights, and a simple “What to expect” snippet. Make it easy for someone to say “Yes, this is the right office” and book.
Your service pages do more than list what you do—they match real patient intent (what someone types when they’re ready to solve a problem, compare options, and choose a provider). The goal is simple: make each high-value service easy to find, easy to understand, and easy to book.
Avoid squeezing everything into one “Services” page. Build dedicated pages for searches with strong booking intent, such as:
Each page should stand on its own with a clear topic and a clear next step.
For each service page, include:
Keep the language patient-friendly and avoid burying key details in long paragraphs.
Add internal links between services that naturally connect—like cleaning → whitening, emergency visit → root canal, or implants → bone grafting. This helps patients explore options without returning to your main menu.
End every service page with a single primary action: book online, call, or request a consultation—and repeat it near the top for mobile visitors.
Patients rarely choose a dentist based on services alone. They’re looking for reassurance: “Will I feel comfortable here?” and “Can I trust this team?” Trust pages are where that decision gets made—often before someone ever clicks your booking button.
Your About page should feel specific, not generic. Include credentials (education, licensing, memberships), but also explain your approach in plain language—how you handle anxious patients, how you explain treatment options, and what a first visit is like. If you have a focus (family dentistry, cosmetic, implants), state it clearly without making guarantees.
Add short bios for key staff patients will meet: dentists, hygienists, and front desk. A few lines on “what I enjoy about patient care” can be more comforting than a long resume. Keep names and roles consistent across the site and your Google Business Profile.
Use real, recent photos—ideally shot in a consistent style:
Outdated or mismatched photos can quietly reduce confidence.
Show reviews on your homepage, About page, and service pages where relevant, with a link to a dedicated Reviews page. Use real patient quotes and dates when possible. Set a reminder to add new reviews regularly so the page doesn’t look abandoned.
Before/after photos can be powerful, but handle them carefully. Add a short disclaimer like “Results vary by patient,” avoid “perfect smile” promises, and confirm you have written consent. Keep captions factual (procedure type, general timeframe), not salesy.
If a patient can’t quickly find where you are, how to reach you, or what to do in urgent pain, they’ll move on to the next practice. This section is about removing friction: clear contact details, accurate directions, and straightforward emergency instructions.
Your contact page should answer the “Can I get there and talk to a human?” questions at a glance.
Include:
On mobile, add click-to-call and click-to-map buttons near the top. Many visitors won’t scroll—they’ll tap the first obvious action.
Don’t rely on a map alone. Add short, practical details: landmark references, public transit options, where to enter the building, and accessibility notes (ramps, elevators, automatic doors).
If you serve patients from nearby areas, mention key neighborhoods naturally (“5 minutes from Downtown and the Riverfront”) without turning the page into a list of cities.
Create a dedicated “Emergency Dentist” section or page that explains:
Make sure this is linked from your header, footer, and /contact.
If you have multiple offices, create unique location pages for each one—distinct address, hours, staff, parking, and local direction notes. Duplicate copy across locations can confuse patients and weaken search visibility.
A beautiful website doesn’t help if patients can’t quickly take the next step. Your calls-to-action (CTAs) should be obvious, repeated in the right places, and friction-free—especially on mobile.
Treat booking like a “persistent option,” not a one-time link.
Use plain language that matches what people want right now:
Keep wording consistent across the site so patients don’t wonder whether buttons lead to different outcomes.
Conversion drops when patients hit long forms or unclear processes. Aim for the shortest path to a confirmed next action.
Online booking is ideal, but it shouldn’t be a dead end.
Offer at least one fallback near the booking CTA:
If scheduling is limited (new patients only, specific days), say so near the button to reduce frustration and abandoned attempts.
Local SEO is what helps your practice show up when someone searches “dentist near me” or “emergency dentist in [city].” Before you tweak title tags or add blog posts, get the basics right—because small inconsistencies can confuse Google and frustrate patients.
NAP stands for Name, Address, Phone. Use the exact same formatting across your website (header, footer, contact page) and across key directories.
For example, choose one version of your practice name (with or without “DDS”), one address format (Ste vs. Suite), and one primary phone number. If you have multiple locations, give each location its own dedicated page and NAP block.
Your Google Business Profile is often the first “page” patients see. Claim it, verify it, and complete it:
Then link to it from your site—most commonly on the Contact page and in the footer.
Include city + service phrases where they fit in human language, especially on:
Avoid stuffing. One clear mention in the intro and a few supporting mentions throughout the page is usually enough.
Help patients—and search engines—connect you to a real place:
If you’re unsure what to prioritize next, pair this with your on-page checklist in /blog/dentist-website-on-page-seo-checklist.
On-page SEO is the “page-by-page” work that helps Google understand what a page is about and helps patients quickly find the answers they need. Use this checklist on every key page (homepage, service pages, location page, etc.) to keep your site consistent and easy to scan.
Write a unique title tag for every page. Aim for a clear service + location format, plus your practice name when it fits.
Example title tags:
Meta descriptions don’t directly boost rankings, but they heavily influence clicks. Keep them patient-focused: what you offer, where you are, and what to do next (call, book, directions).
Use one H1 per page that matches the main topic (often similar to the title tag). Then structure content with logical H2s (benefits, what to expect, pricing/insurance, FAQ) so people can skim.
Keep paragraphs short, avoid walls of text, and use clear labels patients recognize (e.g., “Dental Implants,” not internal jargon).
Images can support trust and conversions, but they should also be search-friendly and fast.
Use:
dental-implant-before-after-austin.jpg)Don’t create multiple near-identical pages targeting tiny keyword variations (e.g., separate pages for “teeth cleaning” and “dental cleaning” with the same text). It confuses search engines and patients.
Instead, make one strong page per service with specific details: who it’s for, the process, recovery or aftercare, insurance/payment info, and common questions.
Schema markup is a small layer of “labeling” you add to your website’s code so search engines can better understand what your dental practice offers. It won’t replace good content, but it can help your pages qualify for richer search results and reduce confusion about your services, location, and contact details.
Most dental practices can start with one of these:
From there, add details you already show on the page—especially your practice name, address, phone, opening hours, and primary services. Consistency matters: the same practice name, address format, and phone number should match what’s visible on the site and what you use elsewhere.
If you genuinely offer online booking, you can mark it up with appointment-related details (for example, a booking URL). If you don’t have true online scheduling, don’t imply that you do—use a ContactPoint (phone, email, or contact form) instead.
A simple rule: only mark up what a patient can verify on the page in a few seconds.
A short FAQ section can reduce repetitive phone calls and support better visibility for “quick answer” searches. Keep answers factual and aligned with your policies. Good dental FAQs often cover:
If the FAQ content is on the page, you can consider adding FAQ schema for that specific page.
After adding structured data:
Treat schema like a checklist item you revisit whenever you update your contact info, booking flow, or core service pages.
A dental website should feel effortless: pages load quickly, text is readable on a phone, and every patient (including those using assistive tech) can book or call without friction. These basics also support SEO—slow, hard-to-use sites tend to underperform.
Start with the heaviest items first.
A simple check: open your homepage on cellular data. If it feels sluggish, patients will feel it too.
Most patients will visit from a phone, often between errands.
Accessibility improvements often boost conversion because they make the site clearer for everyone.
On at least one iPhone and one Android device, confirm you can:
If any step takes more than a few seconds, simplify the page or move the primary action higher.
Your website should make it easy to book—without making patients worry about what happens to their information. A few clear safeguards also protect your team from compliance headaches, spam, and misleading marketing data.
Add a dedicated Privacy Policy and link it in the footer. Keep it readable: what you collect (name, phone, email, preferred time), why you collect it, and who can access it.
On every form, include a short notice near the submit button (not buried): “By submitting this form, you agree to be contacted by our office.” If you use SMS or email marketing, add an explicit opt-in checkbox.
Use HTTPS sitewide (not just on the contact page). Keep forms focused on scheduling—not medical history. Avoid collecting highly sensitive details unless you truly need them. If you do collect more sensitive info, make it clear where that information is stored and who can access it.
If your booking tool is third-party, confirm it uses encrypted connections and is reputable. When in doubt, link out to their security/privacy documentation.
Set up analytics around real actions:
Keep tracking minimal: measure outcomes, not identities. Document what you track so anyone on your team can explain it.
Reduce junk leads with simple validation (required fields, email format checks) and modern CAPTCHA alternatives (like invisible challenges) rather than puzzles that frustrate legitimate patients.
A dental website isn’t “done” after launch. Small issues—like an outdated holiday schedule or a broken booking link—can quietly cost you calls and appointments. Use the checklist below to keep everything accurate, fast, and conversion-friendly.
Start with quick checks that affect patients immediately:
Maintenance is also about staying relevant to what patients search:
Before you announce the new site, run a quick “no surprises” checklist:
When your list gets long, prioritize by impact:
Keep this scorecard in a shared doc so your team can update it between checkups.
If you’re implementing this checklist as part of a redesign, speed matters—especially when you’re iterating on service pages, CTAs, and location pages.
Platforms like Koder.ai can help teams build and revise a dental website from a chat-driven workflow (web front end, backend services, database-backed forms, and deployment/hosting), which is useful when you want to make quick changes, test a new booking flow, or spin up separate location pages without months of back-and-forth. It also supports source code export plus snapshots and rollback—handy when you’re making frequent updates and want a safe way to revert if something breaks.
Start with the changes that remove friction:
These typically lift calls and appointment requests faster than a full redesign.
Keep top navigation short and aligned with what patients look for:
If you offer urgent care, add Emergency as a top-level item. Move everything else to the footer so booking and key info stay easy to find.
Because patients search with specific intent (and Google ranks specific pages better than catch-all lists). Create dedicated pages for high-intent services like:
Each page should have one clear topic and one clear next step (book/call/request).
Use a simple structure that answers real patient questions:
End with a single primary CTA and repeat it near the top for mobile visitors.
Treat CTAs as a persistent option, not a one-time link:
Also add a fallback (phone/text) if online booking has limited availability.
Match the button text to what the patient wants right now:
Keep wording consistent sitewide so patients don’t wonder if different buttons do different things.
The essentials patients look for at a glance:
If you handle urgent care, link to the Emergency page/section from here too.
Start with the basics that most affect local rankings and patient trust:
Use schema to label what you already show on the page:
After implementation, run a structured-data validator and fix errors first (warnings second), especially around address/phone/hours.
Focus on changes that improve speed, usability, and basic access:
Then test the three key flows on real phones: find phone number, book/request, and get directions.
For page-by-page checks, pair this with an on-page audit like /blog/dentist-website-on-page-seo-checklist.