Jul 03, 2025·8 min
Domain + Business Email Setup: A Simple Non-Technical Guide
Step-by-step guide to buying a domain, connecting DNS, and setting up business email (MX, SPF, DKIM, DMARC). Clear checks, common fixes, and security tips.
Step-by-step guide to buying a domain, connecting DNS, and setting up business email (MX, SPF, DKIM, DMARC). Clear checks, common fixes, and security tips.
You’re setting up two things that work together: a domain name (like yourcompany.com) and business email addresses that use that domain (like [email protected]). Once they’re connected properly, you can send and receive email reliably—and people see your brand every time you hit “send.”
[email protected]) and team addresses (e.g., [email protected]).The connection between your domain and your email provider is made through DNS settings (a few records you add in your domain manager). Those settings tell the internet where to deliver mail for your domain and how to verify it’s legitimate.
This guide is for non-technical people—solo founders, freelancers, and small teams—who want business email working without needing to understand networking or servers.
info@, billing@, support@).Most setups take 30–90 minutes of hands-on work.
The main wildcard is DNS propagation: after you update DNS records, it can take anywhere from a few minutes to 24–48 hours for changes to be recognized everywhere. During that window, email may work for some people but not others—or it may start working gradually.
Once everything is connected, you’ll have a cleaner, more trustworthy email presence—and a foundation you can grow with (new teammates, new addresses, and better deliverability over time).
Before you click around in settings, it helps to know which company does what. Most email setup confusion happens because three different “places” are involved.
Domain registrar: The company where you buy your domain name (like yourcompany.com). They manage ownership, renewals, and basic domain controls.
DNS host (DNS provider): The place where your domain’s “address book” lives. DNS is a set of records that tell the internet where different services are for your domain (website, email, etc.). Sometimes your registrar is also your DNS host, but not always.
Email provider: The service that actually runs your inboxes and sends/receives mail (for example, Google Workspace or Microsoft 365). They give you mailboxes like [email protected].
Think of it like this:
So you buy the domain at the registrar, then you edit DNS records (wherever DNS is hosted) to tell the world, “Email for @yourcompany.com should be delivered to this provider.”
If you want a simple diagram for the article, use:
Domain (registrar) → DNS (records) → Email provider (inboxes)
When you change DNS (like MX, SPF, DKIM), the update doesn’t appear everywhere instantly. Propagation is the time it takes for DNS changes to spread across the internet as different networks refresh their cached information.
In practice, that means you might save a DNS change and still see old behavior for a while—especially during the first hour or two.
Your domain is the foundation for your website and your email address (like [email protected]). It’s also something you’ll keep for years, so a little care up front saves headaches later.
Aim for something short, clear, and easy to spell after hearing it once.
A few practical rules:
If possible, buy the most important variations (like the .com plus your local domain) to protect your brand, then choose one “primary” domain for email.
When choosing a registrar (the company you buy the domain from), compare:
Make sure the domain is registered in your business name (or a trusted owner) and that you control the login, recovery email, and any two-factor authentication. Keep registrar access in one place—shared safely—so the domain doesn’t walk away with a departing employee or contractor.
Turn on WHOIS privacy unless you have a specific reason not to. It helps reduce spam and protects personal contact details from being publicly listed.
Choosing an email provider is mostly about deciding where the mail service lives. Your domain (the name) can stay with one company, while your email can run on another.
1) Email with your domain registrar
Many registrars sell email bundles alongside domains. This can be convenient because billing and support are in one place. The trade-off is that features can be basic (fewer collaboration tools, simpler admin controls), and migrating later may take extra steps.
2) Email with a separate email provider
This is the typical choice for growing teams. Providers like Google Workspace or Microsoft 365 focus heavily on deliverability, security, and productivity apps. Your domain can remain with your registrar—you just connect email using DNS records.
Focus on what you’ll actually use:
Non-technical admins usually feel the difference here:
Expect pricing per user per month for full-featured providers; registrar email is often cheaper but lighter on features. Before you commit, check what’s included at each tier (mailboxes vs aliases, storage, shared inboxes) and compare plans on pages like /pricing.
If you’re unsure, pick a provider that supports easy exports and migration tools—future you will appreciate it.
This is where your custom-domain email starts feeling real: you’ll create the inboxes people use every day, plus the extra addresses that make your business look organized.
Create the primary address first—usually one of these:
If you’re a solo business, you can use you@ as the real mailbox and add hello@ as an alias that delivers to it.
Next, create mailboxes for real people (e.g., sara@, mike@). Then add “role” addresses that match how customers contact you:
For role addresses, decide who should receive messages. Options usually include: delivering to one person, delivering to multiple people, or a shared inbox (more on that later).
Use an alias when:
Create a separate mailbox when:
Pick a simple rule and stick to it:
Avoid random variations (like support-team@ vs help@)—consistency makes onboarding, security, and troubleshooting much easier later.
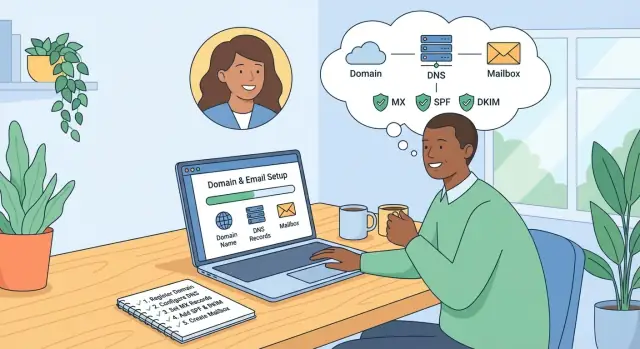
DNS is the settings page for your domain. It’s where you tell the internet where your website lives and, for email, which service should receive messages for addresses like [email protected].
The good news: you usually only need to edit a few items for business email—mainly MX records, plus a couple of TXT records (for SPF, DKIM, and DMARC later). The hard part is simply finding the right screen.
Most people manage DNS in one of these:
A quick clue: if your domain uses custom nameservers (often something like ns1.cloudflare.com), DNS is probably not managed at the registrar—even if you bought the domain there.
Look for menu items like:
Once you’re in the right place, you should see a table with columns like Type, Name/Host, Value/Content, Priority, and TTL.
Take 2 minutes to protect yourself from easy mistakes:
For business email with a custom domain, you’ll typically add or replace:
You can usually leave website-related records (like A, AAAA, and CNAME) alone unless your provider specifically tells you otherwise.
These are the ones that cause the most “email not working” situations:
mail.example.com while others auto-add the domain.If you stay organized—find the correct DNS host, save what’s there, then make only the changes your email provider lists—you’ll be in great shape for the next step: setting up MX records.
MX records are the mail routing signs for your domain. When someone emails you at [email protected], their email service checks your domain’s DNS and looks for MX records to learn which provider (Google Workspace, Microsoft 365, etc.) should receive that message.
MX (Mail Exchange) records tell the world where to deliver your email. If they point to the wrong place—or you have a conflicting mix—messages can bounce, disappear, or land at an old inbox you’ve forgotten about.
In your domain’s DNS settings, your email provider will give you a specific list of MX entries (host/name, value/target, and priority). Add them exactly as shown.
If you’re switching providers, you’ll usually need to remove old MX records that point to the previous service. Many providers explicitly say “delete any existing MX records.” Follow that instruction carefully—leaving old MX records can split delivery between systems.
Tip: before changing anything, copy the current MX records into a note so you can restore them if needed.
MX priority is a ranking: lower numbers are tried first. Example: priority 1 is preferred over priority 5.
Most setups work as long as you:
First, use your provider’s admin/check tool (most have a “Verify domain/DNS” step) to confirm the MX records are detected.
Then do a real-world test: send a message from a personal address (like Gmail) to your new business address and confirm it arrives. Reply back to confirm outbound email is working too (MX affects incoming mail; outbound is handled by your provider).
SPF, DKIM, and DMARC are three DNS records that help other mail systems trust messages sent from your domain. Their job is simple: reduce spoofing (someone pretending to email “from” you) and improve deliverability by lowering the chance your real mail gets treated like spam.
SPF is a single TXT record that lists which services are allowed to send email using your domain.
Two practical rules:
Example SPF TXT value (example only):
v=spf1 include:_spf.google.com include:servers.mcsv.net -all
“include:” lines authorize senders. The ending -all means “anything else is not allowed.” If you’re unsure while testing, some teams start with ~all (softer), then later switch to -all.
DKIM lets your email provider sign outgoing messages. You’ll add a DNS record, then turn on signing in your provider.
Most providers give you:
google or s1)It might look like selector._domainkey.yourdomain.com. After adding it, go back to your email admin panel and enable DKIM/signing.
DMARC tells receivers what to do if SPF/DKIM checks fail. Start with a monitoring policy so you don’t accidentally block good mail.
A common starter DMARC record:
v=DMARC1; p=none; rua=mailto:[email protected]; adkim=s; aspf=s
With p=none, you’re only collecting reports. Later, after you’ve confirmed everything legitimate is passing, you can tighten it to quarantine or reject.
Once your domain email is created and DNS is connected, the last mile is getting it working everywhere you read and send mail: laptop, phone, and sometimes a tablet.
Webmail is the inbox you open in a browser (for example: Gmail in Chrome, Outlook on the web, or your provider’s web portal). It’s the easiest place to confirm your account works because there’s nothing to “configure.” If you can send/receive in webmail, your mailbox is fine.
Email apps are programs like the Gmail or Outlook mobile apps, Apple Mail, or desktop Outlook. They’re convenient (notifications, offline access), but they rely on correct sign-in and server settings.
Tip: If setup in an app fails, first sign in to webmail. That separates “account issue” from “device setup issue.”
Some providers offer multiple ways to connect:
If you have the option and your plan includes it, choose Exchange/ActiveSync for simplicity. Use IMAP when Exchange isn’t available or you want a more universal setup.
If your account has two-factor authentication (2FA) enabled, some older apps (or certain desktop clients) can’t handle the second step.
Common fixes:
[email protected]), not just the username.When an app asks for “Manual settings,” you’ll typically need:
[email protected]If you don’t know the server names, get them from your email provider’s help page—search their support for “IMAP settings” or “Exchange settings” and copy exactly.
After setup, send a test email to a personal address and reply back to confirm both outgoing and incoming mail work.
Once your team has real mailboxes, you’ll likely want a few convenience setups: forwarding, aliases, catch-all, or a shared inbox for group work. They sound similar, but they behave very differently.
info@ → sarah@)sarah@ also receives invoices@)support@.A simple rule: use aliases for “more addresses for one person,” and shared inboxes for “many people, one address.”
Forwarding is fine for:
Forwarding can cause issues when used long-term:
If a team address matters (sales@, support@), a shared inbox or helpdesk-style setup is usually cleaner.
A catch-all means [email protected] will be accepted and delivered (even typos like suupport@).
Pros:
Cons:
If you enable catch-all, consider routing it to a monitored shared inbox and setting firm spam filtering.
Most providers let you create inbox rules like:
These small touches keep mail from becoming a group chat nobody owns.
Switching to a new business email address doesn’t have to mean losing old messages or scrambling to find contacts. The key is deciding what you’re moving and using a simple “run both for a bit” approach.
Start by choosing the scope:
If you’re not sure, move email first, then bring contacts/calendar over once mail is stable.
Most providers give you three practical options:
1) Built-in importer (easiest)
Google Workspace and Microsoft 365 both offer migration tools that copy mail (and sometimes contacts/calendar) from another provider. This is usually the least error-prone option for non-technical setups.
2) IMAP move (works with many providers)
If your old email supports IMAP (many do), a migration tool can copy folders and messages across. This typically moves mail reliably, but it may not bring over calendar/contacts unless you export those separately.
3) Manual export/import (most hands-on)
Use this when an automated tool isn’t available. Export from the old service (often as PST/mbox/CSV), then import into the new one. It’s doable, but you’ll want extra time for cleanup.
Don’t shut down the old account right away. Keep it active until you’ve verified:
Also consider setting an auto-reply on the old address: “We’ve moved to [email protected]” (with a short date window).
Choose a quiet time (early morning or end of week), then:
Once everything checks out, update sign-ups, invoices, and logins that used the old address—then keep the old inbox around for a short safety period before canceling it.
Most business email issues boil down to three areas: DNS records (your domain settings), authentication (SPF/DKIM/DMARC), or sign-in/setup (passwords, 2FA, app settings). Use this checklist to narrow it down quickly.
Start with your MX records.
This is usually an authentication or identity mismatch issue.
[email protected]).When contacting support, include:
If you’re setting up email alongside a new product or internal tool, it helps to align your “from” addresses early (for example, support@ for customer replies, billing@ for invoices, and a dedicated sender for app notifications). Teams building apps on Koder.ai often do this upfront so transactional and support email stays consistent as the app evolves, without revisiting DNS and deliverability basics later.
You need access to two accounts:
Also prepare a short list of addresses you want (e.g., you@, hello@, support@) so you can create everything in one pass.
Usually 30–90 minutes of hands-on setup, plus DNS propagation time.
Propagation can take minutes to 24–48 hours, so it’s normal if email starts working gradually (works for some senders before others).
They’re different roles:
If your domain uses custom nameservers (e.g., Cloudflare), you must edit DNS there, not at the registrar.
MX records tell the internet where to deliver incoming email for @yourdomain.com.
To set them up safely:
Start with your provider’s verification tool, then do real tests:
They’re DNS-based trust signals that improve deliverability and reduce spoofing:
Use an alias when one person should receive mail sent to multiple addresses (e.g., hello@ → your main inbox).
Use a separate mailbox/shared inbox when:
A catch-all accepts mail sent to [email protected], including typos.
Pros:
Cons:
If you enable it, route it to a monitored inbox and set strong spam filtering.
Best practice is to stabilize the new setup first, then migrate:
Work top-down:
When asking support for help, include DNS screenshots and a sample message’s full headers (shows SPF/DKIM/DMARC results).
p=nonesupport@sales@