

From Figma to Production Code: How AI Bridges Design Gaps
Learn how AI turns Figma designs into production-ready code by mapping components, tokens, and specs—reducing rework and speeding up releases.
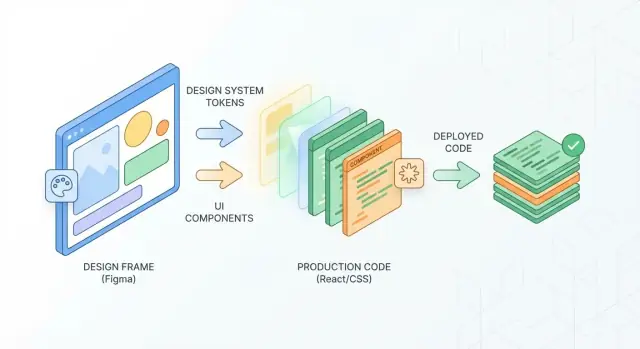
Why the Design-to-Code Gap Still Happens
“Figma to production” is often treated as “export some CSS and ship.” In reality, production-ready UI includes responsive behavior, interactive states, real data, accessibility, performance constraints, and integration with a design system. A design can look perfect in a static frame while still leaving dozens of implementation decisions unanswered.
What “Figma to production” really includes
A front-end build has to translate design intent into reusable components, tokens (colors, type, spacing), layout rules across breakpoints, and edge cases like long text, empty states, loading, and errors. It also needs consistent interaction details (hover, focus, pressed), keyboard support, and predictable behavior across browsers.
Where the breakdowns usually happen
The gap isn’t just about tooling—it’s about missing or ambiguous information:
- One-off styling vs. reusable components: Designers may create unique variants in Figma, while developers need a small set of components that scale.
- Auto Layout vs. real layout constraints: What “looks aligned” can fail when content grows or containers resize.
- States and flows not fully specified: Hover, focus, disabled, validation, and empty states are easy to overlook.
- Token drift: A “close enough” color or spacing choice creates subtle inconsistency that spreads.
Why it costs time
Every unresolved design decision becomes a conversation, a PR comment thread, or—worse—rework after QA. That rework often introduces bugs (layout regressions, missing focus rings) and makes the UI feel inconsistent across screens.
Where AI helps most
AI reduces the repetitive parts of bridging the gap: mapping frames to existing UI components, flagging token inconsistencies, checking spacing and type against rules, and generating clearer handoff docs (props, states, acceptance criteria). It doesn’t replace judgment, but it can catch mismatches early and keep implementation closer to design intent.
In practice, the biggest gains show up when AI is connected to your real production constraints—your component APIs, tokens, and conventions—so it can generate output that’s compatible with how your team actually ships UI.
What “Production Code” Means (and What It Doesn’t)
“Production code” is less about perfectly matching pixels and more about shipping UI that your team can safely maintain. When AI helps convert Figma to code, clarity on the target prevents a lot of frustration.
The target: reusable components, not one-off screens
A screen-level export can look right and still be a dead end. Production work aims for reusable UI components (buttons, inputs, cards, modals) that can be composed into many screens.
If a generated layout can’t be expressed as existing components (or a small number of new ones), it’s not production-ready—it’s a prototype snapshot.
Decide what “production-ready” means for your team
Define your bar in terms everyone can verify:
- Uses the design system: components, tokens, spacing scale, typography styles.
- Meets accessibility basics: semantic elements, focus states, contrast, labels.
- Fits your codebase: naming conventions, folder structure, linting, tests (where applicable).
- Handles real states: loading, empty, error, long text, different device sizes.
AI can accelerate implementation, but it can’t guess your team’s conventions unless you state them (or provide examples).
What production code doesn’t mean
It doesn’t mean:
- Pixel-perfect at any cost (hardcoded values everywhere, duplicated CSS).
- All edge cases solved automatically.
- Zero human review.
A small, intentional deviation that preserves consistency and maintainability is often a better outcome than a perfect replica that increases long-term cost.
Inputs AI needs: clean layers, naming, styles, tokens
AI performs best when Figma is structured like a system:
- Consistent component usage (avoid detached instances).
- Clear layer names (e.g.,
Button/Primary,Icon/Close). - Text styles and color styles applied (not one-off hex values).
- Auto Layout and constraints used intentionally.
Quick pre-handoff checklist for designers
Before handing off for AI-assisted frontend implementation:
- Replace “fake” UI with real components from the library.
- Normalize spacing to your scale (no random 13px gaps).
- Confirm variants and states exist (hover, disabled, error).
- Ensure tokens/styles are applied everywhere.
- Add notes only where intent isn’t visible (e.g., animation timing).
How AI Interprets Figma Designs
AI doesn’t “see” a Figma file the way a person does. It reads structure: frames, groups, layers, constraints, text styles, and the relationships between them. The goal is to translate those signals into something a developer can implement reliably—often as reusable components plus clear layout rules.
Detecting components and patterns
A strong AI pipeline starts by finding repetition and intent. If multiple frames share the same hierarchy (icon + label, same padding, same corner radius), AI can flag them as the same pattern—even when names are inconsistent.
It also looks for common UI signatures:
- Buttons: a text layer centered in a filled rectangle with consistent padding
- Inputs: a container with border/fill plus placeholder text and optional icon
- Cards: a background container with elevation/radius and stacked content
The better your design system alignment, the more confidently AI can classify these elements.
Mapping layers to your component library
Interpreting a “button” is useful; mapping it to your Button component is where the real time savings happen. AI typically matches by comparing properties (size, typography, color token usage, state variants) and then suggests a component name and props.
For example, a primary button might become:
- Component:
Button - Props:
variant="primary",size="md",iconLeft,disabled
When AI can map to existing components, you avoid one-off UI code and keep the product consistent.
Inferring layout rules and responsiveness
Figma already contains layout intent through Auto Layout, constraints, and spacing. AI uses that to infer:
- Stack direction (row/column), gap, and alignment
- Container padding and min/max sizes
- “Hug” vs “fill” behavior for responsive resizing
If constraints are missing, AI may guess from visual proximity—helpful, but less predictable.
Generating specs and implementation notes
Beyond code suggestions, AI can produce developer-friendly output: measurements, typography details, color references, component usage notes, and edge cases (empty states, long text wrapping). Think of it as turning a frame into a checklist a developer can actually build against—without manually writing specs for every screen.
Preparing Figma Files for AI-Assisted Implementation
AI can generate UI code faster when your Figma file is predictable. The goal isn’t to “design for the machine” at the expense of creativity—it’s to remove ambiguity so automation can make safe assumptions.
Why naming and structure matter
Most AI tools infer intent from layer names, hierarchy, and repeated patterns. If a button is called Rectangle 12 inside Frame 8, the tool has to guess whether it’s a button, a card, or a decorative shape. Clear structure turns guessing into matching.
A good rule: if a developer would ask “what is this?” the AI will too.
Practical conventions that help
Use a consistent layout:
- Pages by feature or platform (e.g.,
Web,iOS,Marketing) - Sections for flows (e.g.,
Checkout,Onboarding) - Frames named by screen purpose (e.g.,
Checkout — Payment)
For reusable UI, rely on components + variants:
- Name components by role:
Button,Input,Card - Name variants by properties:
size=md,state=hover,tone=primary - Avoid encoding styling in the name like
Blue Button 2
Reduce “mystery layers” and one-off overrides
Flattening and masking are fine—but “mystery layers” aren’t. Delete hidden leftovers, unused groups, and duplicated shapes. Prefer Auto Layout over manual spacing, and avoid per-instance overrides that silently change padding, corner radius, or font styles.
If something must be unique, label it clearly (e.g., Promo banner (one-off)), so it doesn’t get mistaken for a system component.
Icons, images, and complex illustrations
For icons, use a single source format (SVG preferred) and consistent naming (icon/chevron-right). Don’t outline text inside icons.
For images, mark intent: Hero image (cropped), Avatar (circle mask). Provide aspect ratios and safe-crop guidance when necessary.
For complex illustrations, treat them as assets: export once, store versions, and reference them consistently so AI doesn’t attempt to rebuild intricate vector art as UI shapes.
Design Tokens: The Shared Language Between Teams
Design tokens are the named, reusable decisions behind a UI—so designers and developers can talk about the same thing without arguing over pixels.
What design tokens are (in plain terms)
A token is a label plus a value. Instead of “use #0B5FFF,” you use color.primary. Instead of “14px with 20px line height,” you use font.body.sm. Common token families include:
- Color: brand, semantic states (success/warning), text, surfaces
- Typography: font families, sizes, weights, line heights
- Spacing: a scale (e.g., 4, 8, 12, 16…) for paddings and gaps
- Radii: corner rounding for buttons, cards, inputs
The win isn’t just consistency—it’s speed. When a token changes, the system updates everywhere.
How AI helps extract and normalize token candidates
Figma files often contain a mix of intentional styles and one-off values created during iteration. AI tools can scan frames and components, then propose token candidates by clustering similar values. For example, it can detect that #0B5FFF, #0C5EFF, and #0B60FF are likely the same “primary blue” and recommend a single canonical value.
It can also infer meaning from usage: the color used for links across multiple screens is probably “link,” while the one used only in error banners is likely “danger.” You still approve the naming, but AI reduces the tedious audit work.
Avoiding duplicates and “almost-the-same” values
Small inconsistencies are the fastest way to break a design system. A practical rule: if two values are visually indistinguishable at normal zoom, they probably shouldn’t both exist. AI can flag near-duplicates and show where they appear, so teams can consolidate without guesswork.
Keeping tokens in sync over time
Tokens only help if they stay aligned. Treat them as a shared source of truth: update tokens intentionally (with a brief changelog), then propagate to both Figma and code. Some teams review token changes the same way they review UI components—lightweight, but consistent.
If you already have a system, link your token updates to the same workflow as component updates (see /blog/component-mapping-and-reuse-at-scale).
Component Mapping and Reuse at Scale
Scaling UI delivery isn’t mainly a “convert Figma to code” problem—it’s a “convert the right components the same way every time” problem. AI helps most when it can reliably map what’s in the design file to what already exists in your codebase, including names, variants, and behavior.
Mapping Figma components to code components (and variants)
Start by giving AI stable anchors: consistent component names, clear variant properties, and a predictable library structure. When those anchors exist, AI can propose a mapping like:
- Figma:
Buttonwith propertiessize,intent,state - Code:
<Button size="sm" variant="primary" disabled />
This is where design tokens and component APIs meet. If your code component expects variant="danger" but Figma uses intent="error", AI can flag the mismatch and suggest a translation layer (or a naming update) so mapping doesn’t become guesswork.
Detecting missing variants before they ship
At scale, the most expensive bugs are “almost right” components: the default state looks correct, but edge states are missing or inconsistent. AI can scan your library and highlight gaps such as:
- Hover/focus/active states not defined
- Disabled styles missing for certain intents
- Loading state exists in code but not in Figma (or vice versa)
- Error state defined in designs but not supported by the component API
The useful output isn’t just a warning—it’s a concrete to-do: “Add state=loading to Button variants and document its spacing + spinner alignment.”
Encouraging reuse instead of duplicating lookalikes
AI can detect near-duplicates by comparing structure (padding, typography, border radius) and recommend reuse: “This ‘Primary CTA’ is 95% identical to Button/primary/lg—use the existing component and override only the icon placement.” That keeps your UI consistent and prevents a slow drift into one-off styles.
Create a new component vs extend an existing one
A practical rule AI can help enforce:
- Extend when differences are parameters (size, icon, intent, state) and can be expressed as props/tokens.
- Create new when behavior, layout structure, or accessibility semantics change (e.g., a button becomes a split-button, or a “card” becomes an interactive list item with different focus rules).
If you document these rules once, AI can apply them repeatedly—turning component decisions from debates into consistent, reviewable recommendations.
From Specs to Tasks: Automating Handoff Documentation
Good handoff documentation isn’t about writing more—it’s about writing the right details in a format developers can act on quickly. AI can help by turning design intent into clear tasks, acceptance criteria, and implementation notes that fit naturally into your existing workflow.
Turning design specs into tickets and acceptance criteria
Instead of copying measurements and behavior notes manually, use AI to generate task-ready text from a selected frame/component:
- Task title + scope (what is being built, and what is explicitly out of scope)
- Acceptance criteria in plain language (what “done” looks like)
- Edge cases that often get missed (empty states, loading, error, long text)
Example acceptance criteria AI can draft (then you refine):
- Button has default / hover / pressed / disabled states matching the design.
- On mobile, the layout switches to the stacked variant at the defined breakpoint.
- Text truncates after 2 lines with ellipsis; full text visible via tooltip on desktop.
Capturing the details that prevent rework
AI is most useful when it consistently extracts the “small” rules that cause the biggest mismatches:
- Spacing rules: padding, gaps, alignment, and when spacing changes between variants.
- Breakpoints: what reflows, what wraps, and what stays fixed.
- Component states: interaction states, focus styles, validation messaging, and loading behavior.
Have AI summarize these as concise implementation notes attached to the component or frame—short enough to scan, specific enough to code.
Keeping documentation discoverable where work happens
Documentation only works if people can find it.
- Add AI-generated notes directly in the ticket description (Jira/Linear/etc.).
- Mirror the key decisions in a PR template checklist so reviewers verify the same things.
- Link back to a single source of truth (e.g., a handoff page like /docs/handoff) rather than duplicating specs across tools.
The goal: fewer clarification threads, faster estimates, and less “almost matches the design” UI.
Accessibility and UX Guardrails with AI
Accessibility shouldn’t be a separate “compliance sprint” after UI is built. When you use AI alongside Figma and your component library, you can turn accessibility and core UX rules into guardrails that run continuously—while designs are still changing and before code ships.
What AI can reliably catch from designs
AI works well as a fast reviewer that compares what’s in Figma against known standards (WCAG basics, platform conventions, your team’s patterns). Practical checks include:
- Auto-checking contrast, text sizing, and focus states
- Flagging missing labels, error messages, and keyboard flow
- Linking issues back to specific components in the design
- Making accessibility part of definition-of-done, not a late fix
These checks are most effective when AI understands your design system. If a “TextField” component is mapped to a real input component in code, the AI can look for required states (label, help text, error state, disabled, focus) and warn when a design uses a “custom input look” without the supporting semantics.
Turning findings into actionable fixes
The goal isn’t a long report—it’s a short list of changes designers and developers can act on. Good AI tooling will attach each issue to a concrete node in Figma (frame, component instance, or variant) and suggest the smallest viable fix, such as:
- “Use the
TextField/Errorvariant and include an error message placeholder.” - “Increase button text to 14px or switch to the high-contrast token.”
- “Ensure focus ring is visible on the primary button style.”
Make it part of your team’s done criteria
Add a lightweight gate: designs can’t be marked “ready for implementation” until key accessibility/UX checks pass, and PRs can’t be merged if the implemented UI regresses. When guardrails run early and often, accessibility becomes a routine quality signal—not a last-minute scramble.
Quality Checks: Keeping Design and UI Consistent
AI can speed up implementation, but it also makes it easier to ship small inconsistencies quickly. The fix is to treat “design fidelity” like any other quality goal: measurable, automated, and reviewed at the right level.
Compare the built UI to design intent (visual diffs)
Visual diffing is the most direct way to spot drift. After a component or page is implemented, generate screenshots in a controlled environment (same viewport sizes, fonts loaded, deterministic data) and compare them to a baseline.
AI can help by:
- suggesting the correct breakpoints and states to capture (hover, error, empty, loading)
- grouping diffs by likely cause (layout vs. typography vs. color)
- summarizing “what changed” in plain language for faster review
Catch spacing, typography, and color mismatches early
Most “looks slightly off” bugs come from a few recurring sources: spacing scales, font styles, and color values. Rather than waiting for a full-page review, validate these at the smallest unit:
- spacing: check padding/margins against your token scale (e.g., 4/8/12/16)
- typography: validate font family, size, weight, line-height, and letter spacing
- color: ensure usage maps to semantic tokens (e.g., text/default, bg/surface) instead of hard-coded hexes
When AI is connected to your design tokens, it can flag mismatches as the code is written, not after QA finds them.
Prefer component-level QA over page-level QA
Page-level QA is slow and noisy: one small component discrepancy can ripple across multiple screens. Component-level checks make fidelity scalable—fix once, benefit everywhere.
A useful pattern is “component snapshots + contract tests”: snapshots catch visual drift, while small checks confirm props, states, and token usage stay consistent.
Define acceptable differences (and document them)
Not every mismatch is a bug. Platform constraints (font rendering, native controls, responsive reflow, performance tradeoffs) can create legitimate differences. Agree on tolerances upfront—like sub-pixel rounding or font anti-aliasing—and record exceptions in a short decision log linked from your handoff docs (e.g., /docs/ui-qa). This keeps reviews focused on real regressions instead of endless pixel debates.
Workflow Patterns That Actually Work
AI is most useful when it’s treated like a teammate with a narrow job, not a replacement for design judgment or engineering ownership. The patterns below help teams get speed without sacrificing consistency.
Where AI fits: before, during, after development
Before dev, use AI to pre-flight the file: identify missing states, inconsistent spacing, unlabeled components, and token violations. This is the quickest win because it prevents rework.
During dev, use AI as an implementation assistant: generate first-pass UI code from selected frames, suggest component matches from your library, and draft CSS/token mappings. Developers should still wire real data, routing, and state.
After dev, use AI to validate: compare screenshots to Figma, flag visual diffs, check accessible names/contrast, and confirm token usage. Treat this as an automated reviewer that finds “paper cuts” early.
The 3-person collaboration model
The most reliable setup is designer + developer + reviewer:
- Designer ensures the Figma source of truth is clean (components, variants, tokens) and answers intent questions (“Is this hover state required?”).
- Developer owns production code decisions (component reuse, performance, responsive behavior).
- Reviewer (often a design systems lead or senior engineer) confirms the output matches your system and approves exceptions.
AI supports each role, but doesn’t replace the “final say” responsibility.
Governance that doesn’t slow you down
Define lightweight approval rules:
- Tokens: design systems owner approves new tokens; everyone else proposes.
- Components: library maintainers approve new components/variants; feature teams reuse first.
- Changes: product teams can adjust layout within allowed constraints; anything that creates a new pattern requires review.
Write these rules down once and link them in your team docs (e.g., /design-system/governance).
Preventing “AI-generated drift”
Drift happens when the model invents spacing, colors, or components that are “close enough.” Reduce it by:
- Constraining generation to existing components and tokens (no raw hex values, no ad-hoc padding).
- Requiring a component mapping table in PRs (“Figma Card → DS Card v3”).
- Running automated checks that fail builds when non-token styles appear.
When AI can only build with your system’s Lego bricks, output stays consistent—even at speed.
A Practical Rollout Plan (Pilot to Team-Wide)
Rolling out AI-assisted “Figma to production code” works best when you treat it like any other process change: start small, measure, then expand.
1) Pick a pilot that’s small—but real
Choose one feature area with clear UI boundaries (for example: settings page, onboarding step, or a single dashboard card). Avoid core navigation or heavily stateful flows for the first run.
Define success metrics upfront, such as:
- Time to first working UI (design approved → working screen in app)
- Rework rate (number of PR cycles caused by UI/design mismatches)
- Component reuse (how many screens use existing components vs. one-offs)
- Accessibility deltas (issues found before vs. after AI assistance)
2) Establish a minimal “shared foundation”
Before generating anything, agree on a small baseline:
- A token set (colors, spacing, typography) that maps to your code variables
- A starter component library (buttons, inputs, modal, card) with known props
The goal isn’t completeness—it’s consistency. Even a dozen well-defined components can prevent most “almost right” output.
3) Run, review, and create a feedback loop
Treat AI output as a draft. In each pilot PR, capture:
- What the AI misinterpreted (constraints, responsive rules, states)
- What was missing (loading/empty/error states, focus styles)
- What was over-specified (extra wrappers, hardcoded values)
Turn these into a short checklist that lives next to your design handoff docs, and update it weekly.
4) Scale to the team with repeatable habits
Once the pilot is stable, expand by feature teams—not by “turning it on everywhere.” Provide a template repo or “golden path” example, and a single place to track learnings (a page in /blog or your internal wiki). If you’re evaluating tools, keep procurement friction low with a clear comparison and budget reference (/pricing).
If you want to test this approach without rebuilding your pipeline first, platforms like Koder.ai can help teams go from chat to working web apps quickly—especially when you standardize on a design system and expect output to align with real components and tokens. Because Koder.ai supports building React frontends with Go + PostgreSQL backends (and Flutter for mobile), it’s a practical environment for validating “design-to-production” workflows end-to-end, including iteration, deployment, and source code export.
Next steps you can do this week
Audit one Figma file for token usage, align naming with your code variables, and map 5–10 core components end-to-end. That’s enough to start seeing reliable gains.
FAQ
Why does the “Figma to production” gap still happen even with modern tools?
It includes more than visual styles:
- Responsive layout rules across breakpoints
- Interactive states (hover/focus/pressed/disabled)
- Real data behavior (loading/empty/error/long text)
- Accessibility (semantic elements, labels, keyboard flow)
- Integration with your design system (components + tokens)
A static frame can’t encode all of those decisions by itself.
What does “production code” mean in the context of AI-generated UI?
Because “production-ready” is primarily about maintainability and reuse, not perfect pixels. A team-friendly definition usually means:
- Built from your existing components and tokens
- Accessible by default (semantics, focus, contrast)
- Works with real content and edge states
- Fits your codebase conventions (linting, structure, tests)
Pixel-perfect output that duplicates styles and hardcodes values often increases long-term cost.
How can a team define “production-ready” in a way that avoids arguments?
Start with a checklist your team can verify:
- Design system compliance: tokens + component usage (no ad-hoc hex/spacing)
- State coverage: default, hover, focus, active, disabled, loading, error, empty
- Responsive rules: what wraps, stacks, truncates, and at which breakpoints
- Codebase fit: naming, file structure, lint, and minimal tests where needed
If you can’t measure it, you’ll debate it in PRs.
Where does AI provide the biggest ROI in the Figma-to-code workflow?
AI helps most with repetitive and review-heavy work:
- Mapping frames to existing components (and proposing props)
- Flagging token drift (near-duplicate colors/spacing/typography)
- Detecting missing states and variant gaps
- Drafting handoff artifacts (acceptance criteria, edge cases, implementation notes)
It’s a force multiplier for consistency, not a replacement for engineering decisions.
How does AI interpret a Figma file differently from a human?
AI reads structure and relationships, not “intent” the way people do. It relies on:
- Component instances and variants
- Auto Layout and constraints
- Applied text/color styles (tokens)
- Layer hierarchy and naming
If those signals are weak (random names, detached instances, manual spacing), AI has to guess—and output becomes less predictable.
What should designers do to prepare Figma files for AI-assisted implementation?
Prioritize predictability:
- Use real components (avoid detached/one-off lookalikes)
- Apply text styles and color styles everywhere (no random hex values)
- Normalize spacing to your scale (e.g., 4/8/12/16)
- Define key variants and states (error, disabled, loading, focus)
- Clean up “mystery layers” (unused groups, hidden leftovers)
This turns generation from “best guess” into “reliable mapping.”
What is token drift, and why is it so costly?
Token drift is when “close enough” values sneak in (e.g., 12px vs 13px gaps, near-identical blues). It matters because:
- Inconsistencies compound across screens
- Reuse becomes harder (components can’t share the same rules)
- QA becomes noisy (“slightly off” everywhere)
AI can flag near-duplicates and show where they appear, but teams still need a consolidation decision.
When should we create a new component vs extend an existing one?
A practical split:
- Extend an existing component when differences are expressible as props/tokens (size, intent, icon, state).
- Create a new component when behavior/structure/semantics change (e.g., split-button, interactive list item, new keyboard rules).
AI can suggest which path fits, but you should enforce a written rule so decisions stay consistent.
How can AI improve handoff documentation without creating more busywork?
Use AI to produce task-ready text tied to a frame/component:
- Scope and out-of-scope notes
- Acceptance criteria (states, breakpoints, truncation rules)
- Edge cases (loading/empty/error/long text)
- Mapping summary ("Figma Button → DS Button v3, props…")
Paste the output into tickets and PR templates so reviewers check the same requirements every time.
How do we prevent “AI-generated drift” while still moving faster?
Treat it as a continuous guardrail, not a late audit:
- Run design-time checks (contrast, missing labels, absent focus states)
- Enforce code-time rules (no raw hex values, spacing must use tokens)
- Validate after implementation (visual diffs at agreed breakpoints/states)
Keep findings actionable: each issue should point to a specific component/frame and a smallest viable fix.