

How AI Reads Layout and Intent to Turn Designs into UI Code
Learn how AI infers layout, hierarchy, and user intent from designs, then generates UI code—plus limits, best practices, and review tips.
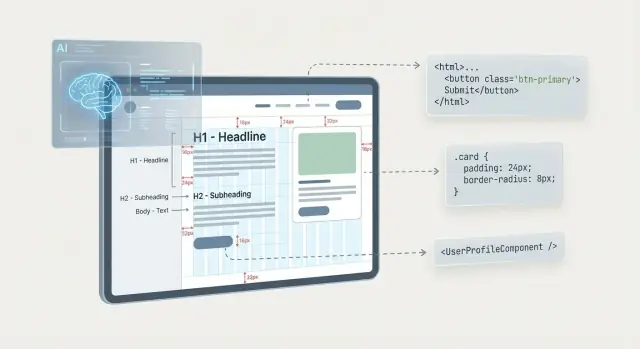
What “design to code” AI really means
“Design to code” AI translates a visual design idea—usually a Figma frame or a screenshot—into runnable UI code. The point isn’t “perfect code”; it’s a usable first draft that captures structure, styling, and basic behavior so a human can refine it.
What it actually translates
At its core, the system maps what it can observe to how UIs are typically constructed.
- Layout: Where elements sit, how they align, spacing, grids, and container grouping.
- Hierarchy: What looks primary vs. secondary (headlines vs. captions, main buttons vs. links), and how sections nest.
- Intent: What an element is “for” (submit button, detail card, input field).
- Components: Repeated patterns that can become reusable building blocks (buttons, nav bars, cards, form rows).
What AI can infer vs. what you must specify
AI can infer common patterns: a row of icons is likely a toolbar; a stacked label + input is likely a form field; consistent styling suggests a reusable component. It may also guess responsive behavior based on constraints and spacing.
But you usually must specify what pixels can’t guarantee: real component names, design tokens (colors/type scales), states (hover/disabled/error), breakpoints, data rules, and actual interactions (validation, navigation targets, analytics).
Setting expectations
Treat the output as a starting point. Expect to review structure, replace ad-hoc styles with tokens, align to your component library, and iterate. “Design to code” is acceleration—not automation that removes the need for design and engineering judgment.
What inputs AI uses to understand a design
AI can’t infer product rules from a “pretty screen.” It works from the evidence you provide—some inputs describe pixels, others describe structure. That difference often determines whether you get clean UI code or brittle absolute positioning.
Screenshots and static mockups: what information is missing
A screenshot is the thinnest input: it contains colors and shapes, but no explicit facts about what’s a button vs. a label, what’s reusable, or how the layout should adapt.
From pixels alone, AI must guess boundaries (where one element ends and another begins), text styles, spacing rules, and even whether a “card” is one component or several separate pieces. It also can’t infer constraints—so responsive behavior is mostly speculation.
Figma/Sketch exports: frames, layers, constraints, styles
When AI can access the design file (or an export that preserves structure), it gains crucial metadata: frames, groups, layer names, auto-layout settings, constraints, and text/style definitions.
This is where layout becomes more than geometry. For example, a Figma frame with Auto Layout communicates intent like “stack these items vertically with 16px gap” far better than any screenshot. Consistent layer naming also helps map elements to UI roles (e.g., “Primary Button,” “Nav Item,” “Input/Error”).
Design systems: tokens, components, naming conventions
A connected design system reduces guesswork. Tokens (colors, spacing, typography) let AI generate code that references a shared source of truth instead of hard-coded values. Published components (buttons, fields, modals) provide ready-made building blocks and clearer boundaries for reuse.
Even small conventions—like naming variants (Button/Primary, Button/Secondary) and using semantic tokens (text/primary) instead of #111111—improve component mapping.
Written specs: user flows, acceptance criteria, edge cases
Specs add the “why” behind the UI: hover behavior, loading and empty states, validation rules, keyboard behavior, and error messaging.
Without this, AI tends to generate a static snapshot. With it, output can include interaction hooks, state handling, and more realistic component APIs—closer to something a team can ship and maintain.
How AI interprets layout and structure
Design-to-code tools don’t perceive a screen like a person; they try to explain every layer as layout rules: rows, columns, containers, and spacing. The clearer those rules are, the less the output relies on brittle positioning.
Detecting grids, columns, and spacing
Most models start by looking for repeated alignment and equal gaps. If several elements share the same left edge, baseline, or center line, AI often treats them as a column or grid track. Consistent spacing (e.g., 8/16/24px patterns) hints that layout can be expressed with stack gaps, grid gutters, or tokenized spacing.
When spacing varies slightly (15px here, 17px there), AI may conclude the layout is “manual” and fall back to absolute coordinates to preserve pixel-perfect distances.
Recognizing containers and nested groups
AI also searches for visual “enclosure”: backgrounds, borders, shadows, and padding-like gaps that suggest a container. A card with a background and internal padding is a clear signal for a parent element with children.
From there it often maps structure into primitives such as:
- vertical stacks (lists, forms)
- horizontal rows (toolbars, nav)
- nested groups (card → header → actions)
Clean grouping in the design file helps distinguish parents from siblings.
Interpreting constraints: fixed vs. fluid
If the design includes constraints (pinning, hugging, fill), AI uses them to decide what stretches and what stays fixed. “Fill” elements typically become flexible widths (e.g., flex: 1), while “hug” maps to content-sized elements.
Why absolute positioning shows up (and why it’s risky)
Absolute positioning usually appears when the model can’t confidently express relationships with flow layouts—often due to inconsistent spacing, overlapping layers, or misaligned elements. It can look correct at one screen size but break responsiveness and text resizing.
A quick win: spacing consistency
Using a small spacing scale and aligning to a clear grid dramatically increases the chance the AI produces clean flex/grid code instead of coordinates. Consistency isn’t just aesthetics—it’s a machine-readable pattern.
How hierarchy is inferred from visual cues
AI doesn’t “understand” hierarchy; it infers importance from patterns that usually signal it. The more clearly your design communicates those signals, the more likely the generated UI matches your intent.
Typography as a ranking system
Typography is one of the strongest clues. Larger type, heavier weight, higher contrast color, and more generous line height typically indicate higher priority.
For example, a 32px bold title above a 16px regular paragraph is a clear “heading + body” pattern. Where it gets tricky is when styles blur—e.g., two text blocks differ by only 1–2px or use the same weight with different colors. In those cases, AI may label both as plain text or choose the wrong heading level.
Grouping: proximity and shared containers
Hierarchy is also inferred from spatial relationships. Elements that are closer together, aligned, and separated from other content by whitespace are treated as a group.
Common backgrounds (cards, panels, tinted sections) act like visual brackets: AI often interprets them as containers such as a section, aside, or a component wrapper. Uneven padding or inconsistent spacing can cause accidental regrouping—like a button being attached to the wrong card.
Repetition suggests components
Repeated patterns—identical cards, list items, rows, or form fields—are strong evidence of a reusable component. Even small differences (icon size, corner radius, text style) may lead AI to generate multiple one-off versions instead of a single component with variants.
Emphasis: primary vs. secondary actions
Buttons communicate intent through size, fill, contrast, and position. A filled button with strong contrast is usually treated as the primary action; outlined or text buttons become secondary. If two actions look equally emphasized, AI may guess incorrectly which one is “primary.”
From visual hierarchy to semantic structure
Finally, AI tries to map hierarchy into semantics: headings (h1–h6), grouped regions (section), and meaningful clusters (like “product details” vs. “purchase actions”). Clear typographic steps and consistent grouping make this translation far more reliable.
How AI guesses user intent and interactions
Models predict intent by matching what they see to patterns learned from many UIs: common shapes, labels, iconography, and placement conventions.
Recognizing familiar UI patterns
Certain arrangements strongly suggest specific components. A horizontal strip at the top with a logo on the left and text items on the right is likely a navigation bar. A row of equal-width items with one highlighted often maps to tabs. Repeated boxes with an image, title, and short text read as cards. Dense grids with aligned headers and rows often become tables.
These guesses matter because they affect structure: a “tab” implies selected state and keyboard navigation, while a “row of buttons” might not.
Inferring what’s interactive
AI looks for cues that typically indicate interaction:
- Button-like shapes (filled backgrounds, rounded rectangles, strong contrast)
- Link styling (blue text, underlines) or placement in navs
- Inputs (borders, placeholder text, caret indicators)
- Affordance icons (chevrons for dropdowns, magnifiers for search, “⋯” for menus)
From there it assigns behaviors: click, open menu, navigate, submit, expand/collapse. The more the design differentiates interactive from static elements, the more accurate the output.
Understanding states (and when intent is ambiguous)
If the design shows multiple variants—hover, active/selected, disabled, error, loading—AI can map them to stateful components (e.g., disabled buttons, validation messages, skeleton loaders). When states aren’t explicit, AI may omit them.
Ambiguity is common: is a card clickable or informational? Is a chevron decorative or a disclosure control? In those cases, clarify through naming, annotations, or separate frames that demonstrate the interaction.
Turning design into UI primitives and components
Once an AI has a plausible read of layout, the next step is translating “what it looks like” into “what it is”: semantic HTML, reusable components, and consistent styling.
From layers to structure (and roles)
Most tools map design layers and groups into a DOM tree: frames become containers, text layers become headings/paragraphs, and repeated items become lists or grids.
When intent is clear, AI may attach better semantics—e.g., a top bar becomes a <header>, a logo and links become a <nav>, and a clickable card becomes an <a> or <button>. ARIA roles can sometimes be inferred (like role="dialog" for a modal), but only when the pattern is unambiguous; otherwise, safer output is plain HTML plus TODOs for accessibility review.
Drawing component boundaries
To avoid generating a single giant file, AI tries to cut UI into primitives:
- Atoms: buttons, inputs, icons, tags
- Molecules: search bars, form rows, list items
- Templates/sections: hero blocks, pricing tables, page shells
Common signals for a “component” are repetition, consistent padding/typography, and a grouped clickable area. Common failure modes are over-fragmentation (too many tiny components) or under-fragmentation (everything hardcoded once).
Styling: CSS vs. utilities vs. CSS-in-JS
The generator usually picks one approach based on the target stack or its defaults:
- Plain CSS / modules: clear separation, easy to hand-edit
- Utility classes: fast to generate and consistent, but verbose markup
- CSS-in-JS: co-locates styles with components, but can be noisy without token discipline
Tokens over pixels
High-quality output leans on design tokens—colors, spacing, radius, shadows—so the code stays consistent when the design evolves. A strict pixel match often produces one-off values (e.g., 13px gaps, near-identical grays) that look right but are hard to maintain.
A practical balance is: preserve hierarchy and spacing rhythm, then normalize into tokens and components you can reuse (and refactor further in the review step—see /blog/how-to-review-and-refactor-generated-ui-code).
Responsiveness: from fixed frames to adaptive UIs
Design files often look “finished” because they’re drawn at a few fixed frame sizes (like 1440 and 375). Code can’t assume that. A design-to-code tool must decide how the UI behaves across in-between widths, using a mix of clues and defaults.
How breakpoints get inferred (or guessed)
If your design includes multiple versions of the same screen (desktop/tablet/mobile) and the structure is consistent, AI can align them and infer where layout rules change. Without variants, it typically falls back to common breakpoints and treats the frame size as the “base,” which can lead to awkward jumps.
Wrap, stack, and reflow decisions
AI looks for patterns: repeated cards in a grid, equal spacing, and alignment. From that it may decide that a 3-column grid becomes 2 columns, then 1. It struggles when the design relies on manual nudges—elements that look aligned but aren’t truly consistent—because it can’t tell whether that was intentional.
Dynamic content: long text and localization
Most designs use short, tidy copy. Real products don’t. AI-generated UI code often sets fixed widths/heights or truncates too aggressively.
A quick sanity check is to test:
- 2–3× longer titles (German-style compounds, legal names)
- multi-line buttons and error messages
- larger text sizes (OS accessibility settings)
Responsive images and media
AI may preserve the pixel-perfect crop from the design, but responsive UIs need rules: keep aspect ratio, choose how to crop, and decide when images should scale down versus swap placement. If the design doesn’t specify this, expect “fill” behavior that crops important parts.
Practical checks
Before trusting the output, preview at very small widths, very large monitors, and in-between sizes. If anything overlaps, clips, or becomes unreadable, the issue is usually missing layout intent—not “bad code”—and it’s a signal to add clearer constraints in the design.
Accessibility: signals, gaps, and quick wins
AI can convert pixels into UI code surprisingly well, but accessibility is where “looks right” often diverges from “works for everyone.” Because many requirements aren’t visible in a static frame, the model needs explicit signals.
What AI can infer from a design
Some accessibility-friendly choices do show up visually, and AI can often map them into better HTML:
- Contrast and emphasis: big, bold text tends to become headings; high-contrast buttons become primary actions.
- Labels near inputs: a text label placed directly above/left of a field is often inferred as the field’s label.
- Focus order hints: a clean left-to-right, top-to-bottom layout can produce a reasonable DOM order.
What AI can’t reliably infer
Other requirements aren’t reliably visible:
- Keyboard flow and traps: modals, menus, and custom widgets need explicit focus management.
- Meaningful labels: “Email” in a placeholder isn’t the same as an accessible label; intent like “Search products” vs. “Search site” may be ambiguous.
- State announcements: errors, loading, and dynamic updates need ARIA patterns that aren’t obvious from appearance alone.
Common misses in generated code
Expect gaps like missing label/for connections, incorrect heading levels, clickable divs without keyboard support, weak focus styles, and icons without text alternatives.
Quick checklist before shipping
- Headings form a logical outline (
h1→h2→h3). - Landmarks exist (
header,nav,main,footer) and aren’t duplicated. - Images/icons have appropriate
alt(oralt=""when decorative). - Visible focus styles are present and meet contrast needs.
- Inputs have associated labels and clear error messaging.
When to add an explicit accessibility spec
Add a short spec when you have modals, drawers, complex forms, custom selects, drag-and-drop, or anything with non-trivial states. Even a few notes like “trap focus in modal,” “Esc closes,” and “announce inline errors” can dramatically improve generated UI code.
Where AI-generated UI code often goes wrong
AI can produce UI code that looks close at first glance, but small interpretation errors add up quickly. Most issues come from “reasonable guesses” when the design doesn’t clearly encode rules.
Spacing that doesn’t match the design
A common complaint is mismatched spacing: buttons that feel slightly off, sections that breathe too much, or cards that look cramped. This happens when padding across similar elements is inconsistent, or when auto-layout/constraints are mixed with manual nudges. The model may infer a pattern (e.g., “16px everywhere”) and override exceptions—or preserve exceptions that were accidental.
Over-nesting and a messy DOM
Generated markup often has too many wrapper elements. Each inferred visual grouping becomes another <div>. The result is harder to style, harder to debug, and sometimes slower to render. You’ll notice it when a simple card becomes five nested containers just to align an icon and a title.
Component splitting that misses the point
AI might split components too granularly (every label becomes its own component) or too monolithic (a whole screen becomes one component). The root cause is unclear boundaries: if repeated patterns aren’t identical, the model can’t confidently extract a shared component.
Typography drift
Typography often “drifts” because design text styles don’t map cleanly to code. Subtle differences in line height, letter spacing, or weight may be lost, and font fallbacks can change metrics between environments. That’s why a headline that fit in Figma suddenly wraps in code.
Missing interaction states
If hover, focus, error, loading, or empty states aren’t represented in the design, the AI rarely invents them. The UI may look correct in a static screenshot but fail as soon as users interact.
How to prepare designs so AI can generate better code
AI code generators don’t “see” your design the way a human does—they read a structured file full of layers, constraints, styles, and component instances. The cleaner that structure is, the less the model has to guess (and the fewer weird div soups you’ll untangle later).
1) Make naming do real work
Layer names are one of the strongest signals for intent and component mapping. Prefer consistent, descriptive patterns that match how you build UI:
Button/Primary,Button/SecondaryCard/Product,Card/ArticleForm/Input/Text,Form/Checkbox
Avoid leaving everything as “Rectangle 12” or “Group 5”—that pushes the AI toward generic wrappers instead of reusable components.
2) Use Auto Layout and constraints (not pixel choreography)
Manual positioning often turns into absolute coordinates in code. If you want flex/grid output, your design should behave like flex/grid:
- Use Auto Layout for rows/columns, spacing, alignment, and padding.
- Apply constraints so elements resize predictably (e.g., text expands, buttons stay pinned, cards stretch).
When the design responds well inside the design tool, the generated UI is much more likely to be responsive by default.
3) Define tokens and reuse styles
One-off colors, font sizes, and spacing values encourage one-off CSS. Instead:
- Create and reuse color/text styles (or variables) for type, surfaces, borders, and states.
- Standardize spacing steps (e.g., 4/8/12/16) so layouts translate into consistent tokens.
This improves consistency and makes it easier to refactor toward a design system later.
4) Include states, variants, and short intent notes
AI can’t infer what it can’t find. Add key variants like hover/pressed/disabled, error states for inputs, loading states, and empty states.
When behavior matters, annotate it briefly: “opens modal”, “server-validated”, “shows toast on success”. A single line near a component can prevent incorrect interaction code.
If you’re standardizing a team workflow, capture these conventions in a lightweight checklist and link it internally (e.g., /blog/design-to-code-checklist).
How to review and refactor the generated output
AI-generated UI code is best treated like a first draft: it can save hours, but it still needs a human pass to ensure the UI behaves correctly, stays maintainable, and matches product standards.
1) Verify semantics before pixels
Start by reading the markup as if you were a screen reader.
- Check heading order (one
<h1>, then logical<h2>/<h3>). - Confirm lists are real lists (
<ul>/<ol>) and not stacked<div>s. - Inspect forms: every input should have a label, and error/help text should be connected.
- Make sure interactive elements are correct: buttons for actions, links for navigation.
If semantics are wrong, fixing CSS won’t rescue accessibility or usability.
2) Refactor layout for stability
Many generators rely on absolute positioning or deeply nested wrappers to “match the screenshot.” That tends to break when content changes.
Prefer flex/grid rules over coordinates, and reduce nesting until each wrapper has a clear reason to exist (layout grouping, spacing, or component boundary). If you see repeated style={{ left, top, width, height }} patterns, rewrite that area first.
3) Extract components and tokens
Look for repeating UI patterns (cards, input rows, nav items) and turn them into reusable components. Then replace hard-coded values with tokens: spacing, radius, typography, and colors. If your team already has token guidance, align to it; otherwise, start with a minimal set and expand deliberately (see /blog/design-tokens).
4) Add quick checks to prevent regressions
You don’t need a heavy test suite to get value.
- Add Storybook stories for key components and snapshot/visual checks.
- Do a small QA loop: keyboard navigation, focus states, responsive breakpoints, and “long text” scenarios.
5) Document assumptions
Generators guess intent. Capture any edits you made (interaction rules, breakpoints, component mapping decisions) so the next generation pass—or the next developer—doesn’t undo them.
Choosing the right workflow and setting expectations
AI “design to code” works best when you treat it as an accelerator, not an autopilot. The fastest teams pick a workflow that matches the maturity of their design system and the risk level of the screen they’re building.
Two common workflows
1) AI assist inside design tools (e.g., Figma plugins): Great for staying close to the source file. You get quick scaffolding while designers iterate, and it’s easier to keep names, components, and tokens aligned with the file.
2) External converters (upload/export → code): Useful when you need a repeatable pipeline across many files or teams. It can be faster for bulk conversion, but you often spend more time cleaning up structure and wiring interactions.
In practice, many teams end up combining design-to-code with a broader “spec to shipped app” flow. For example, platforms like Koder.ai take the same principle—turning intent into implementation—and extend it beyond UI scaffolding: you can describe features in chat, generate React frontends with Go/PostgreSQL backends (and Flutter for mobile), then iterate with planning mode, snapshots, rollback, and source-code export when it’s time to integrate with an existing repo.
When AI helps most
AI shines on:
- Prototypes and MVPs where speed matters more than perfect architecture
- Scaffolding: grids, spacing, basic component mapping, and placeholder content
- Repetitive UI (tables, cards, settings screens) where patterns repeat
When to avoid (or limit) AI
Be cautious with:
- Complex multi-step flows where state, validation, and edge cases matter
- Screens with heavy accessibility requirements (keyboard behavior, ARIA nuances, focus management)
- Data-heavy UI with tricky conditional rendering and performance constraints
Build a feedback loop
Treat each generation as a draft: review output, note recurring issues (naming, missing states, incorrect semantics), then update your prompt/spec and design conventions. Over a few rounds, quality improves more than you’d expect.
Next steps and evaluation criteria
Before committing, run a small pilot and score results on: fidelity to layout, component reuse, responsiveness, accessibility basics, and refactor time. If you’re comparing tooling options and plans, check /pricing.
FAQ
What does “design to code” AI actually do?
It’s an AI-assisted translation from a visual UI (Figma frame, design export, or screenshot) into runnable UI code. The goal is a solid first draft—layout, styling rhythm, and basic structure—so a developer can refactor into tokens, components, and production-quality semantics.
What parts of a design can AI translate reliably?
It typically translates:
- Layout (rows/columns, alignment, gaps, grids)
- Hierarchy (headings vs body text, primary vs secondary actions)
- Component patterns (repeated cards, form rows, nav items)
- Basic intent guesses (button vs link vs input) based on common UI conventions
What can’t AI infer from pixels alone?
Pixels don’t encode everything. You usually must specify or provide:
- Design tokens (colors, type scale, spacing scale)
- Component names/variants that match your library
- Interaction rules (validation, navigation targets, analytics)
- States (hover, focus, disabled, error, loading, empty)
- Breakpoints and responsive rules when they’re not shown in the design
Why is a Figma file better than a screenshot for design-to-code?
A screenshot is the thinnest input: it has color and geometry but no explicit structure (layers, constraints, components). Expect more guesswork, more absolute positioning, and less reusable code.
A Figma/Sketch file or structured export provides frames, layer names, Auto Layout, constraints, and styles—signals that help produce cleaner flex/grid layouts and more accurate component boundaries.
How does AI detect grids, columns, and spacing?
AI looks for repeated alignment and consistent gaps to express the UI as flex/grid rules. If it finds a clear spacing rhythm (like 8/16/24), it can generate stable stacks and grids.
If spacing is inconsistent or elements are slightly misaligned, the model often falls back to absolute coordinates to preserve the exact look—at the cost of responsiveness.
How does AI recognize containers and nested groups like cards and sections?
It searches for visual “enclosure” signals:
- Backgrounds, borders, shadows (card/panel boundaries)
- Padding-like whitespace inside a region
- Proximity + alignment (items that belong together)
Clean grouping and consistent structure in the design tool (frames, Auto Layout) makes parent/child relationships much easier to reproduce in code.
Why does generated UI code sometimes rely on absolute positioning (and why is that risky)?
Absolute positioning appears when relationships are ambiguous—overlaps, inconsistent spacing, manual nudges, or unclear grouping. It can match one screen size but tends to break with:
- Different viewport widths
- Longer text/localization
- User font scaling (accessibility)
If you want flexible output, make the design behave like flex/grid via Auto Layout and constraints.
How does AI infer hierarchy (headings, sections, primary actions) from a design?
It infers hierarchy from visual cues:
- Typography (size, weight, contrast, line height)
- Placement and whitespace separation between sections
- Repetition (suggesting reusable components)
When styles differ by only 1–2px or hierarchy steps are unclear, it may choose the wrong heading level or treat headings as plain text.
How does AI guess user intent and which elements are interactive?
AI guesses interactivity from UI affordances:
- Button-like shapes and high-contrast fills
- Link styling or placement in navigation
- Input borders, placeholders, caret indicators
- Icons like chevrons (dropdown), magnifier (search), “⋯” (menu)
If a “card” could be clickable or informational, annotate or show a variant; otherwise the model may wire the wrong behavior or omit it entirely.
What’s the best way to review and refactor AI-generated UI code?
Do a fast, structured pass:
- Fix semantics first (headings, lists, real buttons/links, form labels)
- Replace brittle layout with flex/grid and reduce unnecessary wrappers
- Extract repeated UI into components and replace one-off values with tokens
- QA responsiveness (small/large/in-between widths) and “long text” cases
- Run basic accessibility checks (focus styles, labels, keyboard navigation)
Treat the output as scaffolding, then document assumptions so future generations don’t undo your decisions.