Nov 28, 2025·8 min
How to Build a Smart Home Control & Monitoring Mobile App
Plan, design, build, and launch a mobile app for smart home control and monitoring—covering device support, security, UX, notifications, and testing.
Define the Use Cases and Target Devices
Before you think about screens, protocols, or app architecture, get specific about what the app is for. A “smart home mobile app” can mean quick device control, continuous monitoring, or a mix of both—and each choice changes what you should build first.
Start with a clear goal
Pick one primary job the app must do exceptionally well:
- Control-first: fast actions like turning lights on, unlocking a door, or setting a thermostat.
- Monitoring-first: understanding what’s happening (temperature trends, door events, camera status) and responding to alerts.
- Control + monitoring: common for a home automation app, but scope can balloon—define what’s “must-have” vs “later.”
A practical rule: if users open the app for seconds, prioritize control. If they open it for answers, prioritize monitoring.
List the devices you’ll support (and what “support” means)
Make an explicit device inventory early. Typical categories include:
- Lights and switches
- Smart plugs
- Thermostats
- Locks
- Cameras and doorbells
- Sensors (motion, contact, smoke/CO, leak, temperature/humidity)
For each device type, define required capabilities: on/off, dimming, battery level, history, live view, firmware status, and whether it must work when the internet is down. This prevents vague “device control and monitoring” requirements from turning into endless edge cases.
Identify target users and core scenarios
Write 5–10 scenarios your users actually care about, such as:
- Arrive home: disarm, unlock, turn on entry lights
- Bedtime: lock doors, turn off downstairs, set thermostat
- Away mode: arm sensors, get alerts, check camera status
Decide success metrics early
Good IoT app development is measurable. Choose metrics like:
- Setup completion rate (pairing + first successful action)
- Daily/weekly active control (how often key actions happen)
- Alert response time (from notification to user opening details)
These metrics will guide product decisions when trade-offs appear later.
Pick Platforms and Your Build Approach
Platform choices affect everything: device integrations, performance, QA effort, and even what “offline control” realistically means. Decide your scope and approach before committing to UI components and data models.
Choose your platform scope (iOS, Android, or both)
If you’re shipping for a consumer audience, plan for both platforms sooner or later. The question is sequencing:
- Start with one platform when you’re validating the product and need speed.
- Build for both from day one when you already have distribution partners, hardware bundles, or a clear deadline.
Also define your minimum OS versions. Supporting very old devices can quietly raise costs (background limitations, Bluetooth behavior differences, notification quirks).
Tablet support and accessibility
Tablets can be a big win for wall-mounted “home dashboard” use. If that’s part of the product, design screens that scale (split views, larger touch targets) and consider landscape layouts.
Accessibility isn’t optional if you want a polished control experience. Set requirements early: dynamic text size, color contrast for status states, screen reader labels for switches and sensors, and haptics/sound alternatives.
Pick an approach: native, cross-platform, or web + wrapper
- Native (Swift/Kotlin): best for Bluetooth performance, background behavior, and platform-polished UX.
- Cross-platform (Flutter/React Native): faster shared UI and feature parity, but verify the maturity of plugins for Bluetooth, Wi‑Fi provisioning, and push notifications.
- Web + wrapper: usually the weakest fit for real device control; acceptable for “monitoring-only” or admin screens, but can struggle with pairing and low-latency control.
Offline basics: local control vs cloud-only
Decide what must work without internet: turning lights on, unlocking doors, viewing last-known sensor states.
- Cloud-only control is simpler, but users will blame the app when Wi‑Fi is flaky.
- Local control can improve reliability, but adds complexity (network discovery, local auth, conflict resolution).
Define an explicit offline promise (what works, what doesn’t) and design around it.
Understand Smart Home Protocols and Integrations
A smart home app rarely talks to “a smart home.” It talks to a mix of devices that connect in different ways, with different reliability and latency. Getting this right early prevents painful rewrites later.
How devices connect (and what it means for your app)
Wi‑Fi devices usually talk over the internet (vendor cloud) or your home network (local LAN). Cloud control is easier to reach remotely, but it depends on uptime and rate limits. Local LAN control can feel instant and keep working when the internet drops, but requires discovery, authentication, and network edge-case handling.
Bluetooth is common for pairing and for nearby-only devices (locks, sensors). It can be fast, but it’s phone‑centric: background limits, OS permissions, and range matter.
Zigbee and Z‑Wave typically require a hub. Your app often integrates with the hub’s API rather than each end device. This can simplify multi-device support, but ties you to hub capabilities.
Matter/Thread aims to standardize device control. In practice, you’ll still deal with ecosystems (Apple/Google/Amazon) and varying device feature coverage.
Choose your integration path
You’ll generally pick one (or more):
- Hub integration (Home Assistant, SmartThings, etc.) for broad device coverage
- Vendor clouds for branded ecosystems and remote access
- Local LAN APIs for speed and offline-friendly control
For each device you support, document: pairing method, required permissions, supported actions, update frequency, and API limits (rate limits, quotas, polling restrictions).
Build a device capability model
Avoid hardcoding “Device X has button Y.” Instead, normalize devices into capabilities like switch, dimmer, temperature, motion, battery, lock, energy, and attach metadata (units, ranges, read-only vs controllable). This makes your UI and automations scale as new device types appear.
Design UX for Fast Control and Clear Monitoring
A smart home UX succeeds or fails in the first few seconds: users want to take an action, confirm it worked, and move on. Prioritize speed, clarity, and confidence—especially when devices go offline or behave unpredictably.
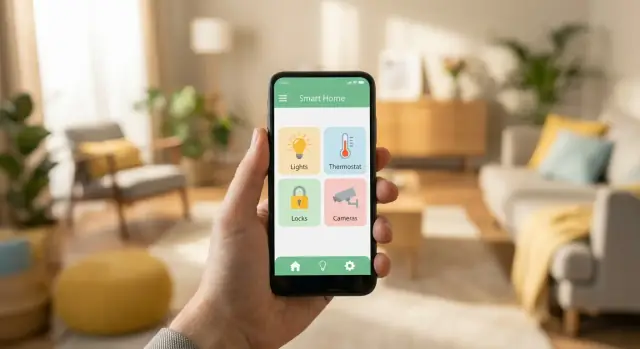
Map the core screens (and keep them predictable)
Start with a small set of “anchor” screens users can learn once and reuse everywhere:
- Onboarding: account (if needed), permissions, and a clear “Add a device” entry point.
- Home dashboard: overview of rooms, favorites, and critical statuses (e.g., alarms, leaks).
- Room view: grouped devices with consistent controls and a room-level status.
- Device detail: expanded controls, history (if applicable), battery level/firmware, and troubleshooting.
- Automations/scenes: simple creation and testing, with plain-English conditions and actions.
Consistency matters more than cleverness: same icons, same placement for primary actions, same status language.
Optimize for “one-tap” control
Make frequent actions effortless:
- Use large toggles and gesture-safe controls (avoid tiny sliders for critical actions).
- Provide quick actions on the dashboard (e.g., “All lights off”, “Lock doors”).
- Show immediate feedback: button state changes instantly, while the app confirms completion (“Turning on…”, then “On”).
Monitoring that builds trust
Monitoring is mostly about communicating uncertainty well. Always show device online/offline and last updated time. For sensors, show both current value and a small hint of trend (“Updated 2 min ago”). Don’t hide bad news.
Friendly alerts and error copy
Use language that helps users act:
- “Pairing failed. Make sure the device is in setup mode and within 10 feet.”
- “Device unreachable. Check power and Wi‑Fi, then try again.”
Offer a single clear next step and a “Try again” button.
Accessibility basics that pay off
Design with large tap targets, strong contrast, and support for dynamic text. Ensure every control has a clear label for screen readers, and avoid relying on color alone to show status (use text like “Offline” plus an icon).
Create a Reliable Onboarding and Device Pairing Flow
Onboarding is where smart home apps win or lose trust. Users aren’t “setting up a device”—they’re trying to turn on a light right now. Your job is to make pairing feel predictable, quick, and recoverable.
Pick the right pairing flow (and be explicit)
Support the pairing methods your devices require, but present them as clear choices with plain-language labels:
- QR code pairing: fastest when the device has a printed code. Explain where to find it and what happens after scanning.
- Bluetooth discovery: great for nearby setup. Show a device list with signal strength and an identifiable name.
- Wi‑Fi credentials: guide users step-by-step, including the exact network name they should select (2.4 GHz vs 5 GHz when relevant).
- Hub pairing: if a hub is involved, communicate the sequence (“Pair hub first, then add devices”).
Ask for permissions only when needed
Pairing often requires Bluetooth and sometimes location (OS requirement for scanning), plus notifications for alerts. Don’t request everything on the first screen. Instead, explain the “why” right before the system prompt: “We need Bluetooth to find nearby devices.” If a user denies access, provide a simple “Fix in Settings” path.
Design for failures (because they will happen)
Common issues include wrong Wi‑Fi password, weak signal, and firmware mismatch. Detect what you can and offer specific fixes: show the selected network name, suggest moving closer to the router, or prompt an update with an estimated time.
Always include a recovery path
Every pairing screen should have a visible escape hatch: Retry, Start over, and Reset instructions (with model-specific steps). Add a support entry point (“Contact support” or “Chat”) and include diagnostic info users can share without hunting for it.
Plan the App Architecture and Data Flow
Kickstart the mobile UI
Generate a Flutter mobile baseline for fast device control and clear monitoring screens.
A smart home mobile app is rarely “just an app.” It’s a system made of three moving parts: the mobile client, a backend (often), and the device side (direct-to-device, via a hub, or via each vendor’s cloud). Your architecture should make it obvious how commands travel (tap → action) and how truth travels back (device → status).
Define the core components
At a minimum, map these paths:
- Control path: phone → (backend or hub) → device, with clear retries and timeouts.
- Telemetry path: device → (hub/cloud) → backend → phone, with updates that can arrive out of order.
If you support both local and remote control, decide how the app chooses the route (same Wi‑Fi = local, away from home = cloud) and what happens when one path fails.
Decide where “state” lives
Smart home apps succeed or fail on state consistency. Pick a primary source of truth:
- Hub-managed state (common for Zigbee/Z‑Wave): hub stores device state and exposes it to the app.
- Cloud database state: backend stores last-known state for cross-device access and history.
- App local cache: speeds up UI, but must be treated as “best effort,” not truth.
A practical pattern is: backend (or hub) is the source of truth, the app caches, and the UI clearly marks “Updating…” when uncertain.
Plan real-time updates
Choose per device type and scale:
- Polling: simplest; fine for slow-changing sensors, costly for frequent updates.
- Push events: best for battery and responsiveness (e.g., via vendor webhooks).
- WebSockets: great for live dashboards and multi-user sync.
Multi-home and multi-user from day one
Model Home → Rooms → Devices, then add Users + Roles (owner, admin, guest) and shared access. Treat permissions as data-flow rules: who can send commands, who can see history, and which notifications are allowed per household.
Faster iteration: prototype architecture without locking yourself in
If you’re validating an IoT product (or rebuilding a legacy pipeline), it can help to prototype the full stack quickly—mobile UI, backend, and data model—before you harden device integrations.
Platforms like Koder.ai are useful here: you can describe your smart home mobile app flows in chat, use Planning Mode to map screens and data flow, and generate a working baseline using common stacks (React for web dashboards, Go + PostgreSQL for the backend, and Flutter for mobile). Snapshots and rollback also make it safer to iterate on device capability models and automation rules without losing progress.
Security, Privacy, and Access Control Basics
Security isn’t a feature you bolt on later in a smart home mobile app. Your app may unlock doors, disable alarms, or expose camera feeds—so small shortcuts can become real-world safety issues.
Authentication and safe sessions
Start by choosing a login method that fits your audience and support burden:
- Email + password (simple, but requires secure password reset flows)
- SSO (Apple/Google) for lower friction and fewer forgotten passwords
- Magic links / one-time codes to avoid password storage entirely
Whatever you choose, treat session handling as first-class: short-lived access tokens, refresh tokens with rotation, and a clear “log out of all devices” option. If you support shared tablets or wall-mounted devices, add a “shared device mode” with tighter permissions.
Transport security and secret storage
All traffic between app, backend, and devices should use TLS. Don’t allow “temporary” HTTP exceptions in production, and consider certificate pinning for high-risk apps.
On the phone, never store secrets (API keys, device pairing codes, refresh tokens) in plain text. Use platform-provided secure storage (Keychain on iOS, Keystore on Android). Also be careful with logs: redact tokens and personally identifiable information.
Authorization: who can do what
Define roles early and keep them consistent across app UI and backend rules:
- Owner: full control, billing, sharing, factory reset
- Admin: manage devices and automations, but limited critical actions
- Guest: basic control only (e.g., lights), no security system changes
- Time-limited access: guests that expire automatically (cleaners, dog walkers)
Enforce permissions server-side—not just by hiding buttons.
Audit history for trust and troubleshooting
Build an audit trail for high-impact actions: unlock/lock, arm/disarm, adding/removing users, changing automations, and remote access events. A simple in-app “Activity” screen (with timestamps and actor names) increases user trust and helps support diagnose issues quickly.
Monitoring, Alerts, and Notifications
Learn and offset costs
Publish what you learn building IoT apps and earn credits to keep experimenting on Koder.ai.
Alerts are where a smart home app can feel reassuring—or annoyingly noisy. The goal is simple: surface the right event, with enough context, at the right time, without turning the user’s phone into a siren.
Decide what should trigger an alert
Start by listing the events that actually matter to someone living in the home. Common categories include:
- Safety: smoke/CO alarm, water leak, glass break (if supported)
- Security: motion detected, door/window opened, alarm armed/disarmed
- Reliability: device offline, hub disconnected, battery low
- Convenience: package detected, garage door left open
Be careful with “chatty” events (every motion in a busy hallway). Those should be off by default or downgraded to in-app history.
Make notification settings easy to understand
People don’t want to configure a matrix of rules. Provide a few clear controls that cover most needs:
- Quiet hours (e.g., 10pm–7am) with exceptions for critical safety alerts
- Severity levels (Critical, Important, Info) users can enable/disable
- Per-device settings (notify for front door, but not for living room motion)
If your app supports multiple homes or users, settings should be scoped correctly (per home, per user) so one person’s preferences don’t break another’s.
Add an in-app activity feed for “what happened?”
Push notifications are ephemeral. An in-app activity feed helps users trust the system because they can verify events later.
Your feed should include:
- A clear event title (“Front Door Opened”)
- Timestamp (and timezone awareness)
- Location context (home + room)
- Device name (and ideally an icon)
If you support cameras, link to the relevant clip or snapshot from the feed. If you don’t, link to the device details page so users can quickly check the current state.
Keep alerts actionable and specific
A useful alert answers four questions immediately: what happened, where, when, and what should I do next.
Good: “Smoke alarm: Kitchen • 2:14 AM — Tap to call emergency contact and silence (if supported).”
Not good: “Alarm triggered.”
When possible, include quick actions (e.g., “Turn off siren,” “Lock door,” “View device”). But don’t offer actions that are likely to fail—if the device is offline, say so and offer recovery steps instead.
Ensure history and notifications match: if a push fails or is dismissed, the activity feed should still reflect the event so the user never feels like the app “missed something.”
Scenes and Automations Users Can Understand
Scenes and automations are where a home automation app starts to feel “smart”—but they’re also where users get confused if the rules look like a programming tool. The goal is to make powerful behavior feel predictable and easy to fix.
Start with familiar automation types
Support the core set most households expect:
- Schedules: “Every day at 7:00 AM, turn on Kitchen lights.”
- Scenes: one-tap bundles like “Movie Night” (dim lights, close blinds, set thermostat).
- Sensor-based triggers: “If motion is detected after 10 PM, turn on Hallway light for 5 minutes.”
- Geofencing (optional): “When I leave home, turn off lights.” (Make this opt-in and explain it clearly.)
Use “If this happens → do that” templates
A simple builder works best when it starts from templates that match real intent:
- “When door opens → then turn on entry light”
- “At sunset → then run ‘Evening’ scene”
- “If temperature drops below X → then turn on heater”
Keep the editor short: Trigger, Conditions (optional), Action(s). Show a plain-language summary at the top, like: “If Motion in Hallway after 10 PM, turn on Hallway Light for 5 minutes.”
Prevent loops and repeated triggers
Plan safety checks so automations don’t spam devices:
- Cooldowns (e.g., don’t re-run within 2 minutes)
- State checks (only turn on if already off)
- Conflict warnings (two rules fighting over the same device)
Define manual override behavior
Users will flip switches manually. Decide—and communicate—what happens next:
- Does the automation resume immediately, after a timeout, or at the next scheduled run?
- Does a manual change disable the automation for that device (“Pause until tomorrow”)?
Expose this as a simple control like: “Manual changes pause this automation for: 1 hour / until next run / never.”
Reliability: Offline Handling and Error Recovery
Smart home apps live in messy conditions: Wi‑Fi drops, routers reboot, devices sleep to save battery, and cloud services hiccup. Reliability isn’t just uptime—it’s how clearly your app behaves when things go wrong.
Make connection problems visible (without panic)
Show a consistent connection status at the right level: home (gateway/cloud), room, and device. When a command is sent, reflect what’s happening: Sending… → Confirmed or Failed.
Use sensible timeouts (so a tap doesn’t spin forever) and bounded retries (short backoff). The UI should say what the app is doing (“Trying again…”) rather than silently looping.
Cache state, but label it honestly
Cache the last known state locally so the dashboard stays useful even when offline. When data may be stale, show a Last updated timestamp (or “Updated 3 min ago”) and avoid pretending it’s live.
For controls, use optimistic UI carefully. Turning a light on can feel instant, but if confirmation doesn’t arrive, you need a clear rollback: “Couldn’t reach device. State may not have changed.”
Local-first control during outages
Where possible, support local-only control (LAN/Bluetooth/Hub-to-device) when the internet is down. The key is setting expectations:
- If local control is available: “Working locally (no internet).”
- If it isn’t: “Internet required for this device.”
This reduces support tickets and builds trust.
Error recovery patterns that reduce frustration
Prefer one-tap recovery actions: Retry, Reconnect, Reboot hub instructions, or Check Wi‑Fi tips specific to the device. Also handle background recovery: when the app returns to the foreground, refresh quietly and only interrupt when user action is required.
Firmware updates without scary surprises
Firmware updates are reliability features—but they can break reliability if rushed. Use clear prompts and guidance:
- Explain why the update matters (bug fix, security).
- Provide safety steps: keep the phone nearby, don’t unplug, don’t close the app.
- Detect risky situations (low battery, weak signal) and recommend waiting.
Done well, offline handling and recovery make your app feel dependable even when the home network isn’t.
Testing Plan for Real Homes (Not Just Labs)
Iterate without losing work
Use snapshots and rollback to iterate safely on automations, roles, and offline behavior.
A smart home app can look perfect in a demo and still fail in someone’s apartment. Real homes bring messy Wi‑Fi, thick walls, older phones, shared accounts, and a mix of brands. Your testing plan should recreate that variety early—before you lock your release date.
Pairing tests across real phone and network variety
Pairing is where most users form their first impression, so test it like a product, not a feature.
Run pairing scenarios across:
- Multiple phone models (low-end and flagship), and several OS versions
- Different router setups (2.4 GHz only, dual-band, band steering, guest network)
- Common “home quirks” (weak signal rooms, extenders/mesh, captive portals)
Also test the “human” flow: wrong Wi‑Fi password, user denies Bluetooth/location permission, user switches apps mid-pairing, or the phone locks during setup.
Edge conditions: failures you must handle gracefully
Real homes regularly trigger edge cases, so write explicit test cases and expected UI behavior for each.
Examples worth turning into repeatable scripts:
- Device offline during a control action (toggle, temperature setpoint, lock/unlock)
- Low battery warnings and what happens when the battery dies mid-session
- Hub reboot or power cycle while the user is watching the dashboard
- Router reboot, ISP outage, and switching from Wi‑Fi to cellular mid-control
Your app should communicate clearly: what is known, what is pending, and what failed—without trapping the user in a spinner.
Security checks that match real user behavior
Security testing isn’t only penetration testing; it’s validating that your auth and permissions behave safely.
Focus on:
- Authentication flows (token refresh, logout, session expiration, multi-device sign-in)
- Permission prompts (Bluetooth, location, notifications): correct timing and helpful explanation text
- Data storage review: no secrets in logs, safe local caching, and secure keychain/keystore usage
If your app supports multiple household members, test role changes (admin vs guest) and verify access is removed immediately when someone is revoked.
Performance under load: big dashboards and notification latency
Many smart homes have dozens of devices. Performance issues often appear only at scale.
Test:
- Dashboards with 50+ devices (scrolling, search, filtering, room switching)
- Cold start and returning-from-background speed
- Real-time update behavior under churn (frequent sensor updates)
- Notification latency from event to push delivery, including “Do Not Disturb” and low-power modes
Track metrics and set clear thresholds. If a dashboard takes too long to load or notifications arrive late, users will assume the system is unreliable—even if the devices are fine.
Launch, Support, and Ongoing Improvements
A smart home mobile app isn’t “done” when it ships. Real homes are messy: Wi‑Fi drops, devices get replaced, and users expect fixes without having to relearn the app. A good launch plan sets you up to learn quickly, support customers, and keep the app trustworthy over time.
App Store & Play Store readiness
Before release, prepare store assets and compliance details so users aren’t surprised by permissions or data handling.
- Clear permission explanations (Bluetooth, location, notifications): write plain-language purpose strings like “Used to find nearby devices during setup.”
- Privacy details: disclose what you collect and why (especially diagnostics and analytics). If you support cameras/microphones, be explicit about when those are accessed.
- Screenshots that show outcomes: pairing, device control, and monitoring states (including an offline example) tend to convert better than generic home screens.
If you sell subscriptions or premium monitoring features, ensure your in-app purchase copy matches the store listing and link users to /pricing for a simple comparison.
Analytics that respects the home
Instrumentation should focus on product health and UX improvements, not sensitive household behavior.
Track:
- Onboarding funnel: install → account creation (if any) → pairing started → pairing success → first control action.
- Pairing failure reasons: timeouts, wrong credentials, firmware mismatch (logged as categories, not raw Wi‑Fi names).
- Feature usage: which device types are controlled most, which screens cause exits.
Avoid collecting raw device names, exact addresses, or detailed event timelines that can reveal routines. Aggregate where possible and provide a clear opt-out.
Support paths that actually solve problems
Smart home support is often “device + network + user.” Make help reachable from the moment things go wrong.
- FAQ and quick fixes in-app: “Device offline,” “Pairing stuck,” “Reset instructions,” “LED meanings.”
- Contextual help: show troubleshooting steps directly on the error state, not buried in settings.
- Escalation route: include a “Contact support” flow that attaches non-sensitive diagnostics (app version, device model, last error code). Link to /contact for users who prefer email.
Maintenance roadmap: keep the app compatible
Plan ongoing releases around:
- New device support (and new firmware behaviors)
- Bug fixes prioritized by severity and frequency
- Security updates: dependency patches, certificate rotations, permission changes
Treat compatibility work as continuous: OS updates, router changes, and new smart home standards can break flows that worked perfectly at launch.
Shipping faster without cutting corners
As you iterate, tooling can make a real difference in cycle time—especially when you’re coordinating UI changes, backend endpoints, and role/permissions logic.
With Koder.ai, teams often prototype and ship increments faster by generating and refining features through a chat workflow, exporting source code when needed, and using built-in deployment/hosting plus custom domains for staged rollouts. If you’re publishing learnings from your build, Koder.ai also runs an earn credits program for content creators, and a referral option for teams inviting collaborators—useful for keeping experimentation budget-friendly across free, pro, business, and enterprise tiers.
FAQ
How do I decide whether my smart home app should be control-first or monitoring-first?
Start by choosing one primary job:
- Control-first if users open the app for seconds (quick toggles, lock/unlock, thermostat adjustments).
- Monitoring-first if users open it for answers (status, trends, event history, alerts).
- Both only if you have a strict must-have vs later list to prevent scope creep.
Then write 5–10 real scenarios (arrive home, bedtime, away mode) and build around those.
What should I define for each device type before I start building?
Make a device inventory early and define what “support” means per device type.
For each category (lights, locks, thermostats, cameras, sensors), document:
- Required actions (on/off, dim, setpoint, lock/unlock)
- Required readouts (battery, firmware, online/offline, last updated)
- History needs (events vs trends)
- Whether it must work without internet
- Pairing method (QR, Bluetooth, Wi‑Fi provisioning, hub)
This avoids vague requirements turning into endless edge cases later.
Should I build iOS and Android from day one, and do I need tablet support?
Use these three decision rules:
- Start with one platform (iOS or Android) if you’re validating and need speed.
- Build both from day one if you have partners, hardware bundles, or a fixed launch deadline.
- Set a clear minimum OS version early; supporting very old phones increases QA and can break Bluetooth/background/notifications behavior.
If wall-mounted dashboards matter, plan (landscape, split views, larger touch targets) from the start.
Native vs cross-platform: what’s best for a smart home control app?
Pick based on the hardest technical requirement:
- Native (Swift/Kotlin): best for Bluetooth reliability, background behavior, and “platform-polished” UX.
- Cross-platform (Flutter/React Native): good for shared UI and speed, but verify plugin maturity for Bluetooth, Wi‑Fi provisioning, and push notifications before committing.
- Web + wrapper: usually only acceptable for monitoring/admin screens; it often struggles with pairing and low-latency device control.
If pairing and offline/local control are core features, native (or carefully validated cross-platform) is the safer bet.
What does “offline control” realistically mean, and how should I implement it?
Decide an explicit offline promise and design around it.
Common offline-friendly options:
- Local LAN control for Wi‑Fi devices on the same network
- Hub-based control (Zigbee/Z‑Wave) where the hub stays local
- Bluetooth for nearby-only devices (often setup + basic control)
Also define what happens when offline:
How do I choose between hub integration, vendor clouds, and local LAN APIs?
Treat integrations as separate lanes and choose intentionally:
- Hub integration (e.g., Home Assistant/SmartThings) for broad coverage and a single API surface.
- Vendor clouds for branded ecosystems and reliable remote access.
- Local LAN APIs for low latency and better outage behavior.
For each integration, document pairing steps, permissions, supported actions, update frequency, and . This documentation prevents surprises when you scale device count or event volume.
What is a device capability model, and why does it matter?
Use a capability model instead of device-specific UI logic.
Example capabilities:
switch,dimmer, , , , ,
What makes a reliable onboarding and device pairing flow?
A pairing flow should be predictable and recoverable.
Practical pairing checklist:
How should I design the app architecture and data flow for control and monitoring?
Model two flows: commands and state updates.
- Control path: phone → backend/hub/device, with retries + timeouts.
- Telemetry path: device → hub/cloud/backend → phone, where updates can arrive late or out of order.
Choose a source of truth:
What security and privacy basics should a smart home app include from day one?
Focus on the basics that prevent real-world harm:
- Use TLS everywhere and secure storage (iOS Keychain/Android Keystore) for tokens and secrets.
- Implement safe sessions (short-lived access tokens, refresh token rotation, “log out of all devices”).
- Define roles (owner/admin/guest, optional time-limited access) and enforce permissions server-side, not just by hiding buttons.
- Keep an for critical actions (unlock, arm/disarm, sharing changes) so users and support can see what happened.