Jun 11, 2025·8 min
How to Build a Web App for Content Approval Pipelines
Step-by-step guide to designing workflows, roles, statuses, UI, and integrations for a web app that routes content through reviews and approvals.
Step-by-step guide to designing workflows, roles, statuses, UI, and integrations for a web app that routes content through reviews and approvals.
Before you design screens or pick a database, get clear on what you’re building: a system that moves content from “someone started it” to “it’s approved and published,” with everyone knowing what happens next.
A content approval pipeline is the set of steps content must pass through—drafting, review, approval, and publishing—plus the rules about who can move it forward. Think of it as a shared checklist with traffic lights: content has a current status, a next step, and a responsible person.
The goal isn’t to add bureaucracy. It’s to replace scattered emails, chat threads, and “latest_final_v7” files with one place where the current version and decision are obvious.
Most teams fall into a few roles (your app can implement these as roles, groups, or permissions):
Even if the organization chart is complex, your app should keep the day-to-day experience simple: “What’s waiting on me?” and “What do I do next?”
A pipeline app usually starts with one content type, then expands. Common types include:
This matters because the workflow may be the same, but the data and UI differ. For example, product pages may need field-level review, while articles need rich text and editorial comments.
Define success in outcomes the team can feel:
If you can measure it, even better—cycle time from draft to approval, number of revision loops, and overdue reviews. These targets will guide your workflow design and reporting later.
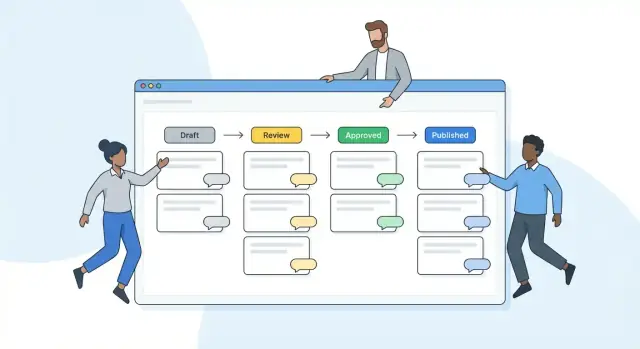
A content approval app becomes easy to use when everyone can answer two questions at a glance: “What state is this in?” and “What can happen next?” Start by defining a small set of clear, mutually exclusive states, then decide the rules that move content between them.
A common baseline is:
Draft → Review → Revisions → Approved → Scheduled/Published
Keep state names user-friendly (“Needs changes” often reads better than “Revisions”), and make sure each state implies who should act next.
Decide whether “Approved” is one decision or the result of multiple checks.
If you need multi-step approval (for example, Legal then Brand), model it explicitly:
Option B keeps the state list shorter, but you’ll need to show progress clearly (e.g., “2 of 3 reviewers approved”).
Write down the allowed moves and enforce them consistently:
Also decide whether “backward” transitions preserve approvals or reset them (most teams reset approvals when content changes).
Parallel reviews are faster: multiple reviewers can approve at once, and you decide whether approval requires all reviewers or any one of them.
Sequential reviews are stricter: content must pass step-by-step (useful for compliance). If you support both, make it a per-workflow setting so teams can choose what fits their process.
A content approval workflow fails fastest when people aren’t sure what they’re allowed to do—or who’s responsible when something gets stuck. Before building features, define clear roles, what each role can do at every stage, and how ownership changes as content moves through review.
List the actions your app supports (create, edit, comment, request changes, approve, publish, archive) and map them to roles. A simple baseline might be:
Keep “publish” separate from “approve” if you want an extra safety check.
Most teams need rules that vary by context:
Aim for a permission model that’s easy to explain in one sentence, like: “Permissions are assigned per project and enforced per workflow stage.” If users need a training session to understand it, it’s too complex.
For every item, store:
Add delegation so approvals don’t stall during time off: allow backup approvers, temporary role handoffs, and an “auto-reassign after X days” rule.
Admins need tools to keep work moving without breaking trust: manage roles, view permission checks, resolve conflicts (e.g., two approvers disagree), and reassign items with a required reason. Pair this with an audit-friendly record (covered later) so overrides are transparent.
Your data model is where an approval pipeline either stays flexible—or becomes painful to change. Aim for a structure that supports versioning, discussions, and traceability without forcing every future feature into a single “content” table.
A practical baseline usually includes:
id, type, owner_id, current status, and timestamps.title, body, tags, structured fields). A ContentItem has many Versions.Model relationships explicitly so reporting is easy later:
current_version_id for fast reads)If you support files, add Attachment linked to a Version (or Comment) so assets follow the exact revision being reviewed.
If your workflow is fixed (Draft → In Review → Approved → Published), an enum is simple and fast.
If customers need custom states (“Legal Review”, “SEO Check”), use configurable tables like WorkflowState and WorkflowTransition, and store the current state as a foreign key. This costs more upfront but prevents a code deploy for every change.
Even simple content benefits from predictable structure: title, body, summary, tags, plus optional JSON for type-specific fields. Add Reference links (e.g., sources, tickets, or related pages) so reviewers can see context without digging elsewhere.
The UI is where your approval pipeline becomes real for users. Aim for two primary surfaces—Drafting and Reviewing—with the workflow always visible so nobody has to guess what happens next.
On the editor screen, reserve a consistent header area for workflow context:
Keep actions contextual: “Submit for review” should only appear when the draft is valid enough, while “Revert to draft” should be restricted to allowed roles. Add lightweight checks (missing title, empty summary) that prevent accidental submissions without turning the editor into a form-filling chore.
Reviewers should spend their time reading and deciding—not hunting for buttons. Use a split layout: content on one side, review tools on the other. Make it easy to:
When a revision is submitted, show a diff view between versions and a short change summary (“What changed since last review?”). This avoids repeated feedback and speeds up re-approval.
For teams reviewing many items, add batch actions on list views: approve multiple, request changes on multiple, or assign to a different reviewer—while still requiring a short note when requesting changes to keep decisions traceable.
Notifications are where a content approval workflow feels “alive.” Done well, they keep reviews moving without forcing people to constantly check the app. Done poorly, they train users to ignore everything.
Start with in-app notifications for real-time awareness (a bell icon, an inbox, unread counts). Keep messages short and actionable: what changed, who did it, what’s expected next.
Add email for events that matter when someone isn’t logged in: being assigned a review, being mentioned, or an upcoming deadline. If your audience uses chat heavily, offer optional Slack/Teams hooks via integrations like “post to channel when an item enters Review.” Make these opt-in per workspace or project.
Reminders should be tied to clear timing rules, not feelings.
For example:
Make reminders smart: suppress them when a reviewer is out of office (if you track it), and stop nudging once a comment or decision is posted.
Let users subscribe at multiple levels:
Subscriptions reduce “FYI” mentions and help stakeholders self-serve updates.
Give each user a notification settings page (link it from /settings/notifications) with:
Design principle: send fewer, clearer notifications—each one should answer “what happened?” and “what should I do next?”
When content moves through review, the history is often more important than the current status. An audit trail protects you when someone asks, “Who approved this?” or “Why did we publish that version?” It also reduces internal friction by making decisions visible and accountable.
Start with an immutable event log: a chronological record that you append to, not overwrite. Each entry should answer four questions—who, what, when, and why.
Keep the log readable for non-technical users: show human-friendly timestamps, names (not IDs), and the exact status transition (Draft → In Review → Approved). If you have a “request changes” step, record the requested changes as structured fields (category, severity) in addition to free-text comments.
Audit trails explain decisions; version history explains content changes. Save a new version whenever the content body, title, metadata, or critical fields change.
Make the UI diff-friendly: highlight what changed between versions (even a simple “before/after” view is enough to start).
Audits happen outside your app too.
Decide retention rules early (e.g., keep logs for 2–7 years) and make exports filterable by date range, content item, and workflow stage to avoid dumping thousands of lines into a spreadsheet.
Once your approval pipeline has more than a handful of items, people stop “browsing” and start finding. Great search and views turn your app from a list into a reliable working tool.
Support full‑text search across the places reviewers actually reference: title, body, and comments. Make results feel predictable by showing highlighted matches and basic context (status, project, current assignee). If you store long content, index only what you need (for example, the latest version plus comments) so results are fast and relevant.
A small touch that helps: search operators that non-technical users understand, like quoting phrases ("brand voice") or filtering by tag right in the search bar.
Filters should answer “What do I need to do next?” and “What’s stuck?” Common filters include:
Combine filters freely, and show them as removable chips so users can see why an item is in the list.
Let users save a set of filters as a named view, like “Needs my review” or “Overdue for Legal.” Teams often want shared views pinned in the sidebar so everyone works from the same queue. Consider permissions here: a saved view should only surface items the viewer can access.
Dashboards don’t need to be fancy to be useful. Start with a few clear metrics: items per status, average cycle time per stage, and where work piles up. If a stage is consistently slow, that’s a staffing or policy issue—your reporting should make it obvious.
Your API is the contract between the UI, integrations, and the workflow rules. If it’s consistent, the product feels predictable; if it’s inconsistent, every screen and integration becomes a one-off.
REST is usually the simplest fit for an approval pipeline web app because workflow actions map cleanly to resources (items, reviews, decisions) and you can keep caching, logs, and tooling straightforward.
GraphQL can be helpful when many screens need different “shapes” of the same content item (draft + reviewers + history in one call). If you go GraphQL, still model workflow actions explicitly (mutations), and keep naming consistent with your state machine.
Design around two ideas: (1) the content item as the core resource, and (2) workflow actions as explicit operations.
A practical REST set might look like:
GET /content?status=in_review&cursor=... (lists)GET /content/{id} (details)POST /content/{id}/workflow/request-reviewPOST /content/{id}/workflow/decision (approve / request changes / reject)POST /content/{id}/workflow/transition (admin-only overrides, if allowed)Keep request bodies boring and consistent:
{ "action": "approve", "comment": "Looks good.", "assignedTo": "user_123" }
Avoid endpoints like /approveContentNow or PUT /content/{id}/status without validation—those tend to bypass the rules that make a workflow trustworthy.
Workflow operations often get retried (mobile networks, queue replays, webhook redelivery). Make state-changing requests idempotent by accepting an Idempotency-Key header and returning the same result for repeated calls.
Also consider optimistic concurrency:
version (or etag) in GET /content/{id}If-Match (or version) on decisions/transitions to prevent “last write wins” accidentsApproval tools live on list screens: “Needs review”, “Waiting on legal”, “My assignments”. Implement pagination from day one—cursor-based pagination is easier to keep stable as data changes.
GET /content?status=needs_changes&limit=50&cursor=...Add sensible rate limits per token (especially for search-heavy endpoints) and return clear headers (e.g., remaining requests, reset time). This protects your workflow management system and makes integration failures easier to diagnose.
Integrations are where an approval pipeline stops being “another tool” and starts fitting into how your team already creates, reviews, and ships content. The goal is simple: reduce copying-and-pasting, keep source files connected, and trigger the next step automatically.
A practical content workflow app typically connects to a few systems:
Expose a small set of reliable events so other tools can react without custom one-off work:
content.approvedcontent.rejectedcontent.publishedreview.requestedEach webhook should include the content ID, current status, timestamps, and URLs back to your app. Document the payloads and signing strategy in a simple reference like /docs/api.
Teams rarely start from zero. Support:
If you only build one “power feature” here, make it idempotent: importing the same file twice shouldn’t create duplicates.
A content approval workflow app is mostly “business logic + permissions + auditability.” That’s good news: you don’t need exotic tech to get it right. Pick tools your team can ship and maintain confidently, then design the architecture around predictable workflow operations (create draft → request review → approve/reject → publish).
If you’re validating the product before investing in a full build, you can prototype the workflow UI, roles, and notifications quickly in a vibe-coding platform like Koder.ai. Because it generates full applications from chat (including React UIs and Go + PostgreSQL backends), it’s a practical way to turn the state machine and permission rules you define here into a working internal tool, with source code export available when you’re ready to take it further.
For the UI, React or Vue are both great fits—choose the one your team already knows. Pair it with a component library (for example, Material UI, Ant Design, Vuetify) so you can move fast on forms, tables, modals, and status badges.
Key UI needs are repetitive: state chips, reviewer queues, diff views, and comment threads. A component library helps you keep those screens consistent without spending weeks on styling.
Any mainstream backend can handle an approval pipeline:
What matters most is how clearly you can implement workflow rules, enforce permissions, and record an audit trail. Prefer frameworks that make it easy to test business logic and keep controllers thin.
Use Postgres for relational workflow data: content items, versions, workflow states, assignments, comments, approvals, and permissions. Approval systems thrive on clear relationships and transactions.
For uploads (images, PDFs, attachments), use object storage (e.g., S3-compatible) and store only metadata + URLs in Postgres.
Notifications, reminders, and outbound webhooks should run in background workers, not in the request/response cycle. This avoids slow page loads and makes retries straightforward.
Typical jobs:
Start with a modular monolith: one backend service, one database, one job queue. Add clear boundaries (workflow engine, permissions, notifications) so you can split services later if needed. If you want a preview of what those boundaries look like from an API perspective, see /blog/api-design-for-workflow-operations.
A content approval workflow is only “done” when it behaves predictably under real pressure: urgent edits, multiple reviewers, and lots of notifications. Treat testing and operations as part of the product, not an afterthought.
Start with unit tests around the rules that define your system’s integrity:
Then add integration tests that run end-to-end approval flows. These should confirm that actions update status correctly, create the right tasks, and trigger notifications (email/in-app) at the right time—without duplicates.
Before production, maintain seed data and a staging environment that mirrors realistic review scenarios: multiple roles, example content types, and varied deadlines. This lets stakeholders validate the flow without guesswork and helps your team reproduce bugs quickly.
A practical deployment checklist includes:
After launch, ongoing maintenance is mostly about noticing issues early:
Pair monitoring with lightweight operational routines: weekly review of failures, alert tuning, and periodic permission audits. If you later add workflow changes, ship them behind a feature flag so teams can adopt updates without disruption.
A content approval pipeline is a defined workflow that moves content through clear states (like Draft → Review → Approved → Published), with rules about who can advance it.
It replaces scattered feedback (email, chat, filenames) with a single source of truth for status, next step, and responsibility.
Most teams need at least five roles:
You can implement these as roles, groups, or permissions, but the UI should always answer: “What’s waiting on me?”
Start with a small, mutually exclusive set of states that clearly imply the next actor, for example:
Keep names user-friendly (e.g., “Needs changes” instead of “Revisions”) and enforce allowed transitions so people can’t skip required checks.
Use single-step approval when one decision is enough (small teams, low risk).
Use multi-step approval when specific groups must sign off (legal, brand, compliance). Two common models:
If you choose the second, show progress explicitly (like “2/3 approvals complete”).
Define transition rules up front and enforce them consistently:
Most teams reset approvals whenever the reviewed content changes, to keep decisions tied to a specific version.
Model the basics with entities that make versioning and traceability straightforward:
If your workflow is fixed and won’t change, an enum is simple and fast.
If you expect custom states per customer/team (e.g., “SEO Check”, “Legal Review”), store workflow configuration in tables like WorkflowState and WorkflowTransition, and keep the current state as a foreign key.
Choose configurability when you want to avoid code deploys for workflow changes.
Two key screens usually carry the product:
Add a diff view and a short “what changed” summary to reduce repeated feedback and speed re-approval.
Use in-app notifications as the default, and add email/chat for higher-impact events.
Good reminders are SLA-based (e.g., nudge after 48 hours in review; escalate after 72). Include:
Stop reminders once a reviewer acts, and avoid flooding users with FYI noise.
Design your API around resources plus explicit workflow actions:
GET /content/{id}POST /content/{id}/workflow/request-reviewPOST /content/{id}/workflow/decision (approve/request changes/reject)For reliability:
This structure makes reporting and audits much easier later.
Idempotency-Key for retried state changesetag/If-Match or version fields)Avoid raw PUT /content/{id}/status updates that bypass validation.