Aug 24, 2025·8 min
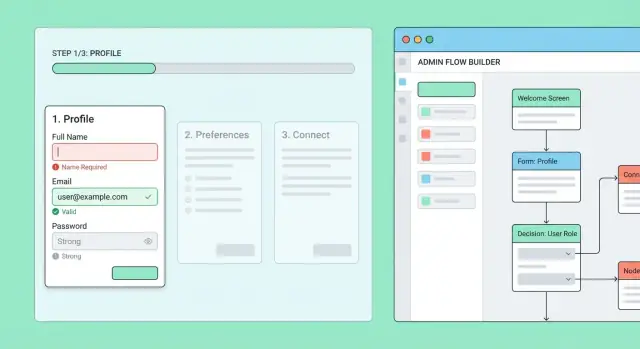
How to Build a Web App for Multi-Step User Onboarding
Learn how to design and build a web app that creates, tracks, and improves multi-step user onboarding flows with clear steps, data models, and testing.
Learn how to design and build a web app that creates, tracks, and improves multi-step user onboarding flows with clear steps, data models, and testing.
A multi-step onboarding flow is a guided sequence of screens that helps a new user go from “signed up” to “ready to use the product.” Instead of asking for everything at once, you break setup into smaller steps that can be completed in one sitting or over time.
You need multi-step onboarding when setup is more than a single form—especially when it includes choices, prerequisites, or compliance checks. If your product requires context (industry, role, preferences), verification (email/phone/identity), or initial configuration (workspaces, billing, integrations), a step-based flow keeps things understandable and reduces errors.
Multi-step onboarding is everywhere because it supports tasks that naturally happen in stages, such as:
A good onboarding flow is not “finished screens,” it’s users reaching value quickly. Define success in terms that match your product:
The flow should also support resume and continuity: users can leave and return without losing progress, and they should land on the next logical step.
Multi-step onboarding fails in predictable ways:
Your goal is to make onboarding feel like a guided path, not a test: clear purpose per step, reliable progress tracking, and an easy way to pick up where the user left off.
Before you draw screens or write any code, decide what your onboarding is trying to achieve—and for whom. A multi-step flow is only “good” if it reliably gets the right people to the right end state with minimal confusion.
Different users arrive with different context, permissions, and urgency. Start by naming your primary entry personas and what’s already known about them:
For each type, list constraints (e.g., “can’t edit company name”), required data (e.g., “must choose a workspace”), and potential shortcuts (e.g., “already verified via SSO”).
Your onboarding end state should be explicit and measurable. “Done” is not “completed all screens”; it’s a business-ready status, such as:
Write the completion criteria as a checklist your backend can evaluate, not a vague goal.
Map which steps are required for the end state and which are optional enhancements. Then document dependencies (“can’t invite teammates until workspace exists”).
Finally, define skip rules with precision: which steps can be skipped, by which user type, under which conditions (e.g., “skip email verification if authenticated via SSO”), and whether skipped steps can be revisited later in settings.
Before you build screens or APIs, draw the onboarding as a flow map: a small diagram that shows every step, where a user can go next, and how they can return later.
Write the steps as short, action-focused names (verbs help): “Create password,” “Confirm email,” “Add company details,” “Invite teammates,” “Connect billing,” “Finish.” Keep the first pass simple, then add detail like required fields and dependencies (e.g., billing can’t happen before plan selection).
A helpful check: each step should answer one question—either “Who are you?” “What do you need?” or “How should the product be configured?” If a step tries to do all three, split it.
Most products benefit from a mostly linear backbone with conditional branches only when the experience truly differs. Typical branch rules:
Document these as “if/then” notes on the map (e.g., “If region = EU → show VAT step”). This keeps the flow understandable and avoids building a maze.
List every place a user might enter the flow:
/settings/onboarding)Each entry should land the user on the right next step, not always step one.
Assume users will leave mid-step. Decide what happens when they return:
Your map should show a clear “resume” path so the experience feels reliable, not fragile.
Good onboarding feels like a guided path, not a test. The goal is to reduce decision fatigue, make expectations obvious, and help users recover quickly when something goes wrong.
A wizard works best when steps must be completed in order (e.g., identity → billing → permissions). A checklist fits onboarding that can be done in any order (e.g., “Add logo,” “Invite teammates,” “Connect calendar”). Guided tasks (embedded tips and callouts inside the product) are great when learning happens by doing, not by filling forms.
If you’re unsure, start with a checklist + deep links to each task, then gate only the truly required steps.
Progress feedback should answer: “How much is left?” Use one of:
Also add a “Save and finish later” cue, especially for longer flows.
Use plain labels (“Business name,” not “Entity identifier”). Add microcopy that explains why you’re asking (“We use this to personalize invoices”). Where possible, prefill from existing data and choose safe defaults.
Design errors as a path forward: highlight the field, explain what to do, keep user input, and focus the first invalid field. For server-side failures, show a retry option and preserve progress so users don’t repeat completed steps.
Make tap targets large, avoid multi-column forms, and keep sticky primary actions visible. Ensure full keyboard navigation, visible focus states, labeled inputs, and screen-reader-friendly progress text (not just a visual bar).
A smooth multi-step onboarding flow depends on a data model that can answer three questions reliably: what the user should see next, what they’ve already provided, and which definition of the flow they’re following.
Start with a small set of tables/collections and grow only when needed:
This separation keeps “configuration” (Flow/Step) cleanly apart from “user data” (StepResponse/Progress).
Decide early whether flows are versioned. In most products, the answer is yes.
When you edit steps (rename, reorder, add required fields), you don’t want users mid-onboarding to suddenly fail validation or lose their place. A simple approach is:
id and version (or immutable flow_version_id).flow_version_id forever.For saving progress, choose between autosave (save as the user types) and explicit “Next” saves. Many teams combine both: autosave drafts, then mark the step “complete” only on Next.
Track timestamps for reporting and troubleshooting: started_at, completed_at, and last_seen_at (plus per-step saved_at). These fields power onboarding analytics and help support teams understand where someone got stuck.
A multi-step onboarding flow is easiest to reason about when you treat it like a state machine: the user’s onboarding session is always in one “state” (current step + status), and you only allow specific transitions between states.
Instead of letting the frontend jump to any URL, define a small set of statuses per step (for example: not_started → in_progress → completed) and a clear set of transitions (for example: start_step, save_draft, submit_step, go_back, reset_step).
This gives you predictable behavior:
A step is only “completed” when both conditions are met:
Store the server’s decision alongside the step, including any error codes. This avoids cases where the UI thinks a step is done but the backend disagrees.
An easy-to-miss edge case: a user edits an earlier step and makes later steps wrong. Example: changing “Country” can invalidate “Tax details” or “Available plans.”
Handle this by tracking dependencies and re-evaluating downstream steps after each submit. Common outcomes:
needs_review (or revert to in_progress).“Back” should be supported, but it must be safe:
This keeps the experience flexible while ensuring the session’s state remains consistent and enforceable.
Your backend API is the “source of truth” for where a user is in onboarding, what they’ve entered so far, and what they’re allowed to do next. A good API keeps the frontend simple: it can render the current step, submit data safely, and recover after refreshes or network hiccups.
At minimum, design for these actions:
GET /api/onboarding → returns current step key, completion %, and any saved draft values needed to render the step.PUT /api/onboarding/steps/{stepKey} with { "data": {…}, "mode": "draft" | "submit" }POST /api/onboarding/steps/{stepKey}/nextPOST /api/onboarding/steps/{stepKey}/previousPOST /api/onboarding/complete (server verifies all required steps are satisfied)Keep responses consistent. For example, after saving, return the updated progress plus the server-decided next step:
{ "currentStep": "profile", "nextStep": "team", "progress": 0.4 }
Users will double-click, retry on poor connections, or your frontend may re-send requests after a timeout. Make “save” safe by:
Idempotency-Key header for PUT/POST requests and deduplicating by (userId, endpoint, key).PUT /steps/{stepKey} as a full overwrite of that step’s stored payload (or clearly documenting partial merge rules).version (or etag) to prevent overwriting newer data with stale retries.Return actionable messages the UI can display next to fields:
{
  "error": "VALIDATION_ERROR",
  "message": "Please fix the highlighted fields.",
  "fields": {
    "companyName": "Company name is required",
    "teamSize": "Must be a number"
  }
}
Also distinguish 403 (not allowed) from 409 (conflict / wrong step) and 422 (validation) so the frontend can react correctly.
Separate user and admin capabilities:
GET /api/admin/onboarding/users/{userId} or overrides) must be role-gated and audited.This boundary prevents accidental privilege leaks while still enabling support and operations to help users who get stuck.
The frontend’s job is to make onboarding feel smooth even when the network isn’t. That means predictable routing, reliable “resume” behavior, and clear feedback when data is being saved.
One URL per step (e.g. /onboarding/profile, /onboarding/billing) is usually the simplest to reason about. It supports browser back/forward, deep linking from emails, and makes it easy to refresh without losing context.
A single page with internal state can be fine for very short flows, but it raises the stakes for refreshes, crashes, and “copy link to continue” scenarios. If you use this approach, you’ll want strong persistence (see below) and careful history management.
Store step completion and the latest saved data on the server, not just in local storage. On page load, fetch the current onboarding state (current step, completed steps, and any draft values) and render from that.
This enables:
Optimistic UI can reduce friction, but it needs guardrails:
When a user returns, don’t dump them at step one. Prompt with something like: “You’re 60% done—continue where you left off?” with two actions:
/onboarding)This small touch reduces abandonment while respecting users who aren’t ready to complete everything immediately.
Validation is where onboarding flows either feel smooth or frustrating. The goal is to catch mistakes early, keep users moving, and still protect your system when data is incomplete or suspicious.
Use client-side validation to prevent obvious errors before a network request. This reduces churn and makes each step feel responsive.
Typical checks include required fields, length limits, basic formatting (email/phone), and simple cross-field rules (password confirmation). Keep messages specific (“Enter a valid work email”) and place them next to the field.
Treat server-side validation as the source of truth. Even if the UI validates perfectly, users can bypass it.
Server validation should enforce:
Return structured errors per field so the frontend can highlight exactly what needs fixing.
Some validations depend on external or delayed signals: email uniqueness, invitation codes, fraud signals, or document verification.
Handle these with explicit statuses (e.g., pending, verified, rejected) and a clear UI state. If a check is pending, let the user continue where possible and show when you’ll notify them or what step will unlock next.
Multi-step onboarding often means partial data is normal. Decide per step whether to:
A practical approach is “save draft always, block only on step completion.” This supports session resume without lowering your data quality bar.
Analytics for multi-step onboarding should answer two questions: “Where do people get stuck?” and “What change would improve completion?” The key is to track a small set of consistent events across every step, and make them comparable even when the flow changes over time.
Track the same core events for every step:
step_viewed (user saw the step)step_completed (user submitted and passed validation)step_failed (user attempted submission but failed validation or server checks)flow_completed (user reached the final success state)Include a minimal, stable context payload with each event: user_id, flow_id, flow_version, step_id, step_index, and a session_id (so you can separate “one sitting” from “over multiple days”). If you support resume, also include resume=true/false on step_viewed.
To measure drop-off per step, compare counts of step_viewed vs. step_completed for the same flow_version. To measure time spent, capture timestamps and compute:
step_viewed → step_completedstep_viewed → next step_viewed (useful when users skip)Keep time metrics grouped by version; otherwise improvements can be hidden by mixing old and new flows.
If you A/B test copy or reorder steps, treat it as part of the analytics identity:
experiment_id and variant_id to every eventstep_id stable even if display text changesstep_id the same and rely on step_index for positionBuild a simple dashboard that shows completion rate, drop-off by step, median time per step, and “top failed fields” (from step_failed metadata). Add CSV exports so teams can review progress in spreadsheets and share updates without needing direct access to your analytics tool.
A multi-step onboarding system will eventually need day-to-day operational control: product changes, support exceptions, and safe experimentation. Building a small internal admin area prevents engineering from becoming the bottleneck.
Start with a simple “flow builder” that lets authorized staff create and edit onboarding flows and their steps.
Each step should be editable with:
Add a preview mode that renders the step as an end user would see it. This catches confusing copy, missing fields, and broken branching before it reaches real users.
Avoid editing a live flow in place. Instead, publish versions:
Rollouts should be configurable per version:
This reduces risk and gives you clean comparisons when you measure completion and drop-off.
Support teams need tools to unblock users without manual database edits:
Every admin action should be logged: who changed what, when, and the before/after values. Restrict access with roles (view-only, editor, publisher, support override) so sensitive actions—like resetting progress—are controlled and traceable.
Before you ship a multi-step onboarding flow, assume two things will happen: users will take unexpected paths, and something will fail mid-way (network, validation, permissions). A good launch checklist proves the flow is correct, protects user data, and gives you early warning signals when reality diverges from your plan.
Start with unit tests for your workflow logic (states and transitions). These tests should verify that each step:
Then add integration tests that exercise your API: saving step payloads, resuming progress, and rejecting invalid transitions. Integration tests are where you catch “works locally” issues like missing indexes, serialization bugs, or version mismatches between frontend and backend.
E2E tests should cover at least:
Keep E2E scenarios small but meaningful—focus on the few paths that represent most users and the most revenue/activation impact.
Apply least privilege: onboarding admins shouldn’t automatically get full access to user records, and service accounts should only touch the tables and endpoints they need.
Encrypt where it matters (e.g., tokens, sensitive identifiers, regulated fields) and treat logs as a data leak risk. Avoid logging raw form payloads; log step IDs, error codes, and timing instead. If you must log payload snippets for debugging, redact fields consistently.
Instrument onboarding like a product funnel and an API.
Track errors by step, save latency (p95/p99), and resume failures. Set alerts for sudden drops in completion rate, spikes in validation failures on a single step, or elevated API error rates after a release. This lets you fix the broken step before support tickets pile up.
If you’re implementing a step-based onboarding system from scratch, most time goes into the same building blocks described above: step routing, persistence, validations, progress/state logic, and an admin interface for versioning and rollouts. Koder.ai can help you prototype and ship these pieces faster by generating full-stack web apps from a chat-driven spec—typically with a React frontend, a Go backend, and a PostgreSQL data model that maps cleanly to flows, steps, and step responses.
Because Koder.ai supports source code export, hosting/deployment, and snapshots with rollback, it’s also useful when you want to iterate on onboarding versions safely (and recover quickly if a rollout hurts completion).
Use a multi-step flow when setup is more than a single form—especially if it includes prerequisites (e.g., workspace creation), verification (email/phone/KYC), configuration (billing/integrations), or branching by role/plan/region.
If users need context to answer correctly, splitting it into steps reduces errors and drop-off.
Define success as users reaching value, not finishing screens. Common metrics:
Also track resume success (users can leave and continue without losing progress).
Start by listing user types (e.g., self-serve new user, invited user, admin-created account) and define for each:
Then encode skip rules so each persona lands on the right next step, not step one.
Write “done” as backend-checkable criteria, not UI completion. For example:
This lets the server reliably decide whether onboarding is complete—even if the UI changes over time.
Start with a mostly linear backbone and add conditional branches only when the experience truly differs (role, plan, region, use case).
Document branches as explicit if/then rules (e.g., “If region = EU → show VAT step”), and keep step names action-focused (“Confirm email,” “Invite teammates”).
Prefer one URL per step (e.g., /onboarding/profile) when the flow is more than a couple screens. It supports refresh safety, deep linking (from emails), and browser back/forward.
Use a single page with internal state only for very short flows—and only if you have strong persistence to survive refreshes/crashes.
Treat the server as the source of truth:
This enables refresh safety, cross-device continuation, and stability when flows get updated.
A practical minimal model is:
Version your flow definitions so in-progress users don’t break when you add/reorder steps. Progress should reference a specific .
Treat onboarding as a state machine with explicit transitions (e.g., start_step, save_draft, submit_step, go_back).
A step is “completed” only when:
When earlier answers change, re-evaluate dependencies and mark downstream steps as or revert them to .
A solid baseline API includes:
GET /api/onboarding (current step + progress + drafts)PUT /api/onboarding/steps/{stepKey} with mode: draft|submitPOST /api/onboarding/complete (server verifies all requirements)Add (e.g., ) to protect against retries/double-clicks, and return structured field-level errors (use 403/409/422 meaningfully) so the UI can respond correctly.
flow_version_idneeds_reviewin_progressIdempotency-Key