May 10, 2025·8 min
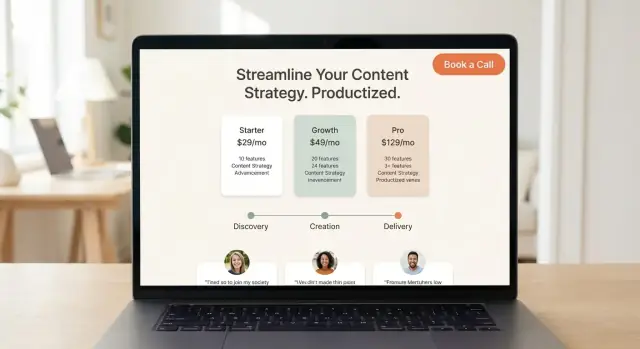
How to Build a Website for a Productized Service Offer
Learn how to build a high-converting website for a productized service: positioning, packages, pricing, proof, onboarding, and the pages you need to launch.
What a Productized Service Website Must Do
A productized service is a service that’s been turned into a clear, repeatable “product”: a defined scope, a fixed (or simple) price, a standard process, and a predictable outcome. Instead of selling custom proposals, you sell a package.
For a productized offer, your website isn’t just a brochure—it’s the primary sales tool. It has to explain what you do, who it’s for, what it costs, and what happens after someone clicks “buy” or “book,” without requiring a long email thread.
The real goal: clarity that converts
You don’t need a huge site with dozens of pages. You need a small set of pages that answer the buyer’s questions quickly and remove uncertainty:
- What is this, and what result do I get?
- Is it a fit for my situation?
- What exactly is included (and not included)?
- How much does it cost, and how do I start?
- Can I trust you to deliver?
When a productized service website works, it does three things at once: positions the offer, pre-qualifies the buyer, and moves them to a single next step.
What you’ll have by the end of this guide
By the end of this article, you’ll be able to:
- Choose a lean website structure that fits a productized service
- Write conversion-focused copy for your homepage, packages, and pricing
- Add the essentials for trust (testimonials, samples, case studies)
- Show a simple onboarding process so buyers know what happens next
- Launch with a practical checklist for SEO, tracking, and ongoing updates
Clarify Your Niche, Offer, and Promise
If your website sells a productized service, clarity beats creativity. Visitors should know within seconds: who you help, what you deliver, and why it’s a good fit for their situation. When that’s clear, pricing, packages, and calls-to-action become much easier to say “yes” to.
Pick one clear niche (and the problem)
Start by choosing a specific group of buyers and a specific problem you solve for them. “Small businesses” is too broad; “independent accounting firms” is clearer. “Marketing help” is vague; “monthly LinkedIn content that generates inbound leads” is concrete.
A helpful prompt:
- Audience: who exactly is buying?
- Pain: what’s the frustrating, expensive, or time-consuming issue?
- Outcome: what changes after they hire you?
Write a simple positioning statement
Use a one-sentence statement you can place near the top of the homepage and reuse across the site:
I help [who] achieve [outcome] in/within [timeframe] by delivering [service].
Examples:
- “We help B2B SaaS teams publish 8 SEO articles per month so they can grow organic signups—without hiring in-house writers.”
- “We help coaches turn long videos into 20 short clips every week within 48 hours.”
Only include a timeframe if you can reliably deliver it.
Clarify what you don’t do
Saying “no” on your website reduces wrong leads and support emails. Add a short “Not a fit if…” note or a small list:
- Not a fit if you need same-day turnaround
- We don’t handle paid ads (only landing pages)
- We don’t work with regulated medical claims
This protects your delivery model and makes the right buyers feel more confident.
Choose Your Conversion Path and Primary Call-to-Action
A productized service site should guide people to one clear next step. If visitors have to “figure out what to do,” they’ll bounce—or they’ll email questions that your website could have answered.
Pick one primary CTA (and commit to it)
Choose the action that matches how your offer is bought:
- Book a call if you need to qualify clients, confirm fit, or scope exceptions.
- Start checkout if the package is standardized and you can deliver without a call.
- Request invite / join waitlist if you have limited capacity, run cohorts, or only accept certain industries.
Once you choose, make it your default button label across the site (header, hero, mid-page, and footer). Secondary CTAs can exist, but they should never compete visually.
Design the “new visitor path” like a short story
Most first-time visitors need the same sequence of answers. A clean path often looks like:
Homepage → Offer → Proof → Pricing → CTA
In practice:
- Homepage: what you do, who it’s for, and the main outcome.
- Offer page (or /services): what’s included, timeline, boundaries.
- Proof: testimonials, case studies, or samples that reduce perceived risk.
- Pricing: a simple decision view.
- CTA: checkout, booking, or invite request.
You don’t have to force this into a complicated funnel. You’re simply arranging pages so a visitor can say “yes” without opening ten tabs.
Remove distractions that steal clicks
If something isn’t helping the primary CTA, consider cutting it—at least for launch.
Common things to remove or demote:
- A blog (especially if it sends people into endless reading instead of buying)
- Long menus with lots of “nice-to-have” pages
- Extra CTAs like “Download,” “Subscribe,” and “Contact” in the main navigation
If you need a blog for SEO later, keep it accessible but not prominent (e.g., in the footer). Your top navigation should feel like a guided route, not a directory.
For examples of lean navigation and high-intent layouts, see /blog/core-page-list.
The Core Page List (Keep It Lean)
A productized service site works best when it’s small, obvious, and quick to scan. Every extra page is another chance for a visitor to get lost, hesitate, or email you questions you’ve already answered.
The five pages that do the job
1) Homepage
Your homepage should instantly answer three questions: who it’s for, what you deliver, and why someone should trust you. Add one clear primary call-to-action (CTA) above the fold (for example, “See packages” or “Book a call”), then repeat it near the bottom.
2) Offer page (service landing page)
This is the “what you get” page. Spell out what’s included, your typical timeline, and—just as importantly—your boundaries (what’s not included, number of revisions, communication windows). A simple “How it works” section reduces sales calls and sets expectations.
3) Pricing page
Make comparison easy: 2–4 packages, each with who it’s best for, key deliverables, turnaround time, and the next step (checkout, booking, or request access). Add a small FAQ right on the pricing page to remove friction at the decision point.
4) Proof page
Keep social proof in one place: testimonials, short case studies, and examples/samples. Link out to it from the homepage and pricing page when people need reassurance.
5) Contact/Booking + Thank You
One page to start (book, pay, or apply) and a simple Thank You page that confirms what happens next. The Thank You page is also a great place to link to your onboarding steps or intake form.
Optional (only if needed)
Add pages like “About” or “Blog” only if they actively help conversion—or you have a clear plan to maintain them.
Homepage Copy That Explains the Offer Fast
Your homepage has one job: help the right person understand what you do and what happens next—within seconds. If they have to decode your offer, they’ll bounce and keep shopping.
Start with a plain headline: audience + outcome
Your headline should tell visitors who it’s for and what they get in everyday language.
Examples of the structure:
- “Design sprints for SaaS teams that need a clearer onboarding flow.”
- “Weekly short-form video editing for coaches who want consistent content.”
Avoid clever taglines. Clarity beats personality at the top of the page.
Add 3–5 bullets that answer the first questions
Right under the headline, add a small set of bullets that quickly remove doubt. Aim for deliverables, timeframe, and your differentiator.
For example:
- Deliverables: “4 ad concepts + 12 variations, ready to launch”
- Timeframe: “First delivery in 5 business days”
- Scope guardrails: “One brand, one offer per order”
- Differentiator: “Conversion-focused copy included”
- Process hint: “Async reviews in one shared doc”
This is not the place for a long bio. It’s the place for purchase-level specifics.
Choose one primary CTA and keep it consistent
Above the fold, use one strong call-to-action and make it obvious what happens when clicked.
Good primary CTAs:
- “Book a 15-min fit call”
- “View packages and pricing”
- “Start checkout”
Then repeat the same CTA after key sections (packages preview, proof, process). Consistency reduces decision fatigue.
Add “Who it’s for / not for” to qualify leads early
A simple qualifier section saves you time and makes buyers feel understood.
Who it’s for might mention team size, stage, or use case. Not for can politely rule out mismatched expectations (e.g., “not for ongoing strategy consulting” or “not for multi-brand organizations”).
This one block can cut pre-sales email back-and-forth and improve conversion quality.
Package Design: Turn Services Into Simple Options
Add onboarding and intake
Create a simple client intake or request workflow with a real backend when you need it.
A productized service works when a buyer can quickly match their problem to a clear package—without negotiating scope on a call. Your website should make the choice feel obvious: “This is the option for me.”
Start with 2–4 packages (not 7)
Aim for a small set of tiers with plain-English names tied to outcomes, not internal effort. For example, “Launch Copy,” “Conversion Refresh,” or “Monthly Content System” is easier to understand than “Silver / Gold / Platinum.” Each package should answer: What will I have when this is done?
Spell out inclusions and exclusions
Package pages convert better when boundaries are visible. Show what’s included as deliverables, then add a short “Not included” section to prevent mismatched expectations.
- Inclusions (deliverables): what the client receives (pages, designs, audits, drafts, templates).
- Exclusions (boundaries): what’s outside scope (extra rounds, additional pages, paid ads management, custom integrations).
This isn’t about being strict—it’s about protecting a predictable process.
Make timelines and collaboration concrete
People buy confidence. Add a few specifics to every tier:
- Timeline: e.g., “5 business days,” “2 weeks,” or “delivered every Friday.”
- Revisions: “1 round,” “2 rounds,” or “unlimited for 7 days” (if you can truly support it).
- Communication: where updates happen (email, Slack, a client portal), and how often they’ll hear from you.
If your service depends on client input, state what you need and by when (brief, assets, approvals).
Use add-ons sparingly
Add-ons can increase average order value, but only if they stay simple. Limit to a small set that’s easy to understand and purchase (e.g., “Extra page,” “Rush delivery,” “Additional revision round”). If add-ons require a custom quote, they’re not really add-ons—keep them off the package menu.
Pricing Page: Make the Decision Easy
A pricing page isn’t where you “justify” your costs—it’s where you help the right buyer say “yes” without needing three emails to understand what they’re buying.
Pick one approach: clear prices (recommended)
If your offer is productized, show pricing clearly. List each package with a short “best for” line, the exact deliverable, and the turnaround time. Keep the page scannable: visitors should understand the difference between options in under a minute.
If you truly can’t price up front, don’t hide behind vagueness—explain how quotes work and what affects the final number. But choose one approach and commit, so you don’t confuse people.
Explain what’s required to start
Make the first step unmissable. Spell out whether it’s:
- A one-time payment
- A deposit to reserve a slot (and when the remainder is due)
- A subscription (what renews, when it renews, and how to cancel)
Then add a clear CTA directly under each package (e.g., “Start with Standard” or “Subscribe to Pro”). If checkout happens elsewhere, say what happens after they click.
Add risk reducers (only if they’re real)
Risk reducers lower hesitation when pricing is visible. Common examples:
- Cancellation terms (what’s refundable and what isn’t)
- Pause options for subscriptions (how often, for how long)
- A guarantee (only if you can honor it without exceptions)
Use plain language and link to details rather than burying them in fine print.
Make /pricing easy to find
Link to /pricing in the main navigation, and don’t be shy about pointing to it from key CTAs across the site. If someone is ready to buy, the fastest path should always be obvious.
Social Proof: Testimonials, Case Studies, and Samples
Ship it without extra steps
Go from draft to a hosted website when you are ready to launch.
Social proof is the “quiet closer” on a productized service website. Because your offer is standardized, buyers want reassurance that the same promise will apply to them—without a long sales call.
Testimonials that reduce hesitation
Use short testimonials that answer the buyer’s unspoken questions: Will this work? Will it be fast? Will it be easy to work with you? Prioritize quotes that mention results, speed, and the experience of collaborating.
Keep each one scannable: one to three sentences, a name, role, and (if possible) the company. If you can, add a single detail that makes it feel real (“delivered in 48 hours,” “cut revisions from 6 to 2,” “increased sign-ups”).
Mini case studies: small, specific, believable
Add 2–4 mini case studies that follow a simple arc:
- Problem: what was broken or missing
- Approach: what you did (aligned with your package scope)
- Outcome: the measurable or observable result
These don’t need to be long. A tight 120–180 words each often outperforms a big wall of text because it’s easier to skim and compare.
Samples/portfolio with context (not just screenshots)
Show samples or a portfolio, but add a line or two of context so visitors understand the work, not just the visuals: what you delivered, what constraints you worked under, and what changed after. If you can’t share client work, create “sanitized” examples or a demo project that matches your typical package.
Logos and credibility signals
Logos can help, but only include them if you have permission and it’s accurate. When in doubt, use plain-text client names or categories (“Series A fintech,” “local clinic”) to stay honest while still building trust.
Onboarding: Show the Process Before They Buy
People don’t just buy your deliverable—they buy the experience of getting it. A clear onboarding flow reduces hesitation, prevents misunderstandings, and cuts down on back-and-forth emails.
Show the exact steps after payment/booking
Spell out what happens immediately after someone checks out or books a call. Keep it simple and chronological:
-
Intake (they provide access, assets, and context)
-
Kickoff (you confirm scope, timeline, and success criteria)
-
Delivery (draft → feedback → final handoff, or whatever fits your service)
Include time expectations next to each step (e.g., “Intake: ~10 minutes” or “First draft in 3 business days”). Clarity here can be the difference between “I’ll think about it” and “Let’s do this.”
Create an intake form checklist (so work can start fast)
Your intake form should feel like a helpful checklist, not homework. Ask only what you need to begin:
- Access: website/CMS login, analytics, ad accounts, repo access (as relevant)
- Assets: brand guidelines, logos, copy docs, images, past examples
- Goals: what “good” looks like, target audience, primary metric
- Constraints: legal/compliance notes, must-use tools, deadlines, approvals
If missing info blocks progress, say so up front (“Work begins once access + assets are received”).
Set communication expectations
Define how you’ll work together: response time (e.g., 1 business day), meeting cadence (none / weekly / kickoff-only), and status updates (email every Friday or updates in a shared doc).
If your process needs more detail, link to a dedicated page like /onboarding so buyers can review it without hunting through emails.
FAQ and Terms: Reduce Back-and-Forth
A strong FAQ turns “quick questions” into confident buyers. It’s also where you quietly set expectations, so projects run smoothly and support stays manageable.
Answer the objections buyers actually have
Start with the decision-stoppers:
- Timeline: When does work start after purchase? What’s the typical turnaround per request?
- Revisions: How many are included, and what happens if they need more?
- Scope: What’s included vs. out of scope (and how out-of-scope work is handled)?
- Fit: Who this is best for—and who should not buy.
Keep answers specific. “Usually fast” is vague; “2 business days per request” is clear.
Define boundaries (without sounding defensive)
Productized services work when requests are standardized. Spell out definitions in plain language:
- What counts as “one request”: e.g., “one landing page wireframe” or “one set of 5 ad variations.”
- What counts as “one revision”: e.g., “one round of changes based on a single compiled list.”
- How you handle mixed requests: if they submit three unrelated items, do they become three separate requests?
Cover the practical questions
These reduce follow-ups and build trust:
- Tools and communication: where requests are submitted, how approvals work.
- Ownership: who owns the final files, and when rights transfer.
- Handoff: what deliverables they receive (source files, links, exports) and how long you keep backups.
Add a “Still unsure?” prompt
End the FAQ with a short nudge that points back to your primary action.
Still unsure? If you’re ready to get started, go to /pricing to choose a package. If you want to confirm fit first, use the same page to book a short intro call.
SEO and Tracking for a Productized Service Site
Pick a tier that fits
Choose Free, Pro, Business, or Enterprise based on how you plan to ship.
SEO for a productized service site is mostly about clarity. You’re not trying to rank for everything—you’re trying to rank for the exact problem you solve, then measure whether visitors take the next step.
SEO basics that actually move the needle
Start with one target keyword per page. Your homepage might focus on “productized service website,” while your offer page targets a tighter phrase like “service landing page for [your niche].” Keep your page focused so Google (and humans) instantly understand what it’s about.
Use clear headings and structure:
- One H1 that states the offer
- A few H2s that answer the main questions (what it is, who it’s for, what you get)
Keep URLs readable and predictable. Examples:
- /pricing
- /faq
- /blog/is-productized-service-right-for-you
Create a small content “support system”
You don’t need a huge blog. Create 1–3 supporting posts that match buying intent and objections, such as “Is a productized service right for you?” or “Agency vs productized service: what’s the difference?” Then link those posts back to the main offer page and /pricing.
Internal links that guide decisions
Add intentional internal links between the pages people compare:
- From the offer page to /pricing (“See packages and turnaround times”)
- From /pricing to /blog (“Not sure yet? Read this first”)
- From blog posts back to the offer (“Ready for help? Start here”)
Track conversions (not just traffic)
Set up analytics and track the actions that matter: pricing-page views, “Book a call” clicks, checkout starts, and form submissions. Build a simple dashboard that shows weekly traffic, conversion rate, and the top pages driving leads—so you can improve what’s already working.
Tech Setup, Launch Checklist, and Ongoing Updates
A productized service site doesn’t need a complicated tech stack. It needs a setup that’s easy to maintain, reduces manual admin, and makes it simple for a client to say “yes” and pay.
Choose a simple stack (and stick to it)
Pick a website builder (Webflow, Squarespace) or a CMS (WordPress) based on what you can comfortably update.
If you want a faster route that still gives you real, editable code, a vibe-coding platform like Koder.ai can help you generate a productized-service website from a simple chat—then iterate on pages like /pricing and /onboarding without rebuilding everything from scratch. It’s especially useful when you want a React-based frontend with a real backend (Go + PostgreSQL) for things like client portals, bookings, or request tracking.
Then add only the essentials:
- Booking (optional): Calendly, SavvyCal, or a simple “Request a start date” form if you don’t do calls.
- Payments: Stripe + a checkout tool (or built-in payments), so clients can buy immediately after reading the offer.
- Email + forms: A form tool that can send confirmations and tag leads (HubSpot, MailerLite, ConvertKit).
If your offer requires payment first, place checkout links prominently on the homepage and /pricing.
Set up your pipeline (so nothing gets lost)
At minimum, connect forms to:
- An autoresponder: “We got your request—here’s what happens next.”
- A basic CRM (HubSpot) or a spreadsheet with columns like: New → Paid → In progress → Delivered.
This is where your productized service stays “productized”: fewer custom emails, fewer exceptions.
If you’re building a lightweight client portal (even just “submit a request” + status tracking), tools like Koder.ai can also be a practical way to ship and host that workflow quickly—and still support exporting source code, custom domains, and safe rollbacks via snapshots.
Pre-launch checklist
Before sharing the site, do a quick pass for the issues that kill conversions:
- Mobile layout (especially pricing and CTA buttons)
- Page speed (compress images, avoid heavy animations)
- Every page has a clear next step (CTA)
- No broken links, forms working, confirmations sent
- Thank-you page works after booking/checkout
Ongoing updates that matter
Once live, plan a light monthly refresh:
- Rotate testimonials/samples and add new proof
- Review pricing and package names based on sales calls and objections
- Add FAQs taken from real client questions
- Check analytics for drop-off points and improve the copy where people hesitate