Oct 03, 2025·7 min
Snapshot-first development workflow for safer big changes
Learn a snapshot-first development workflow to create safe save points before schema, auth, and UI changes, and roll back without losing progress.
Learn a snapshot-first development workflow to create safe save points before schema, auth, and UI changes, and roll back without losing progress.
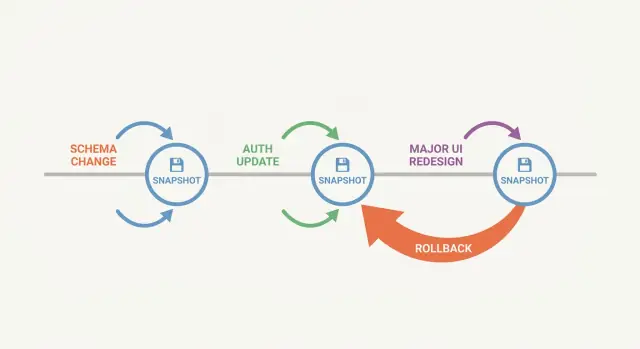
A snapshot-first workflow means you create a save point before you make a change that could break your app. A snapshot is a frozen copy of your project at a moment in time. If the next step goes sideways, you can return to that exact state instead of trying to undo a mess by hand.
Big changes rarely fail in one obvious way. A schema update can break a report three screens away. An auth tweak can lock you out. A UI rewrite can look fine with sample data, then fall apart with real accounts and edge cases. Without a clear save point, you end up guessing which change caused the problem, or you keep patching a broken version until you forget what “working” even looked like.
Snapshots help because they give you a known-good baseline, they make it cheaper to try bold ideas, and they make testing simpler. When something breaks, you can answer: “Was it still OK right after Snapshot X?”
It also helps to be clear about what a snapshot can and can’t protect. A snapshot preserves your code and configuration as they were (and on platforms like Koder.ai, it can preserve the full app state you’re working with). But it won’t fix bad assumptions. If your new feature expects a database column that doesn’t exist in production, rolling back code won’t undo the fact that a migration already ran. You still need a plan for data changes, compatibility, and deployment order.
The mindset shift is to treat snapshotting as a habit, not a rescue button. Take snapshots right before risky moves, not after something breaks. You’ll move faster and feel calmer because you always have a clean “last known good” to return to.
A snapshot pays off most when a change can break many things at once.
Schema work is the obvious one: rename a column and you might quietly break APIs, background jobs, exports, and reports that still expect the old name. Auth work is another: a small rule change can lock out admins or grant access you didn’t mean to. UI rewrites are sneaky because they often mix visual changes with behavior changes, and regressions hide in edge states.
If you want a simple rule: snapshot before anything that changes data shape, identity and access, or multiple screens at once.
Low-risk edits usually don’t need a stop-and-snapshot moment. Copy changes, minor spacing tweaks, a small validation rule, or a tiny helper function cleanup tend to have a small blast radius. You can still snapshot if it helps you focus, but you don’t need to interrupt every minor edit.
High-risk changes are different. They often work in your “happy path” tests but fail on null values in old rows, users with unusual role combinations, or UI states you don’t hit manually.
A snapshot only helps if you can recognize it quickly under pressure. The name and notes are what turn a rollback into a calm, fast decision.
A good label answers three questions:
Keep it short but specific. Avoid vague names like “before update” or “try again”.
Pick one pattern and stick to it. For example:
[WIP] Auth: add magic link (prep for OAuth)[GOLD] DB: users table v2 (passes smoke tests)[WIP] UI: dashboard layout refactor (next: charts)[GOLD] Release: billing fixes (deployed)Hotfix: login redirect loop (root cause noted)Status first, then area, then the action, then a short “next”. That last part is surprisingly helpful a week later.
Names alone aren’t enough. Use notes to capture what your future self will forget: the assumptions you made, what you tested, what’s still broken, and what you intentionally ignored.
Good notes usually include assumptions, 2-3 quick test steps, known issues, and any risky details (schema tweaks, permission changes, routing changes).
Mark a snapshot as GOLD only when it’s safe to return to without surprises: basic flows work, errors are understood, and you could continue from there. Everything else is WIP. This small habit prevents rolling back to a point that only looked stable because you forgot the one big bug you left behind.
A solid loop is simple: only move forward from known-good points.
Before you snapshot, make sure the app actually runs and the key flows behave. Keep it small: can you open the main screen, sign in (if your app has it), and complete one core action without errors? If something is already flaky, fix that first. Otherwise your snapshot preserves a problem.
Create a snapshot, then add a one-line note about why it exists. Describe the upcoming risk, not the current state.
Example: “Before changing users table + adding organization_id” or “Before auth middleware refactor to support SSO”.
Avoid stacking multiple big changes in one iteration (schema plus auth plus UI). Pick a single slice, finish it, and stop.
A good “one change” is “add a new column and keep old code working” rather than “replace the whole data model and update every screen”.
After each step, run the same quick checks so results are comparable. Keep it short so you’ll actually do it.
When the change is working and you have a clean baseline again, take another snapshot. That becomes your new safe point for the next step.
Database changes feel “small” right up to the moment they break signup, reports, or a background job you forgot existed. Treat schema work as a sequence of safe checkpoints, not one big leap.
Start with a snapshot before you touch anything. Then write a plain-language baseline: which tables are involved, which screens or API calls read them, and what “correct” looks like (required fields, unique rules, expected row counts). This takes minutes and saves hours when you need to compare behavior.
A practical set of save points for most schema work looks like this:
Avoid a single huge migration that renames everything at once. Split it into smaller steps you can test and roll back.
After each checkpoint, verify more than the happy path. CRUD flows that rely on changed tables matter, but exports (CSV downloads, invoices, admin reports) are just as important because they often use older queries.
Plan the rollback path before you start. If you add a new column and begin writing to it, decide what happens if you revert: will the old code ignore the column safely, or do you need a reverse migration? If you might end up with partially migrated data, decide how you’ll detect it and finish it, or how you’ll abandon it cleanly.
Auth changes are one of the fastest ways to lock yourself (and your users) out. A save point helps because you can try a risky change, test it, and revert quickly if needed.
Take a snapshot right before you touch auth. Then write down what you have today, even if it feels obvious. This prevents “I thought admins could still log in” surprises.
Capture the basics:
When you start changing things, move one rule at a time. If you change role checks, token logic, and login screens together, you won’t know what caused the failure.
A good rhythm is: change one piece, run the same small checks, then snapshot again if it’s clean. For example, when adding an “editor” role, implement creation and assignment first and confirm logins still work. Then add one permission gate and retest.
After the change, verify access control from three angles. Normal users shouldn’t see admin-only actions. Admins must still reach settings and user management. Then hit the edge cases: expired sessions, password reset, disabled accounts, and users signing in with a method you didn’t use during testing.
One detail people miss: secrets often live outside the code. If you roll back code but keep new keys and callback settings, auth can break in confusing ways. Leave clear notes about any environment changes you made or need to revert.
UI rewrites feel risky because they combine visual work with behavioral changes. Create a save point when the UI is stable and predictable, even if it isn’t pretty. That snapshot becomes your working baseline: the last version you’d ship if you had to.
UI rewrites fail when treated as one big switch. Split the work into slices that can stand on their own: one screen, one route, or one component.
If you’re rewriting checkout, slice it into Cart, Address, Payment, and Confirmation. After each slice, match the old behavior first. Then improve layout, copy, and small interactions. When that slice is “done enough” to keep, snapshot it.
After each slice, run a quick retest focused on what typically fails during rewrites:
A common failure looks like this: the new Profile screen layout is nicer, but one field no longer saves because a component changed the payload shape. With a good checkpoint, you can roll back, compare, and reapply the visual improvements without losing days of work.
Rolling back should feel controlled, not like a panic move. First decide whether you need a full rollback to a known-good point, or a partial undo of one change.
A full rollback makes sense when the app is broken in many places (tests fail, server won’t start, login is locked out). Partial undo fits when one piece went wrong, like a single migration, a route guard, or a component that causes crashes.
Treat your last stable snapshot as home base:
Then spend five minutes on basics. It’s easy to roll back and still miss a quiet break, like a background job that no longer runs.
Quick checks that catch most problems:
Example: you tried a big auth refactor and blocked your admin account. Roll back to the snapshot from right before the change, verify you can log in, then reapply edits in smaller steps: roles first, then middleware, then UI gating. If it breaks again, you’ll know exactly which step caused it.
Finally, leave a short note: what broke, how you noticed, what fixed it, and what you’ll do differently next time. That turns rollbacks into learning instead of lost time.
Rollback pain usually comes from unclear save points, mixed changes, and skipped checks.
Saving too rarely is a classic mistake. People push through a “quick” schema tweak, a small auth rule change, and a UI adjustment, then discover the app is broken with no clean place to return to.
The opposite problem is saving constantly without notes. Ten snapshots named “test” or “wip” are basically one snapshot because you can’t tell which one is safe.
Mixing multiple risky changes in a single iteration is another trap. If schema, permissions, and UI changes land together, a rollback becomes a guessing game. You also lose the option to keep the good part (like a UI improvement) while reverting the risky part (like a migration).
One more issue: rolling back without checking data assumptions and permissions. After a rollback, the database might still contain new columns, unexpected nulls, or partially migrated rows. Or you might restore old auth logic while user roles were created under new rules. That mismatch can look like “rollback didn’t work” when it actually did.
If you want a simple way to avoid most of this:
Snapshots work best when paired with quick checks. These checks aren’t a full test plan. They’re a small set of actions that tell you, fast, whether you can keep going or should revert.
Run these right before you take the snapshot. You’re proving the current version is worth saving.
If something is already broken, fix that first. Don’t snapshot a problem unless you’re intentionally preserving it for debugging.
Aim for one happy path, one error path, and a permissions sanity check.
Imagine you’re adding a new role called “Manager” and redesigning the Settings screen.
Start from a stable build. Run the pre-change checks, then snapshot with a clear name, for example: “pre-manager-role + pre-settings-redesign”.
Do the backend role work first (tables, permissions, API). When roles and access rules behave correctly, snapshot again: “roles-working”.
Then begin the Settings UI redesign. Before a major layout rewrite, snapshot: “pre-settings-ui-rewrite”. If the UI becomes messy, roll back to that point and try a cleaner approach without losing the good role work.
When the new Settings UI is usable, snapshot: “settings-ui-clean”. Only then move on to polish.
Try this on a small feature this week. Pick one risky change, place two snapshots around it (before and after), and practice one rollback on purpose.
If you’re building on Koder.ai (koder.ai), its built-in snapshots and rollback make this workflow easy to keep up with while you iterate. The goal is simple: make big changes feel reversible, so you can move quickly without gambling your best working version.
A snapshot is a frozen save point of your project at a specific moment. The default habit is: take a snapshot right before a risky change, so you can return to a known-good state if something breaks.
It’s most helpful when failures are indirect (a schema change breaking a report, an auth tweak locking you out, a UI rewrite failing with real data).
Snapshot before changes with a big blast radius:
For small edits (copy tweaks, minor spacing, tiny refactors), you usually don’t need to stop and snapshot every time.
Use a consistent pattern that answers:
A practical format is: STATUS + Area + Action (+ next step).
Examples:
Mark a snapshot GOLD only when you’d be happy to return to it and continue work without surprises.
A good GOLD snapshot usually means:
Everything else is . This prevents rolling back to something that stable but had a major unresolved bug.
Keep checks short and repeatable so you’ll actually do them:
The goal isn’t full testing—just proving you still have a safe baseline.
A practical sequence of save points is:
Take a snapshot before touching auth, then write down what exists today:
Then change one rule at a time, retest, and snapshot again if it’s clean. Also note any environment changes—rolling back code won’t automatically revert secrets or external settings.
Break the rewrite into slices you can keep independently:
After each slice, retest what usually breaks: navigation paths, form submit/validation, loading/empty/error states, and mobile behavior. Snapshot when a slice is “done enough” to keep.
Use a controlled rollback sequence:
stable-after-rollback.This turns a rollback into a reset to “home base,” instead of a panic undo.
Common mistakes:
Best default: snapshot at decision points (before/after one risky change), add one sentence of notes, and keep risky work separated by type.
[WIP] Auth: add magic link (next: OAuth)[GOLD] DB: users v2 (passes smoke tests)Avoid names like “test” or “before update”—they’re hard to trust when you’re under pressure.
Default rule: avoid one giant rename-everything migration. Split changes so you can test and revert safely.