Sep 06, 2025·8 min
How Vibe Coding Speeds Up Build–Measure–Learn for Discovery
Learn how vibe coding shortens the Build–Measure–Learn loop with faster prototypes, tighter feedback, and smarter experiments—so teams discover winning ideas sooner.
Learn how vibe coding shortens the Build–Measure–Learn loop with faster prototypes, tighter feedback, and smarter experiments—so teams discover winning ideas sooner.
Product discovery is mostly a learning problem: you’re trying to find out what people actually need, what they’ll use, and what they’ll pay for—before you invest months building the wrong thing.
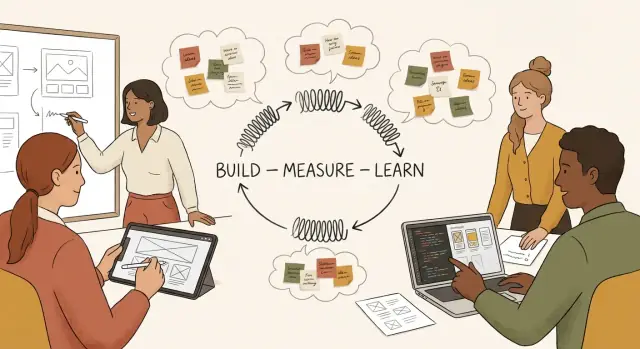
The Build–Measure–Learn loop is a simple cycle:
The goal isn’t “build faster.” It’s reduce the time between a question and a reliable answer.
In a product context, vibe coding is rapid, exploratory building—often with AI-assisted coding—where you focus on expressing intent (“make a flow that lets users do X”) and quickly shaping working software that feels real enough to test.
It’s not the same as shipping messy production code. It’s a way to:
Vibe coding only helps if you still measure the right things and stay honest about what your prototype can prove. Speed is useful when it shortens the loop without weakening the experiment.
Next, we’ll translate assumptions into experiments you can run this week, build prototypes that generate reliable signals, add lightweight measurement, and make faster decisions without fooling yourself.
Product discovery rarely fails because teams don’t have ideas. It slows down because the path from “we think this might work” to “we know” is full of friction—much of it invisible when you’re planning the work.
Even simple experiments get stuck behind setup time. Repos need to be created, environments configured, analytics debated, permissions requested, and pipelines fixed. A one-day test quietly turns into two weeks because the first few days are spent just getting to “hello world.”
Then comes overengineering. Teams often treat a discovery prototype like a production feature: clean architecture, edge-case handling, full design polish, and refactors “so we don’t regret it later.” But discovery work exists to reduce uncertainty, not to ship a perfect system.
Stakeholder waiting is another loop-killer. Feedback cycles depend on reviews, approvals, legal checks, brand sign-off, or simply getting time on someone’s calendar. Each wait adds days, and the experiment’s original question gets diluted as people chime in with new preferences.
When it takes weeks to test a hypothesis, the team can’t rely on fresh evidence. Decisions get made from memory, internal debate, and the loudest viewpoint:
None of these are inherently wrong, but they’re substitutes for direct signal.
The real cost of slow discovery isn’t just velocity. It’s lost learning per month. Markets move, competitors launch, and customer needs shift while you’re still preparing to run a test.
Teams also burn energy. Engineers feel like they’re doing busywork. Product managers feel stuck negotiating process instead of discovering value. Momentum drops, and eventually people stop proposing experiments because “we’ll never get to it.”
Speed alone isn’t the target. The goal is to shorten the time between assumption and evidence while keeping the experiment trustworthy enough to guide a decision. That’s where vibe coding can help: reducing setup and build friction so teams can run more small, focused tests—and learn sooner—without turning discovery into guesswork.
Vibe coding compresses the Build–Measure–Learn loop by turning “we think this could work” into something people can actually click, use, and react to—fast. The goal isn’t to ship a perfect product sooner; it’s to get to a reliable signal sooner.
Most discovery cycles don’t slow down because teams can’t code—they slow down because of everything around the code. Vibe coding removes friction in a few repeatable places:
Traditional planning often tries to reduce uncertainty before building. Vibe coding flips that: build a small artifact to reduce uncertainty through use. Instead of debating edge cases in meetings, you create a narrow slice that answers one question—then let evidence drive the next step.
Compressed loops work best when your experiments are:
Before: 1 day scoping + 2 days setup/UI + 2 days integration + 1 day QA = ~6 days to learn “users don’t understand step 2.”
After vibe coding: 45 minutes scaffold + 90 minutes assemble key screens + 60 minutes mocked integration + 30 minutes basic tracking = ~4 hours to learn the same thing—and iterate again the same day.
Vibe coding is best when your goal is learning, not perfection. If the decision you’re trying to make is still uncertain—“Will people use this?” “Do they understand it?” “Will they pay?”—then speed and flexibility beat polish.
A few places where vibe-coded experiments shine:
These tend to be easy to scope, easy to measure, and easy to roll back.
Vibe coding is a bad fit when mistakes are expensive or irreversible:
In these cases, treat AI-assisted speed as supportive—not the primary driver.
Before you start, answer four questions:
If risk is low, reversible is high, dependencies are minimal, and audience can be limited, vibe coding is usually appropriate.
A thin slice isn’t a fake demo—it’s a narrow, end-to-end experience.
Example: instead of “build onboarding,” build just the first-run screen + one guided action + a clear success state. Users can complete something meaningful, and you get reliable signals without committing to the full build.
Fast iteration only helps if you’re learning something specific. The easiest way to waste a week of vibe coding is to “improve the product” without defining what you’re trying to prove or disprove.
Pick a single question that would change what you do next. Keep it behavioral and concrete, not philosophical.
Example: “Will users complete step 2?” is better than “Do users like the onboarding?” because it points to a measurable moment in the flow.
Write your assumption as a statement you can check within days—not months.
Notice how the hypothesis includes who, what action, and a threshold. That threshold is what prevents you from interpreting any outcome as a win.
Vibe coding shines when you draw hard scope boundaries.
Decide what you will build to learn fastest (prototype scope boundaries):
If the experiment is about step 2, don’t “clean up” step 5.
Choose a timebox and “stop conditions” to avoid endless tweaking.
For example: “Two afternoons to build, one day to run 8 sessions. Stop early if 6 users in a row fail at the same point.” That gives you permission to learn quickly and move on, instead of polishing your way into uncertainty.
Speed is only helpful if the prototype produces signals you can trust. The goal in the Build phase isn’t “shipping,” it’s creating a believable slice of the experience that lets users attempt the core job-to-be-done—without weeks of engineering.
Vibe coding works best when you assemble, not craft. Reuse a small set of components (buttons, forms, tables, empty states), a page template, and a familiar layout. Keep a “prototype starter” that already includes navigation, auth stubs, and a basic design system.
For data, use mock data deliberately:
Make the critical path real; keep everything else as a convincing simulation.
If you can’t measure it, you’ll debate it. Add lightweight tracking from the start:
Keep event names plain-language so everyone can read them.
Test validity depends on users understanding what to do.
A prototype that’s fast and comprehensible gives you cleaner feedback—and fewer false negatives.
Fast building is only useful if you can tell—quickly and credibly—whether the prototype moved you closer to the truth. With vibe coding, measurement should be as lightweight as the build: enough signal to make a decision, not a full analytics overhaul.
Match the method to the question you’re trying to answer:
For discovery, pick 1–2 primary outcomes tied to behavior:
Add guardrails so you don’t “win” by breaking trust: increased support tickets, higher refund rate, worse completion on core tasks.
Early discovery is about direction, not statistical certainty. A handful of sessions can expose major UX problems; tens of click-test responses can clarify preferences. Save strict power calculations for optimization (A/B tests on high-traffic flows).
Page views, time on page, and “likes” can look good while users fail to complete the job. Prefer metrics that reflect outcomes: completed tasks, activated accounts, retained usage, and repeatable value.
Speed is only useful if it leads to clear choices. The “learn” step is where vibe coding can quietly go wrong: you can build and ship so quickly that you start mistaking activity for insight. The fix is simple—standardize how you summarize what happened, and make decisions from patterns, not anecdotes.
After each test, pull signals into a short “what we saw” note. Look for:
Aim to label each observation as frequency (how often) and severity (how much it blocked progress). One strong quote is helpful, but the pattern is what earns a decision.
Use a small set of rules so you don’t renegotiate every time:
Keep a running log (one row per experiment):
Hypothesis → Result → Decision
Example:
If you want a template to make this routine stick, add it to your team’s checklist in /blog/a-simple-playbook-to-start-compressing-your-loop-now.
Speed is only helpful if you’re learning the right thing. Vibe coding can compress your cycle time so much that it becomes easy to ship “answers” that are actually artifacts of how you asked, who you asked, or what you happened to build first.
A few pitfalls show up again and again:
Fast iteration can quietly reduce quality in two ways: you accumulate hidden tech debt (harder to change later) and you accept weak evidence (“it worked for me” becomes “it works”). The risk isn’t that the prototype is ugly—it’s that your decision is built on noise.
Keep the loop fast, but put guardrails around the “measure” and “learn” moments:
Set clear expectations: tell users what’s a prototype, what data you collect, and what happens next. Keep risk minimal (no sensitive data unless necessary), provide an easy opt-out, and avoid dark patterns that push users into “success.” Fast learning is not an excuse to surprise people.
Vibe coding works best when the team treats it like a coordinated experiment, not a solo speed run. The goal is to move quickly together while protecting the few things that can’t be “fixed later.”
Start by assigning ownership for the core pieces:
This division keeps the experiment focused: the PM protects why, the designer protects what users experience, the engineer protects how it runs.
Fast iteration still needs a short, non-negotiable checklist. Require review for:
Everything else is allowed to be “good enough” for a learning loop.
Run discovery sprints (2–5 days) with two fixed rituals:
Stakeholders stay aligned when they can see progress. Share:
Concrete artifacts reduce opinion battles—and make “speed” feel trustworthy.
Vibe coding is easiest when your stack makes “build something, ship it to a few people, learn” the default path—not a special project.
A practical baseline looks like this:
exp_signup_started). Track only what answers the hypothesis.If you’re already offering a product, keep these tools consistent across experiments so teams don’t reinvent the wheel.
If you’re using an AI-assisted build workflow, it helps when the tooling supports quick scaffolding, iterative changes, and safe rollbacks. For example, Koder.ai is a vibe-coding platform where teams can create web, backend, and mobile prototypes through a chat interface—useful when you want to go from hypothesis to a testable React flow quickly, then iterate without spending days on setup. Features like snapshots/rollback and planning mode can also make rapid experiments feel safer (especially when you’re running multiple variants in parallel).
Decide early which path an experiment is on:
Make the decision explicit at kickoff and revisit after the first learning milestone.
Use a tiny checklist stored next to the experiment ticket:
Visibility beats perfection: the team stays fast, and nobody is surprised later.
This is a repeatable 7–14 day cycle you can run with vibe coding (AI-assisted coding + fast prototyping) to turn uncertain ideas into clear decisions.
Day 1 — Frame the bet (Learn → Build kickoff): Pick one assumption that, if wrong, makes the idea not worth pursuing. Write the hypothesis and success metric.
Days 2–4 — Build a testable prototype (Build): Ship the smallest experience that can produce a real signal: a clickable flow, a fake-door, or a thin end-to-end slice.
Checkpoint (end of Day 4): Can a user complete the core task in under 2 minutes? If not, cut scope.
Days 5–7 — Instrument + recruit (Measure setup): Add only the events you’ll actually use, then run 5–10 sessions or a small in-product test.
Checkpoint (end of Day 7): Do you have data you trust and notes you can quote? If not, fix measurement before building more.
Days 8–10 (optional) — Iterate once: Make one targeted change that addresses the biggest drop-off or confusion.
Days 11–14 — Decide (Learn): Choose: proceed, pivot, or stop. Capture what you learned and what to test next.
Hypothesis statement
We believe that [target user] who [context] will [do desired action]
when we provide [solution], because [reason].
We will know this is true when [metric] reaches [threshold] within [timeframe].
Metric table
Primary metric: ________ (decision driver)
Guardrail metric(s): ________ (avoid harm)
Leading indicator(s): ________ (early signal)
Data source: ________ (events/interviews/logs)
Success threshold: ________
Experiment brief
Assumption under test:
Prototype scope (what’s in / out):
Audience + sample size:
How we’ll run it (sessions / in-product / survey):
Risks + mitigations:
Decision rule (what we do if we win/lose):
Start ad hoc (one-off prototypes) → become repeatable (same 7–14 day cadence) → get reliable (standard metrics + decision rules) → reach systematic (shared backlog of assumptions, weekly review, and a library of past experiments).
Pick one assumption right now, fill in the hypothesis template, and schedule the Day 4 checkpoint. Run one experiment this week—then let the result (not the excitement) decide what you build next.
It’s rapid, exploratory building—often with AI assistance—aimed at creating a testable artifact fast (a thin end-to-end slice, fake-door, or clickable flow). The point is to reduce time from question → evidence, not to ship messy production code.
The loop is:
The goal is shortening cycle time without weakening the experiment.
Because the delays are often around the code:
Fast prototyping removes much of that friction so you can run more small tests sooner.
By saving time on repeatable tasks:
That can turn a multi-day loop into a few hours—enough to learn and iterate the same day.
Use it when downside is low and learning is high, for example:
These are usually easy to scope, easy to measure, and easy to roll back.
Avoid it (or heavily constrain it) when failures are expensive or irreversible:
In these cases, speed can help—but it shouldn’t be the main driver.
Write a hypothesis with:
Example: “At least 4/10 first-time users who reach the connect screen click ‘Connect’ within 60 seconds.”
Draw hard boundaries:
Aim for one happy path plus one common failure state.
Start with lightweight observability:
Keep event names plain-language and limit tracking to what answers the hypothesis—otherwise you’ll slow down and still debate outcomes.
Use a consistent decision rule and a simple log:
Capture each experiment as Hypothesis → Result → Decision so you don’t rewrite history later.