Nov 09, 2025·8 min
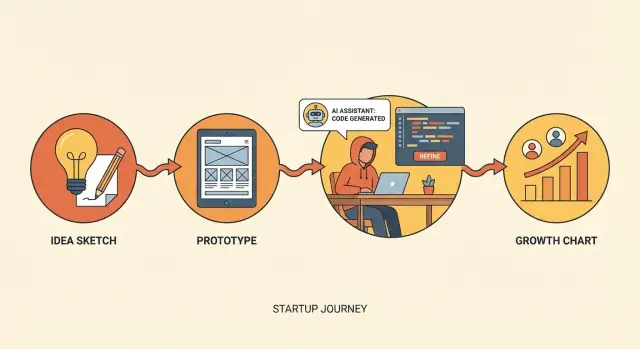
Vibe Coding in the Startup Lifecycle: From Idea to Traction
Learn how vibe coding supports each startup phase: explore ideas, prototype fast, ship an MVP, test growth channels, and iterate quickly while managing quality risks.
Learn how vibe coding supports each startup phase: explore ideas, prototype fast, ship an MVP, test growth channels, and iterate quickly while managing quality risks.
Vibe coding is a way of building software quickly by combining an AI coding assistant with a founder’s (or team’s) product intuition. You describe what you want, generate a first draft fast, and then steer the result through tight feedback loops—tweaking prompts, editing code, and testing the experience until it matches the “vibe” you’re aiming for.
In practice, platforms built for vibe coding (for example, Koder.ai) make this loop even tighter: you can go from a chat prompt to a working web/server/mobile app, iterate on the UI and flows, and then export or deploy when you’re ready—without turning early experiments into month-long engineering projects.
Think of it as rapid building for learning: you’re not trying to write the perfect system on day one. You’re trying to get something usable in front of real people so you can find out what matters.
Vibe coding still requires ownership and judgment. It’s not:
Startups use vibe coding because time and headcount are limited. It can help you:
It shines in early-stage work: prototypes, internal tools, scrappy MVP slices, and quick experiments. It struggles when reliability and scale become the main job—complex permissions, heavy data integrity requirements, compliance, and long-term maintainability.
When the stakes rise, the “vibe” needs more structure: clearer specs, stronger reviews, and more deliberate engineering.
Vibe coding fits best in the parts of the startup lifecycle where speed is a feature—not a risk. Use it to turn fuzzy ideas into testable artifacts quickly, so the team can learn what users actually want before investing heavily in “perfect” engineering.
Discovery (product discovery and problem validation): This is vibe coding’s sweet spot. You’re exploring options, testing flows, and pressure-testing assumptions. The goal isn’t clean architecture—it’s creating something you can put in front of users within days.
MVP build (minimum lovable, not maximum complete): Vibe coding still helps, but with more structure. You narrow to a small set of use cases, harden only what’s necessary, and avoid features that exist only to “finish the product.”
Early traction (experiments and growth): Vibe coding shines again for marketing pages, onboarding tweaks, feature flags, and quick experiments. You’re shipping improvements that increase activation, retention, or conversion—while keeping the core stable.
The operating rhythm is simple: build → show → measure → adjust. Each loop should answer one question (e.g., “Do users understand the value in 10 seconds?”), not ten. The outcome to optimize is learning, not perfect code.
Move carefully—or switch to more traditional engineering—when you touch:
A good rule: vibe code the edges to learn fast, and deliberately engineer the center once you know it’s worth scaling.
Early on, your goal isn’t to “build the product.” It’s to reduce uncertainty. Vibe coding helps you explore ideas quickly by treating code as a sketchpad: use an AI coding assistant to produce small, disposable prototypes that make an idea concrete enough to discuss, critique, and test.
Start with a clear problem statement (“Busy clinic admins can’t confirm appointments fast enough”), then translate it into a tiny concept demo—often in the same day. You’re not proving scalability or perfect UX yet; you’re creating something people can react to.
Vibe coding is strong here because you can generate multiple solution directions to compare in hours, not weeks. For example, you might prototype:
Seeing three approaches side-by-side makes tradeoffs obvious early.
The best prototypes are artifacts that answer questions. Instead of building real integrations, create clickable flows, sample outputs, or mock data that mimic reality just enough to test comprehension and desire.
A useful habit: document assumptions and the question each prototype should answer. Keep it short and explicit:
By the end of Phase 1, you should have a small set of prototypes that (1) make the idea tangible, (2) clarify what you’re actually betting on, and (3) set up the next step: turning what you learned into buildable hypotheses.
User research isn’t “done” when you have quotes and recordings. It’s useful when you can translate it into a clear hypothesis your team can test in days—not weeks. Vibe coding helps by turning raw conversations into testable artifacts quickly, while keeping the scope intentionally small.
Consistency is what makes interviews comparable. Use vibe coding to generate:
A simple note template you can paste into your doc:
Problem:
Trigger moment:
Current workaround:
Cost of workaround (time/money/stress):
What would “better” look like?
Top objections:
Confidence score (1–5):
Good hypotheses describe a change in the user’s world:
Before: what they do today, why it’s painful, and what they risk.
After: what becomes faster, simpler, or more certain.
Example format:
If we help [persona] go from [before] to [after], they will [take action] because [reason]. We’ll know it’s true when [signal].
Instead of debating copy internally, ship a minimal landing page that matches your hypothesis. Use it to test:
Keep it simple: headline, three bullets, one proof element (quote or stat), and a CTA.
Your goal is evidence, not features. Start with low-friction signals: emails collected, waitlist sign-ups, calls booked, replies to a follow-up question. These are strong enough to guide your next build step—without committing to a full product too early.
Phase 2 is where many teams accidentally trade learning for “building.” Vibe coding helps you stay in validation mode: move fast, keep scope tight, and treat every prototype as a question you’re trying to answer—not a product you’re trying to ship.
Define what to prototype by choosing the single flow that proves the value: the moment a user goes from “I have a problem” to “I got a result.” Skip edge cases, settings screens, role management, and perfect onboarding. If the core path doesn’t work, none of the polish matters.
A simple check: can a user complete the main task in under two minutes during a live test?
Use an AI coding assistant to generate UI scaffolds quickly—forms, tables, navigation, empty states, and dummy content—so you can spend your time on what you’re testing (the workflow and messaging). Keep it intentionally lightweight: minimal styling, minimal architecture, minimal abstractions.
To validate demand and usability without a full backend, add controlled shortcuts:
These aren’t hacks to hide problems—they’re tools to isolate what you’re measuring: willingness to try, clarity of the flow, and whether the output is actually useful.
Before user sessions, write down what “success” means. Examples:
If you don’t hit the criteria, don’t add features. Change the hypothesis, adjust the flow, and re-test. That’s prototype-to-validation—without overbuilding.
Phase 3 is where you stop treating the product like a demo and start treating it like something people can rely on—without turning it into a full-blown platform. “Minimum lovable” means the smallest feature set that still delivers the promised outcome and feels coherent, not hacked together.
Start with the user promise, not the feature wishlist. Ask: What is the one result the user is hiring us for? Then choose only the features required to reliably reach that result.
A helpful test: if a feature doesn’t reduce time-to-value, increase trust, or remove a blocker, it probably doesn’t belong in the MVP.
Before you vibe code anything, write a one-page spec that your whole team can agree on:
This keeps speed from turning into surprise scope.
Vibe coding is great for accelerating the “boring but necessary” parts:
Treat it like a fast junior dev: excellent at output, needs clear constraints and review.
If you want a tighter path from prompt → app → deployment, a dedicated vibe-coding platform like Koder.ai can help standardize this phase: it’s designed to generate and iterate on React-based web apps, Go backends with PostgreSQL, and Flutter mobile apps, with practical features like planning mode, source code export, and one-click hosting.
Prefer decisions you can unwind:
The goal isn’t perfection—it’s an MVP you can ship, learn from, and iterate on without a rewrite.
Vibe coding is great at generating momentum—but momentum without guardrails can quietly turn into flaky behavior, confusing bugs, and “why did this break?” releases. The goal isn’t heavyweight process. It’s a few lightweight rules that preserve speed while keeping your product trustworthy.
Set guardrails that run every time you push code: formatting, linting, type checks, and a thin layer of tests.
If you’re using an AI coding assistant, these tools also act like a second opinion on what it produced.
Add structured logging and error tracking from day one. When you’re iterating quickly, you need to answer: “What’s failing, for whom, and when did it start?” without guesswork.
At minimum, log key events (signup, checkout, key actions) and capture errors with request IDs and user/session context (without storing sensitive data).
Create a short “definition of shipped” checklist:
If your platform supports snapshots and rollback (Koder.ai includes this), bake that into your release habit early—it’s one of the simplest ways to keep fast iteration from turning into risky iteration.
Before merging, explicitly scan for:
These guardrails keep vibe coding fun—and keep your team from paying for speed later.
Fast shipping only helps if it’s tied to learning. A good iteration loop turns messy signals (support emails, sales calls, session notes) into a clear “what we’ll ship next” plan—and just as importantly, what we’ll stop doing.
Treat each week like a small experiment cycle:
The key is being explicit: what to build, how to measure, what to drop. That makes speed useful rather than noisy.
Vibe coding gets more powerful when you use an AI coding assistant as a product ops helper, not just a code generator. Paste in a batch of feedback and ask for:
You still make the calls, but AI helps you go from scattered comments to a crisp backlog in minutes.
Iteration dies when everything is “in progress.” Limit work-in-progress to what you can finish this week. Timebox experiments (for example, “two days to test onboarding copy”). If you can’t ship it in the timebox, shrink the scope until you can.
Maintain a simple changelog users can understand: what changed and why. It builds trust, invites better feedback, and keeps the team aligned on the learning goal behind each release.
Phase 4 is about proving you can reliably bring the right people in—and get them to their first “aha” moment—without turning your codebase into a science fair. Vibe coding works well here because most traction work is small, time-bound experiments: you’re building just enough tooling to learn what moves the needle.
Choose 1–2 traction channels per sprint so you can attribute results. Common early candidates are content (SEO or community posts), outbound (email/LinkedIn), partnerships (integrations, affiliates), and paid ads. The goal isn’t scale yet; it’s signal.
Instead of debating channel strategy for weeks, vibe code the minimum assets you need to run the test: a focused landing page, a simple signup flow, and one clear promise.
Early traction experiments fail when you can’t measure them. Use vibe coding to add lightweight plumbing:
Keep the data model small and the logs readable. If you can’t explain what a metric means in one sentence, don’t track it yet.
Activation gains often come from “small UX, big impact” work: clearer onboarding steps, better empty states, and a stronger success moment (e.g., the first report generated, first message sent, first result shared). Vibe coding helps you iterate fast while watching real user behavior.
Run pricing tests with discipline: change one variable at a time, keep tiers understandable, and document what changed so support and sales aren’t surprised. Consider limiting exposure (e.g., new visitors only) until you’re confident.
If you’re using a platform like Koder.ai, it can also simplify packaging experiments because the product itself is tiered (free, pro, business, enterprise), which is a useful mental model for your own pricing: keep each tier’s value clear, and avoid “mystery bundles.”
Vibe coding makes shipping feel effortless—which is exactly why measurement needs to stay small and disciplined. If you track everything, you’ll spend your new speed building dashboards instead of learning what users actually want.
Choose a small set of metrics that directly reflect whether the product is working:
Keep definitions simple and written down (even in a README). “Activated” should be one clear event, not five.
Start with the easiest setup that answers weekly questions. A basic dashboard plus a few alerts (drop in activation, spike in errors, rising refunds) is usually enough. The goal is to notice changes fast, not to build a perfect data warehouse.
If you already have a product analytics tool, use it. If not, log a handful of events and start with a spreadsheet-style view. When you outgrow it, you’ll know why.
An AI coding assistant can also help you summarize and tag qualitative feedback:
Every week, make one explicit “stop” decision: a feature that isn’t moving retention, a channel that isn’t activating users, or a segment that produces high support load. Vibe coding is powerful, but focus is what turns speed into traction.
Vibe coding works best when it’s treated like a team sport, not a solo sprint. The goal is to keep the speed, while making decisions traceable and quality predictable.
Define who does what before the first prompt:
One person can hold multiple roles in a tiny team, but make the “final call” explicit.
Create a small prompt template and store it in a team doc (or /playbook). A good default includes:
This reduces rework and makes outputs comparable across teammates.
Keep reviews short and specific:
After each experiment or feature spike, write a 5-line note:
What we tried → what happened → what we learned → what we’ll do next → link to PR/issue.
Over time, this becomes your internal memory: prompt patterns that work, guardrails that matter, and shortcuts you can trust.
Vibe coding is great for getting to “something real” quickly—but speed has a price. If you treat every phase like a hackathon, the product can quietly become harder to change, riskier to run, and harder to trust.
A frequent downside is a codebase that reflects every idea you tried, not the product you decided to build:
These issues don’t always show up in demos—usually they appear when real users start using the product in messy, unpredictable ways.
Vibe coding stops paying off when the cost of change rises faster than the value of shipping.
Look for patterns like:
If your team starts avoiding certain parts of the app, that’s a strong signal the prototype mindset has overstayed its welcome.
Instead of “we’ll clean it up later,” schedule short stabilization sprints that are explicitly not about new features. Typical focus areas:
The goal isn’t to abandon vibe coding—it’s to place it where it belongs. Keep it for discovery work and bounded experiments, while shifting the core product to repeatable practices: clearer ownership, defined standards, and a “make it easy to change” mindset.
A good rule: once customers rely on it, you’re no longer building a prototype—you’re operating a product.
Vibe coding is a fast way to build software by combining an AI coding assistant with your product intuition. You generate a rough first draft quickly, then steer it through tight loops of prompting, editing, and testing until it matches the intended user experience.
It’s best treated as rapid building for learning, not as a shortcut to “perfect engineering.”
Because it compresses time-to-prototype and time-to-feedback. It helps you:
For small teams, this often means learning faster with the same headcount.
No. Vibe coding still needs planning, testing, and ownership. In practice, it’s not:
Treat AI output like a draft that requires judgment and review.
It shines in Discovery and early validation because you can turn fuzzy ideas into concrete demos quickly. It also works well for early traction experiments (landing pages, onboarding tweaks, feature-flagged tests).
It struggles as the core job becomes reliability and scale—complex permissions, data integrity, compliance, and long-term maintainability.
Use a simple operating rhythm: build → show → measure → adjust. Make each loop answer one question (for example, “Do users understand the value in 10 seconds?”), then ship the smallest change that tests that question.
Keep loops short (days, not weeks) and write down what you’re measuring before you show anyone.
A testable artifact is something users can react to immediately—without you building the full system. Examples:
The goal is to test comprehension and desire, not to finish integrations.
Translate research into a clear before/after hypothesis you can test:
A practical template:
Pick the single workflow that proves value: the moment the user goes from “I have a problem” to “I got a result.” Skip settings, roles, edge-case handling, and “platform” work.
A useful check: can a user complete the main task in under two minutes during a live test? If not, tighten the flow before adding anything else.
Add lightweight guardrails that run every time:
Then review AI-generated code explicitly for security, data handling, and correctness (edge cases, retries, timeouts).
Slow down—or switch to more deliberate engineering—when you touch:
A practical rule: vibe code the edges to learn fast, and deliberately engineer the center once customers rely on it.