Apr 18, 2025·8 min
Why Build Tools and Bundlers Matter for Modern Web Apps
Build tools and bundlers turn scattered code into fast, reliable web apps. Learn how they improve performance, DX, caching, and production safety.
Build tools and bundlers turn scattered code into fast, reliable web apps. Learn how they improve performance, DX, caching, and production safety.
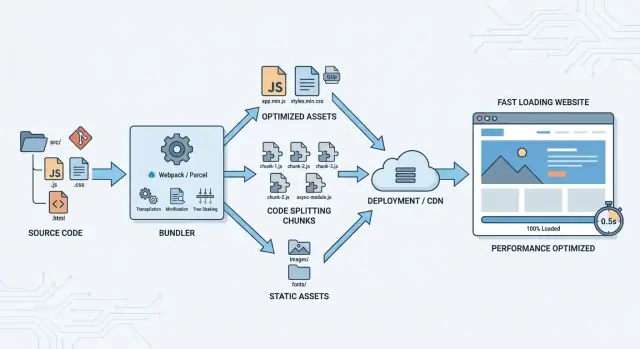
Build tools are the “assembly line” for your web app. They take the code you write for humans (separate files, modern syntax, tidy folders) and turn it into files that browsers can download and run efficiently.
A bundler is a specific kind of build tool focused on packaging: it follows your imports, collects everything your app needs, and outputs one or more optimized bundles.
Most modern apps aren’t a single script tag anymore. They’re made of many JavaScript modules, CSS files, images, fonts, and third‑party dependencies. Build tools sit between those inputs and the final “production” output.
In plain terms, they:
A typical build produces a /dist (or similar) folder containing browser-ready files such as:
app.8f3c1c.js (better caching and safer releases)These outputs are designed for the browser’s strengths: fewer requests, smaller payloads, and predictable caching.
If you’re shipping a very small static page—say, a marketing page with a tiny amount of JavaScript and no complex dependencies—you can often skip bundling and just serve plain HTML/CSS/JS.
The moment you rely on multiple modules, npm packages, or performance-sensitive loading, build tools and bundlers become less of a “nice-to-have” and more of a practical requirement.
A decade ago, many sites could ship a few JavaScript files with plain <script> tags and call it done. Modern web apps rarely work that way. Once you start building UI as reusable components, importing third‑party packages, and sharing code across routes, “just include another file” stops being manageable.
Modules let you write clearer code: import what you need, keep files small, and avoid global variables. The catch is that your project’s dependency graph is bigger than what you want the browser to reason about at runtime. A build step turns a pile of modules into output the browser can load efficiently and consistently.
Richer UI patterns (routing, state management, charts, editors, analytics) increase both dependency count and file count. Without a build step, you’d be hand-ordering scripts, juggling multiple versions of the same library, and chasing subtle “loaded too early” bugs. Build tools automate dependency management so the app starts predictably.
Teams need repeatable results across machines, branches, and CI. A build step locks down how code is transformed (TypeScript, JSX, modern JavaScript), how assets are handled, and how environments are configured. That repeatability is what makes “works on my machine” less common—and releases less stressful.
Users notice slow loads and janky interactions. Shipping less code becomes a core requirement, not a “we’ll optimize later” project. The build step is where you prepare code for production: remove development-only helpers, minimize output, and set the foundation for smarter loading strategies.
Browsers are great at running JavaScript, but they’re picky about how it arrives: lots of small files mean lots of network work, big files slow down downloads, and modern syntax may fail on older devices. Bundlers exist to package your app in a way browsers can load quickly and reliably.
A bundler can combine many modules into fewer files so the browser spends less time negotiating and scheduling downloads. This is still useful even with HTTP/2 and HTTP/3: while those protocols reduce some overhead, each file still has headers, caching rules, priorities, and execution ordering to manage.
In practice, bundlers aim for a small set of entry files that can start the app, plus additional chunks that load only when needed (covered in code splitting).
Bundlers reduce what the browser must download and read:
Smaller bundles don’t just download faster—they also parse and execute faster, which matters on mobile devices.
A bundler can transpile newer JavaScript into versions more browsers understand, but good setups do this only when needed (based on your supported browser list). That keeps modern browsers fast while still supporting older ones.
Optimized code is hard to read. Bundlers generate source maps so error reports and stack traces can point back to your original files, making production issues much easier to diagnose without shipping unminified code.
A bundled app doesn’t have to be a single, all-or-nothing download. Code splitting breaks your JavaScript into smaller chunks so the browser can load only what’s needed for the current screen, then fetch the rest on demand. The goal is simple: users see something useful sooner, especially on slower connections.
The most common approach is route-based splitting: each page (or major route) gets its own chunk. If someone lands on your marketing page, they shouldn’t pay the cost of your account settings screen.
Feature-based splitting is useful for “sometimes” functionality—like a charting library, a rich text editor, or a PDF export flow. Those chunks load only when the user actually triggers the feature.
A single large bundle often happens when every import becomes part of the initial entry point. This makes first load slower and increases the chance that small changes force users to re-download lots of code.
A practical check: if a dependency is only used on one route or behind a button, it’s a candidate for a separate chunk.
Smart loading isn’t just “later.” You can preload critical chunks you know you’ll need soon (high priority), and prefetch likely-next chunks when the browser is idle (low priority). This can make navigation feel instant without bloating the first request.
Splitting improves caching when chunks are stable: updating one feature should ideally change only its chunk, not the whole app. But if shared code is arranged poorly, many chunks can change together. Good bundlers help by extracting shared modules into shared chunks and generating predictable chunk files, reducing unnecessary cache invalidation across deployments.
Tree shaking is the build step that removes code you import but never actually use. It’s most effective with modern ES modules (import/export), where the bundler can “see” which exports are referenced and drop the rest.
A common example: you import a utility library for one helper, but the library exports dozens of functions. With tree shaking, only the referenced exports make it into the final bundle—assuming the library and your code are tree-shakeable.
Practical tips:
Bundlers try to deduplicate dependencies, but duplication can still happen when:
Auditing your lockfile and aligning versions can prevent surprisingly large bundles. Many teams also add a simple rule: if a dependency is big, it must be justified.
Bundle size control isn’t only about removing unused code—it’s also about choosing what code to ship. If one feature pulls in a large library, consider:
Intl for formatting)Tree shaking has limits. If a module has side effects (code that runs on import), bundlers must be conservative. Also watch for:
Treat bundle size like a product feature: measure it, set expectations, and keep an eye on changes during reviews.
Fast apps aren’t just about small bundles—they’re also about not downloading the same files over and over. Build tools help by producing outputs that browsers and CDNs can cache aggressively, while still updating instantly when you ship a change.
A common pattern is content hashing: the build generates filenames that include a hash derived from the file’s contents, such as app.3f2c1a.js.
That lets you set long cache lifetimes (weeks or months) because the URL is effectively unique to that exact file. If the file never changes, the filename never changes, and the browser can reuse it without re-downloading.
The flip side is automatic cache busting. The moment you change a line of code, the content hash changes, so the output filename changes too. The browser sees a new URL and fetches the new asset, avoiding the classic “I deployed but users still see the old site” problem.
This works best when the entry HTML (or loader file) references the new hashed filenames on every deploy.
Bundlers can split app code from third-party vendor code. If your own code changes frequently but your dependencies don’t, a stable vendor bundle means returning visitors reuse cached library files.
To improve cache hit rate, toolchains often support:
With hashed assets, CDNs can cache static files confidently, and browsers can keep them until they’re evicted naturally. The result is faster repeat visits, fewer bytes transferred, and more predictable deployments—even when you roll out fixes quickly.
Build tools aren’t just about producing a smaller bundle for users—they also make developers faster and more confident. A good toolchain turns “change code → see result” into a tight loop, and that speed directly affects quality.
Modern dev servers don’t rebuild the whole app on every edit. Instead, they keep an in-memory version of your app and push updates as you work.
With live reload, the page refreshes automatically after a change.
With HMR (Hot Module Replacement), the browser can swap in just the updated module (often without losing state). That means you can tweak a component, a style, or a translation string and see the result immediately—without re-navigating back to where you were.
When feedback is slow, people batch changes together. Bigger batches hide the real cause of a bug and make code reviews harder. Fast rebuilds and immediate browser updates encourage small, safe edits:
Build tools standardize how your app reads environment variables and settings for local, staging, and production. Instead of each developer having a unique setup, the toolchain defines a predictable contract (for example, which variables are exposed to the browser and which aren’t). This reduces “works on my machine” surprises.
Dev servers often support API proxies so your frontend can call /api/... locally while requests are forwarded to a real backend (or a local one) without CORS headaches.
They also make it easy to mock endpoints during development, so you can build UI flows before the backend is finished—or reproduce edge cases on demand.
JavaScript gets most of the attention, but CSS and “static” files (images, fonts, SVGs) often decide whether a page feels polished or frustrating. A good build pipeline treats them as first-class citizens: processed, optimized, and delivered in a predictable way.
Bundlers can collect CSS imported from components, then run it through preprocessors (like Sass) and PostCSS plugins (like Autoprefixer). This keeps authoring flexible while ensuring output CSS works across target browsers. It also helps enforce conventions—one place to manage variables, nesting rules, and compatibility—rather than relying on each developer’s local setup.
Shipping one giant stylesheet is easy, but it can delay first paint. Many teams extract “critical CSS” (the minimum styles needed above the fold) and load the rest later. You don’t need to do this everywhere—start with your most important routes (homepage, checkout, marketing pages) and measure the impact.
Modern toolchains can compress images, generate multiple sizes, and convert formats (for example, PNG/JPEG to WebP/AVIF where appropriate). Fonts can be subsetted to include only used glyphs, and SVGs can be minified to remove unnecessary metadata. Doing this in the build step is more reliable than expecting manual optimization on every commit.
FOUC usually happens when CSS arrives after the HTML. Avoiding it often means extracting CSS into real stylesheet files for production, preloading key fonts, and ensuring your bundler doesn’t accidentally defer essential styles. When the pipeline is configured correctly, users see styled content immediately, even on slower connections.
Modern bundlers don’t just package files—they can enforce quality gates that keep small mistakes from shipping to users. A good pipeline catches problems while code is still easy to fix, and before they turn into customer-facing bugs.
Linting (ESLint) and formatting (Prettier) prevent inconsistent code and common footguns like unused variables, accidental globals, or risky patterns. Type checking (TypeScript) goes further by verifying how data flows through your app—especially valuable when teams move fast or code is shared across many pages.
The key is to run these checks as part of the build (or pre-build) step, not as “nice-to-have” editor hints. That way, a pull request can’t be merged if it introduces errors the team already agreed to block.
Automated tests act as guardrails. Unit tests confirm small pieces of logic, while integration tests catch breakage across components (for example, a form that stops submitting after a dependency update).
Build tools can wire test commands into predictable stages:
Even if your test coverage isn’t perfect, consistently running the tests you do have is a major win.
A build that fails loudly is better than an app that fails silently. Catching issues at build time helps avoid:
Bundlers can also verify output constraints (for example, preventing a bundle from growing beyond an agreed size) so performance doesn’t degrade over time.
Generating build artifacts in CI (rather than on a developer laptop) improves repeatability. When the build runs in a controlled environment, you reduce “works on my machine” surprises and can confidently deploy the exact artifact that passed checks.
A practical approach: CI runs lint + typecheck + tests, then produces the production build output as an artifact. Deployment simply promotes that artifact forward—no rebuilding, no guessing.
Production bugs are frustrating because the code running in users’ browsers isn’t the code you wrote. It’s bundled, minified, and sometimes split across chunks. Source maps bridge that gap by letting tools translate a minified stack trace back to your original files, line numbers, and function names.
A source map is a mapping file (often a .map) that connects generated JavaScript or CSS to your original sources. With source maps enabled, browser DevTools can show you the real module and line where an error occurred, even if the shipped bundle is a single compressed file.
Source maps are most valuable when paired with error reporting.
If you use an error tracker, upload source maps during CI so it can de-minify stack traces automatically. The key is version matching: the source map must correspond exactly to the deployed assets (same build, same hash). When that’s set up, alerts become actionable—“crash in checkout/validate.ts:83” instead of “error in app.3fd1.js:1:9283.”
If exposing source code is a concern, don’t serve .map files publicly. Instead:
For more on reliable releases, see /blog/caching-hashing-and-reliable-deployments.
Bundlers can make your app smaller and faster—but the wins aren’t real until you measure them. A “feels faster” release can still ship more JavaScript, delay rendering, or hurt mobile users. The good news: you can turn performance into a repeatable check, not a guessing game.
Most toolchains can output a bundle analysis report (often a treemap) that shows what ended up in your production build. This helps you spot surprises like:
When you see a large block in the report, your next action is concrete: replace the dependency, import a smaller entry point, or move it behind a lazy boundary.
Performance budgets are simple targets you commit to, such as “initial JS under 180 KB gzip” or “homepage becomes interactive in under 3s on mid-tier mobile.” Pick a few metrics that match your business goals, then fail the build when budgets regress.
Good starter budgets include:
Lab checks catch problems early, but real-user monitoring tells you what customers experience. Track Core Web Vitals after each release and annotate deploys so you can correlate spikes with changes. If you’re already using analytics, add a lightweight Web Vitals reporter and watch trends over time.
Make it a loop: run the analysis report, apply one improvement, rebuild, and verify the budget and vitals moved in the right direction. Small, validated changes beat big “optimization sprints” that are hard to prove and harder to maintain.
Picking a build toolchain is less about “the best bundler” and more about fit: your app, your team, and where you deploy. A sensible default for many teams is a mainstream bundler with a well-supported dev server, strong ecosystem, and predictable production output—then customize only when you can explain the benefit.
Start with the constraints you can’t change:
Highly configurable setups can handle edge cases (custom asset pipelines, unusual module formats), but they also increase the surface area for breakages. Simpler toolchains reduce “configuration gravity” and make upgrades easier—at the cost of fewer escape hatches.
A good rule: prefer conventions until you hit a measurable need (bundle size, build time, compatibility). Then change one thing at a time.
Start small: introduce the new toolchain for a single route/page or a new package, then expand. Automate the basics (build, test, lint) in CI, and document the “happy path” commands so every developer does the same thing.
If your main goal is to move faster without spending weeks tuning a toolchain, a hosted workflow can remove a lot of build-and-deploy friction. With Koder.ai, teams can vibe-code web, backend, and mobile apps via chat, while the platform generates a modern stack (React on the frontend, Go + PostgreSQL on the backend, Flutter for mobile) and supports practical release workflows like deployments/hosting, custom domains, source code export, and snapshots with rollback. That doesn’t replace understanding bundling concepts—but it can dramatically shorten the path from “idea” to a production build you can iterate on.
If you want a foundation for measuring improvements, see /blog/performance-basics. If you’re evaluating a hosted workflow or support options, compare plans at /pricing.
A build tool turns your project sources (modules, TypeScript/JSX, CSS, images, fonts) into browser-ready output—usually in a /dist folder.
A bundler is a build tool focused on packaging: it follows your import graph and emits one or more optimized bundles/chunks that the browser can load efficiently.
You can often skip bundling for very small sites where you’re serving a single HTML file plus a little CSS/JS with no complex dependencies.
Once you use multiple modules, npm packages, or need performance features like minification, hashing, or code splitting, a build step becomes the practical default.
Most builds output browser-ready assets such as:
app.8f3c1c.js) for long-term cachingEven with HTTP/2 and HTTP/3, each file still has overhead (headers, caching rules, scheduling, execution order). Bundlers optimize by:
Code splitting breaks a large app into smaller chunks so users download only what they need for the current route/feature.
Common patterns:
Tree shaking removes unused exports from your final bundle. It works best when your code and dependencies use ES modules (import/export).
Practical steps:
Hashed filenames let you cache assets for a long time because the URL changes only when the content changes.
That enables:
A dev server keeps an in-memory build and updates the browser as you edit.
The result is a faster feedback loop and fewer “big batch” changes that are hard to debug.
Build pipelines treat CSS and assets as first-class outputs:
This is more reliable than expecting manual optimization on every commit.
Source maps map minified/bundled output back to your original files so production stack traces are actionable.
Safer production workflow:
.map files publiclyFor release hygiene and caching concerns, see /blog/caching-hashing-and-reliable-deployments.